|
| Book Transcription |
|
|

Who for five thousand years have waited patiently while they were throwing everything except the number required to reenter the one open point in their opponent’s board.
Forward
The authors of this book are considered two of New York’s best Backgammon players. They have played the game for years and are responsible for the development of much of the original strategy which is discussed in these pages.
On the same day, unknown to each other, they both submitted to the same publishers, material for a book on this oldest of games. Both books had many interesting and unique features, either one of them was worthy of publication. The publishers, emulating Solomon, decided that they would publish the book of the better Backgammon player.
So a series of games was started, and these two experts played for several evenings to decide whose book would be published. They both exerted all their skill. For a time one player was ahead, and then the other. And then just as one player had the series won by the narrowest margin, the other threw three sets of double sixes in a row, and the set of games ended in a tie.
They were about to start all over again when the publishers wisely intervened. If this playing were allowed to continue, no book would be published. So Simon and Schuster fairly suggested that the two Backgammon players bury the hatchet and together write the one best book on the subject.
“Backgammon Standards — How to Win at Backgammon” is therefore a combination of the best material which these two experts had compiled. It was a case of merging two infant industries before they had even started operations.
Backgammon is a fascinating game, one in which luck will ever play a very large part. But the player who carefully considers his situation and makes use of mathematical probabilities and makes the sound play, will find himself on the credit side of the ledger at the end of the year.
There are times in Bridge when the novice will finesse with eleven cards of the suit, and beat the expert whose wisely plays for the King to drop, and there are times when the player in Backgammon wins by playing opening double ones by moving a back man four spaces, but they are both losing plays. In the long run careful, accepted play will win in both games, and every player should know what these accepted plays are. This book is clearly and concisely written. It has charts to illustrate a great many beginning and advanced plays. It will improve the play of every Backgammon player who reads it.
It seems to me to be far and away the best and most complete book that has been written on the subject.
Introduction
The purpose of this book is fully explained by its title. The rules, scoring and theories of play, all of which will be explained in detail, are subject to variation in all parts of the country. As nearly as possible we will present modern Backgammon as it is generally played in New York City.
The game itself, originating centuries ago in Egypt, or perhaps Japan, has been played all over the world under many different names and with as many different sets of rules and conditions. Hence, it is unavoidable that today there is much difference of opinion as to many of the fundamental rules and the general strategy of play.
William J. Hiss
The Mechanics of Backgammon
Backgammon board
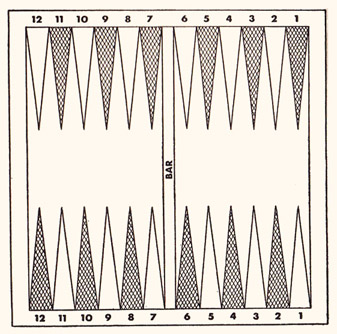
Backgammon is played upon a board divided into four so-called tables, as is shown on the chart above, with fifteen white men and fifteen black men, two sets of dice and two dice boxes. The old type of Backgammon board is to be found on the reverse side of the ordinary folding checkerboard. This kind of board is decidedly out of date. The modern boards made in one piece with low sides are vastly superior.
The men are placed upon the board as is shown on Diagram 1 below. The white men move in a clockwise path around the board until they are all in the white player’s left hand table. The black men move counter clockwise around the board until they are all in the black player’s right hand table.
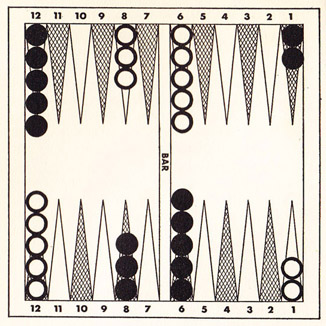
Diagram 1
The customary method of starting the game is for each player to throw one die. The player having the higher die plays the combination of the throw.
Assuming that white has thrown a 6, and black a 5, white plays the 6 and the 5 and it is then black’s turn to throw. If a set of doubles are thrown, that is, both players throw the same number, the dice are thrown again until a split combination is thrown. In making a play the player moves his men over as many spaces as he has thrown on one die and then over as many as he has thrown on the other die. The plays do not necessarily have to be made with the same piece, but may be made with two pieces or, in the case of doubles, as many as four different pieces. When a set of doubles are thrown, the player moves twice as many points as are on the dice but the moves must be made in multiples of the doubles thrown.

Diagram 2
The exact method of counting is shown by this example. Here the black player has thrown a 6 and 4 on his dice and the chart shows the position of the man which has been moved from the 1 point on his inner table to the 5 point on his outer table, or, as it is sometimes called, the 11 point.
A player may not move his pieces upon any space on which his opponent has two or more pieces. A space where a player has two or more pieces is called point. A space where a player has but one piece is called a blot, and if the adversary plays to this spaces, or makes a “hit,” the piece originally on the space is automatically removed from the board, and must reenter in the opponent’s inner table as is shown in Diagram 3.
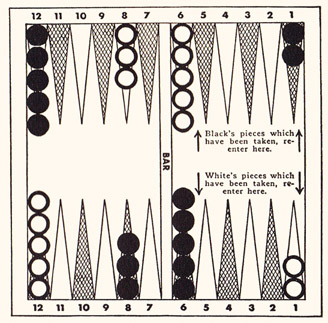
Diagram 3
In reentering pieces the same rules apply, in that a piece may not enter on a space on which the opponent has made a point, but the piece may be reentered on any space which is unoccupied or on which there is an opponent’s blot. In throwing the dice, if a throw is made which cannot be played, the player loses that throw. If he can play either number on the dice he must do so, and if it is possible for him to play both numbers by playing either number first, it is compulsory for him to do so. He must play the larger number if he can play only one.
When all the white men are in the white player’s inner or left hand table, he then starts to bear off his men. This is done by taking off or bearing off men on the respective points for the number whenever that number is thrown. However, for strategic reasons, it is possible instead of bearing men off, to move them up toward the one point in the board to avoid making blots, or in order not to leave an odd number of men on the higher point. The first man who has all his men off the board, wins the game.
Types of Games
A game may be a single game, a Gammon or double game, Backgammon or triple game. When a player has borne off all his men and his opponent has borne off at least one of his men, the game is a single game. If the opponent has not borne any men from the board but has no men in his adversary’s inner table and none yet reentered upon the board, it is a double game or Gammon. If the opponent has a man in the winner’s inner table or a man not yet reentered upon the board and has not borne a man from the board, it is a Backgammon or triple game. However, if the loser has already borne one man from the board, it makes no difference as to the location of the balance of his men for the game cannot then be more than a single game.
Doubling
The chief feature responsible for the popularity of the new Backgammon is the method of doubling games. If the same number is thrown by each player on the original throw, the stake automatically doubles. The stake continues to double as often as the same number is thrown by each player, although the number of doubles is frequently limited by agreement. In addition to these doubles, the stake is doubled again if the game is a Gammon, or is tripled if the game is a Backgammon.
During the play either player before throwing his dice may say “I double.” This is a challenge which may be accepted by his opponent, or may be declined. If the challenge is declined, the player who has doubled wins the game at the original stake. However, if the opponent accepts the double, he may then, at any time before it is his turn to throw during the play of the game, say “I double,” at which time his adversary may accept or decline. In actual practice, the doubles do not often go higher than four, but even at four doubles, the extent to which the game may be increased is obvious. One double increases the stake from one unit to two, four doubles bring it to sixteen, and ten doubles, which is practically unheard of in actual play, would bring it to 1,024.
Chouette
Chouette is a newly introduced method of play which has attained a great deal of popularity. It provides for three or more people to play what has been considered but a two-handed game. In Chouette one player plays against as many other people as have entered the game. The one man who plays against the other players is spoken of as being “in the box.” He wagers against each other player and stays “in the box” until he loses, at which time he steps down and takes his place as the last of the other players, surrendering the position of “in the box” to the player who has defeated him. An order of precedence is determined by throwing a single die, the player throwing the highest die sits “in the box,” the player throwing the next highest is his opponent in the first game. The order of succession of players to play against the man “in the box” is determined by the original throw in the same manner.
The player who plays against the man “in the box” consults with his partners on any point of play or on any matter of accepting or offering doubles. But in case of any disagreement with his partners his decision is final. If any inactive partner does not wish to accept or offer a double he may retire, giving up the stake then being played for, to the active partner, and the active player takes responsibility for the stake his declining partner has been playing for.
Scoring
There are several systems of scoring by points such as counting the number of pieces on various parts of the table, but the customary method which has been adopted quite generally, considers only the matter of who first bears off all his men.
If the original stake has been won and it has been doubled once, the result is two. If under similar circumstances the game has resulted in a Gammon the result is four; or if a Backgammon, the scoring is six. The scoring for Chouette may be kept in exactly the same way as the summary of a bridge score, listing the winnings and losings of each player.
A method which has met with considerable favor in keeping track of whether a game which is being played is a single game or a once doubled game or a twice doubled game, is to indicate by the number of matches placed upon the bar, the amount for which the game is being played. With the new Backgammon board, there are usually scoring cubes which indicate the stake which is being played for.
Original Moves
There are fifteen combinations which can be thrown on split dice on the first throw in addition to which there are six sets of doubles which, although they cannot be thrown upon the first throw, may be thrown by the player who makes the second throw. Each one of these twenty-one different throws will be shown by chart. These moves will apply particularly to the first throw and in most cases to the second throw, although there are certain variations in the second player’s strategy due to his opponent’s previous throw.
The plays shown on the charts are generally accepted, but as the player advances into advanced strategy, there are several somewhat more daring moves which may be attempted. However, until the player has complete mastery of the rudiments of play, he is advised to make the following recommended plays.
The charts of opening moves all show the position of the men after the play has been made.
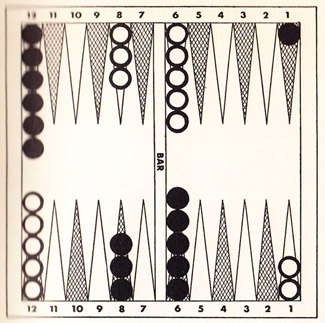
Diagram 4
6 and 5. On this play black’s man which rests upon the 1 point of white’s inner table is moved to safety upon the 12 point in white’s outer table. This is considered one of the advantageous plays inasmuch as it allows one of the men farthest back to escape to safety.
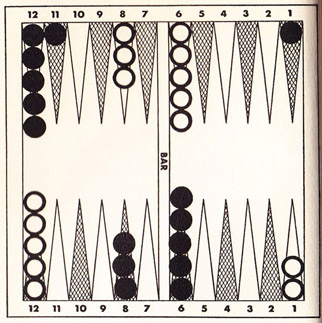
Diagram 5
6 and 4. On this play black’s man which rests on the 1 point of white’s inner table is moved to number 11 point in white’s outer table. Here it leaves a blot which can be hit only by the roll of a 2, and if not hit, is in a position to assist in making a point or to escape to safety on the next roll.
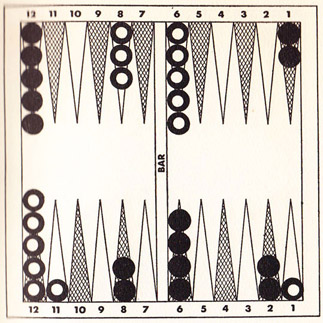
Diagram 6 (alternate play)
6 and 4. If on the second play 6 and 4 is thrown and white has a man on the 10 or the 11 point as a result of his prior throw of a 6 and 3, or a 6 and 4, it is then advisable for black to make the 2 point in his own inner table rather than advancing his man as shown in Diagram 5 inasmuch as such an advance would expose his piece to being hit by either of two of the opponent’s men.
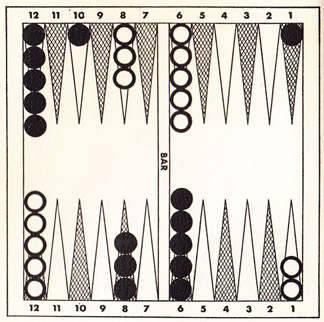
Diagram 7
6 and 3. This throw necessitates a blot and is best played by moving from the number 1 point on white’s inner board to the number 10 point on white’s outer table. Here the same set of circumstances apply as on the previous throw, except that this blot is left exposed to a 3, or a 2 and 1 combination.
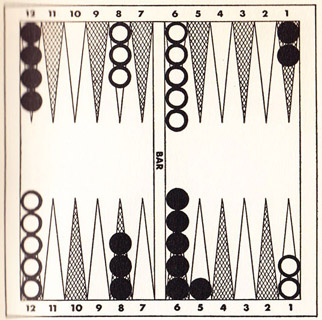
Diagram 8
6 and 2. Play one piece from the 12 point in white’s outer table. Among the more timorous players a black man is frequently advanced to the 9 point but here it is subject to being hit by a 4 exactly as in the approved play. The results from the play more than justify the risk, as black may cover the valuable 5 point on his next throw.
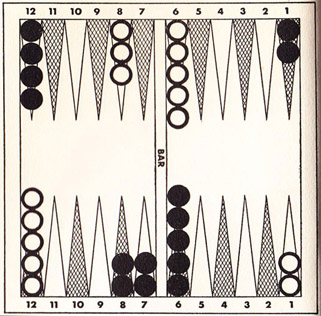
Diagram 9
6 and 1. This is one of the most advantageous throws of the dice and is played by moving one man from the 12 point in white’s outer table to the bar point, or 7 point, in black’s own outer table, and by moving a 1 from black’s 8 point in his outer table to the bar point to make a point in that space. This precludes the possibility of white’s escaping with the 6-5 throw.
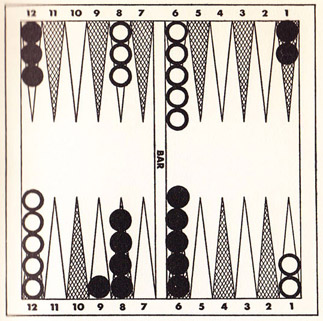
Diagram 10
5 and 4. This is played by moving two men from white’s outer table to the 8 and 9 space in black’s outer table. This leaves a blot on space 9 but the possibility of making the bar point or even the 5 point in black’s inner table on the next throw is enhanced by this play if this man is not captured.
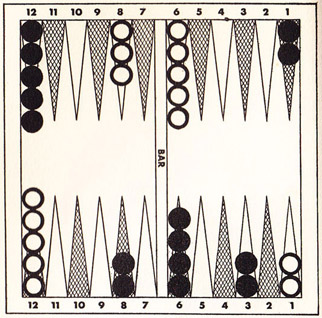
Diagram 11
5 and 3. The conventional play of 5 and 3 is for black to make a point on the 3 space on his own inner table by moving the men as shown on the diagram.
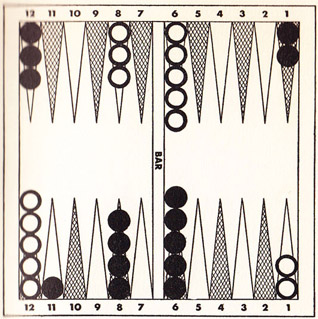
Diagram 12
5 and 2. This play is made by moving 2 pieces over from the opponent’s outer table and while it leaves a blot on the 11 point, there is only one throw, 6 and 4, which can hit this. It is now possible to make the bar point on the next throw with a 6 and 4, or 4 and 1, in addition to the 6 and 1, and there is also an increased chance of making the 5 point in black’s inner table.
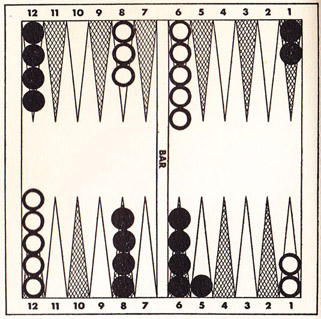
Diagram 13
5 and 1. Black moves a 5 from the 12 point in white’s outer table to the 8 point in his own outer table, and plays the one by moving a man from the 6 point to the 5 point in his own inner table. This leaves a blot on the 5 point, but white must roll a 4, or a combination of 4 to hit black’s man, and if the man is not taken, the chances of making the valuable 5 point on the next roll are excellent.
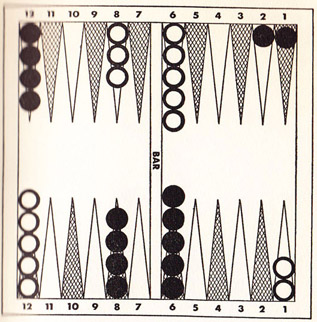
Diagram 14 (alternate play)
5 and 1. For the conservative player, a play which is usually made, but is not recommended, is moving one piece from the 1 point in white’s inner table to the 2 point in his inner table and playing the 5 by moving one piece from the 12 point in white’s outer table to the 8 point in black’s outer table.
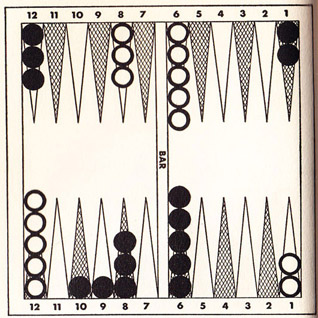
Diagram 15
4 and 3. The play on an original roll of 4 and 3 is to move two men from the opponent’s outer table. There is an excellent possibility of making a point on the next play which will more than compensate for the risk of having one of these pieces captured.
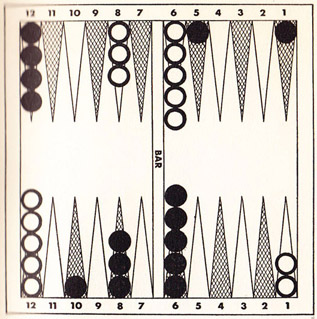
Diagram 16 (alternate play)
4 and 3. An optional and equally good play is to move one man from the 1 point in white’s inner table to the 5 point in his inner table and one man from the 12 point in white’s inner table to the 10 point in black’s outer table.
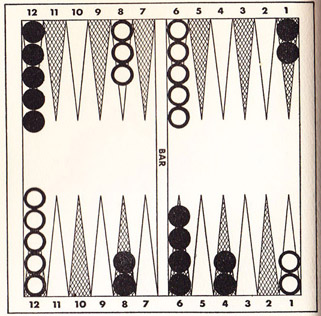
Diagram 17
4 and 2. This is an excellent opening throw. It enables the player to make the 4 point on his own table as is shown. This point ranks close to the bar point and the 5 point in value.
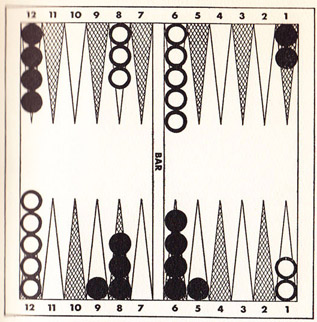
Diagram 18
4 and 1. The correct play in this instance and one which offers the best chance of scoring a Gammon, is to move one man from the 6 point in black’s own inner table to the 5 point, leaving a blot, and moving one man from the 12 point in white’s outer table to the 9 point in black’s outer table. This leaves two blots but both pieces can be captured only by the throw of double fours or double twos.
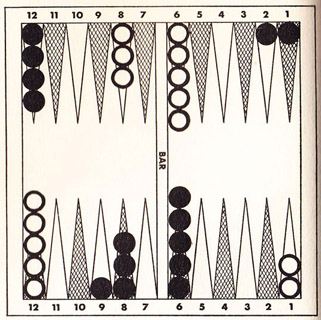
Diagram 19 (alternate play)
4 and 1. This play is made by moving a 4 from the opponent’s outer table to the 9 point and by moving a one in the opponent’s inner table. This play is perfectly orthodox but is not as constructive as the one shown in Diagram 18.
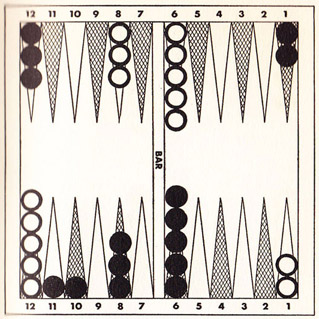
Diagram 20
3 and 2. On this play 2 pieces are brought from the opponent’s outer table to the 10 and 11 point on black’s outer table. The possibility of making a favorable point on the next throw is considerable, and more than justifies this risk. The cautious player frequently plays one man from the 12 point in white’s outer table to the 8 point in black’s outer table, but this play is not recommended.
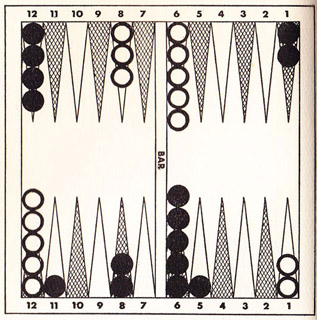
Diagram 21 (alternate play)
3 and 2. As an alternative play which will give more constructive results for a Gammon, but one which exposes two men to being hit, move one piece from the 8 point in black’s outer table to the 5 point, and move the other from the 12 point in white’s outer table to the 11 point in black’s outer table. This is a daring play and should be used only by players who understand Back Game tactics.
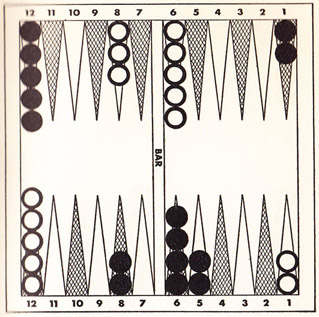
Diagram 22
3 and 1. This is an excellent roll for it enables the player to make the 5 point on his own board, a point as valuable as any he could make on an original roll.

Diagram 23
2 and 1. With this throw play one piece from the 12 point in white’s outer table to the 10 point in black’s outer table.
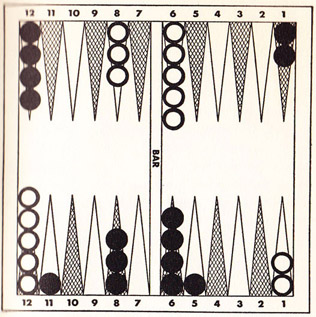
Diagram 24
2 and 1. As an alternative play which is likely to start a game resulting in a Gammon, black moves one piece from his 6 point to the 5 point in his inner table, and one piece from the 12 point in white’s outer table to the 11 point in his own outer table. This play is recommended particularly to the experienced player, who can play a sound Back Game if necessary.
How to Play Doubles
The following charts, 25 to 34 inclusive, show how to move doubles, and are therefore of necessity for the second and not the original throws. These charts show white’s men in their original position, although, of course, they would have already made some progress, which in certain instances would change black’s play to some degree. However, the plays shown are the correct moves in the majority of cases, regardless of white’s previous plays.
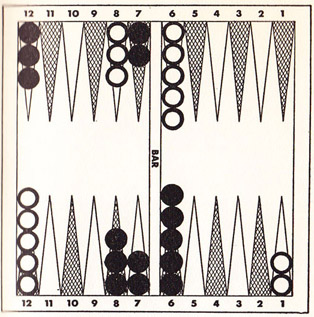
Diagram 25
Double sixes. The play for double sixes is to move two men from the white inner table to white’s bar point, and two men from his outer table to black’s own bar point. This is one of the best possible throws as it makes black’s own bar point, and advances his position considerably.
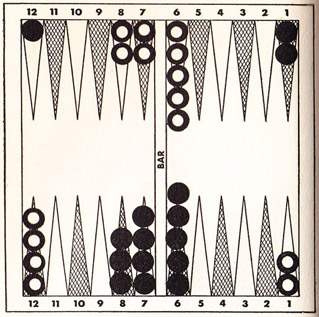
Diagram 26 (alternate play)
Double sixes. Inasmuch as on the second roll black will frequently find the opponent’s bar point already made, this example is included to show the move of four men from the 12 point in white’s outer table to the bar point in black’s outer table.
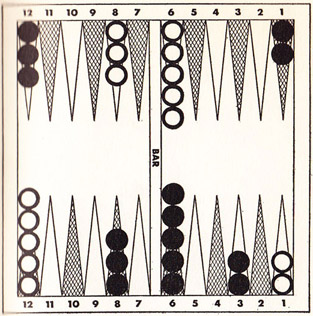
Diagram 27
Double fives. These are the least advantageous doubles from a strategic point of view. Bring two pieces from white’s outer table to the three point in black’s own inner table. If white has broken his point on the one space on black’s inner table, it is wise to hit the opponent’s man off the 1 point, and make another point by moving two men from the 8 point to the 3 point.
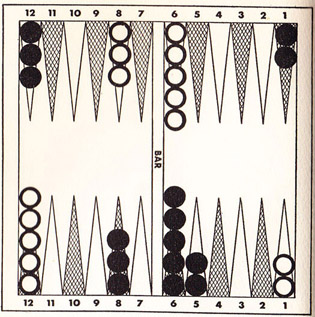
Diagram 28
Double fours. Double fours are played by moving two men from the white’s outer table to the number 5 point in black’s inner table. This covers the very valuable 5 point and is generally considered a better play than one frequently used, illustrated in Diagram 29, especially if one hopes to get a Gammon.
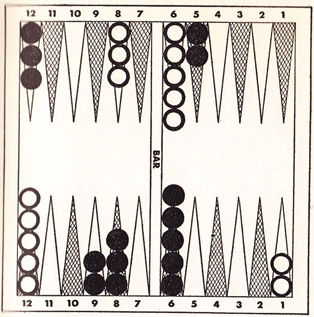
Diagram 29
Double fours. A more conservative play and one which results in good progress in a forward game although not so likely to result in a Gammon, is the move of two men from the 1 point in white’s inner table to the 5 point and two men from the 12 point in white’s outer table to the 9 point in black’s outer table.
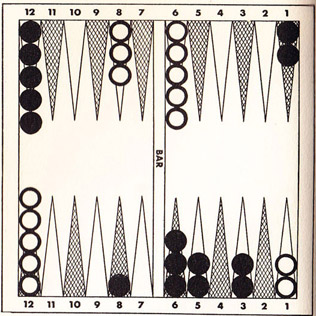
Diagram 30
Double threes. On this throw make 2 points in black’s inner table by moving two men from the 6 point to the 3 point and two men from the 8 point to the 5 point. The blot is subject to being hit by a 7, only by a combination of 6 and 1 and 4 and 3, as the 5 and 2 is blocked. This play is more likely to result in a Gammon than the orthodox play shown in the next diagram.
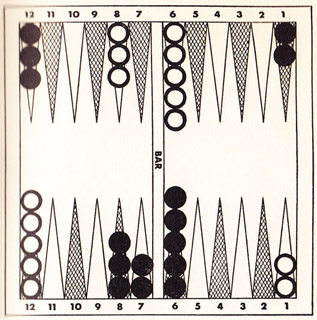
Diagram 31 (alternate play)
Double threes. Double threes may also be played by moving two men from the 12 point in white’s outer table to black’s own bar point. This is a good play but hardly as constructive as the one described in Diagram 30.
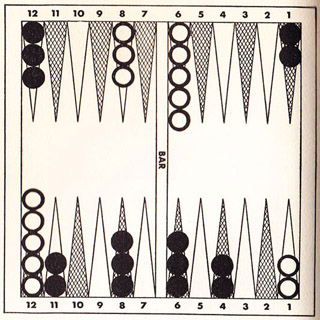
Diagram 32
Double twos. Double twos are best played by moving two men from the 6 point to the 4 point in black’s inner table and by bringing two men from the opponent’s outer table to the 11 point in black’s own outer table.

Diagram 33 (alternate play)
Double twos. As an alternative play for the conservative player, move two pieces from the one point in white’s inner table to the 5 point. This is not as constructive as the play shown in Diagram 32, but is a perfectly safe play.
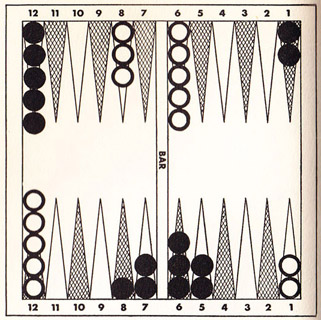
Diagram 34
Double ones. This throw is one of the most advantageous. It is played by making both the 5 point in black’s own inner table and his bar point. This leaves a blot on the 8 point, exposed to any combination of 7. The advantage of having these three favorable points in a block cannot be underestimated and it is possible to cover the blot on the next throw, providing the piece is not taken.
General Theory of Play
Now that the general mechanics of Backgammon and the original moves have been discussed, it will be well to go into the various types of play. The game of Backgammon developed along the lines of forward games. There are two types of forward games: running and blocking. In a running game the player simply makes as much forward progress as is possible and depends largely upon throwing larger dice and safe dice, to win. In a blocking game, a player endeavors to lock in his adversary’s two back men so that they will not be able to escape until such time as he has most of his men in his own inner table.
In playing these forward games it is essential not to leave unnecessary blots, and in leaving them, to leave them only where they are exposed to minimum danger.
Successful Backgammon depends largely upon the establishment of points. The surest way to make new points without destroying old ones is to have so-called builders, that is, more than two pieces on a point. When four pieces are on a point it is well to consider moving one of these four pieces off the point to another point which has but two. In making points it is wise to remember not to advance men too far into one’s inner table where they become out of play and of no value in making points.
One of the first points to consider is the probability of throwing a specific roll of dice. Inasmuch as there are two dice, and a one may be thrown on either or a six on either, there are two chances out of thirty-six, or one chance in eighteen against any specific roll other than doubles. Thus the chances against rolling a six and four are seventeen to one, the chances against rolling any specific set of doubles are thirty-five to one. Table A shows the possibility of any of these.
Showing the number of chances out of 36,
of throwing a specific roll of dice
While the table gives the mathematical chances, it is well to remember that they are still only chances and that inasmuch as the element of luck plays such an important part — probably 80 per cent of the game of Backgammon is luck — one cannot count on these mathematical chances as certainties. However, in a long series of games, one stands a better chance of winning by making plays according to mathematical chances rather than by hunch.
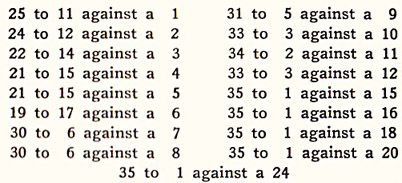
In addition to considering any different combination of dice, it is also well to consider what the odds are against throwing any specific number. Six is the easiest combination to throw inasmuch as this may be thrown by double threes, four and two, five and one, and the six itself. The odds against throwing a six are nineteen to seventeen, while against rolling a one, are twenty-five to eleven. So if it is necessary to leave a blot, the chances are much greater in favor of having the blot subject only to a one throw than to a six throw. The chances of rolling a nine are thirty-one to five. Consequently, it is infinitely wiser to leave a blot exposed to a nine than to a throw of a one or a six. In a great many cases, a piece exposed to a specific roll such as a nine, may have the protection that it can be caught only by a five and four and not by a six and three, assuming that the player has points on the space where the opponent would be required to play his six and three. If this were so, the chances of this blot being captured would be reduced from thirty-five to five, to eight and a half to one. A complete list of these chances is shown in Table B.
Showing the odds against
throwing a specific number
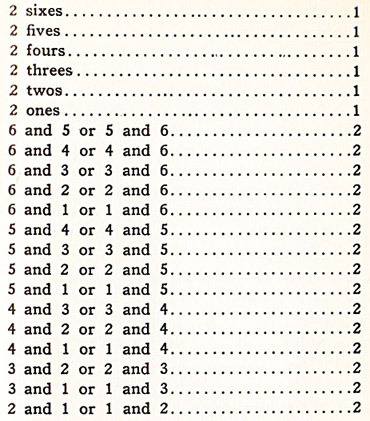
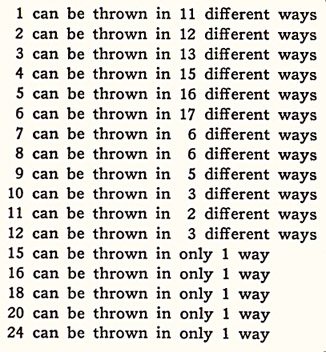
Out of thirty-six throws on the dice, one can be thrown in eleven different ways; six can be thrown in seventeen different ways. Fifteen can be thrown in only one way, three-quarters of a double five throw, so that a blot left exposed to a fifteen stands only one chance in thirty-six of being taken, and no chance if the player has a point on any space upon which the opponent is obliged to rest in playing any one of the fives which make up the fifteen. This is best illustrated in Table C.
Showing the number of ways in
which each number can be thrown
The strategy of Doubling
Generally speaking, it is unwise to double too early in the game unless the player has a very pronounced advantage. It is much too easy for the fortune of the game to change rapidly and if it does the doubler will find himself in the untenable position of being doubled back when he is now behind. Psychological doubles are often made and games won by early doubles, but ordinarily this is only when the strategic position of the double is good and not alone because his men are more forwardly advanced. It is very unwise to double if one’s position strategically is too good, because the double will probably not be taken and with an opportunity of winning a Gammon or a Backgammon, a double may be costly as it gives the opponent a chance to decline and lose only a single game.
Bearing Off
The strategy of bearing off changes considerably depending upon whether or not the opponent still has men in the player’s inner table or men waiting to reenter. If there are no opponent’s men in the inner table or waiting to reenter, the player should bear off a man whenever it is possible. A roll of a six and a one would bear a six and a one off the board. However, if the player has no piece upon his one space he will then do best to move a man from the space on which he has the most men to the next lower space, or to move a man to a space where he has no men. When a throw of doubles is made and the player has not four men upon that space, he should endeavor to take as many men off as possible.
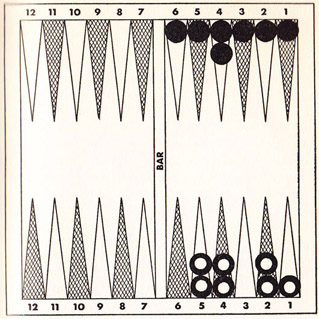
Diagram 35
For instance, in Diagram 35, with a roll of double twos, white should bear off two twos, move one man from the four spot to the two spot and bear that off also, thereby removing three men from the board.
The situation in bearing off men, however, is decidedly different when, as is often the case, the opponent has two men on a low point of the inner table as is shown in Diagram 36.
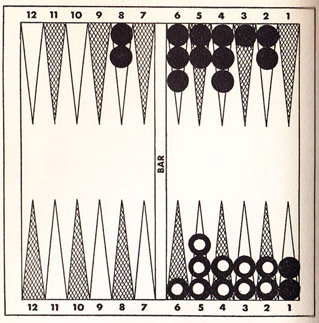
Diagram 36
Here white has just rolled a six and three. He should bear off a six and instead of bearing off a three, he should then move his odd piece on the five point to the two point thus minimizing an immediate blot. Probably on the next few plays it will be necessary for black to start moving out of white’s inner table, where as long as he remains, he is a decided hazard to the possibility of white’s winning the game.
In making plays when an opponent still stays in the player’s inner board, it is well to keep an even number of men upon the highest points. For instance, with five men on the five and six points, a throw of double sixes would leave one man exposed on the five point where it is in danger of being hit by the opponent. Consequently it should always be borne in mind that the least danger exists when there are an even number of pieces on the highest spaces and also that pieces should be moved to lower points in the inner table rather than borne off, if in bearing off, spaces are going to be left between points.
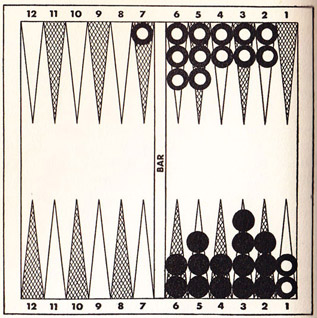
Diagram 37
In Diagram 37, black has just thrown a 4 and 2. The possibility of his winning a Gammon or a Backgammon is comparatively slight. Therefore his safest play would be to move one man from the six point to the four point and one man from the six point to the two point rather than making any of the other plays which are possible, such as taking off one four and moving the other four to the two point. Of course, in certain circumstances, where there is the possibility of a Gammon or a Backgammon, it may be advisable to bear off men as rapidly as possible even though there is some possibility of leaving a blot on the next play, but the player may judge this only after considerable experience.
Playing into Inner Table
When a player is rolling to get his pieces into his own inner table, particularly when there is a possibility of a Gammon being scored against him, he should utilize every count of the dice to advance his men to the maximum advantage. With a great many men still in the outer tables and one man on his own bar point, the man on the bar point should not be moved into the inner table except with the throw of a 1, as only the minimum throw of the dice should be utilized to bring men into their own inner table. It is well to advance men from one table to another by the minimum throw also, thereby leaving the greatest possibility of getting all the men safely into the inner table so that a Gammon will not be scored.
In entering the inner table, it is important, if there is no danger by so doing of losing a Gammon or a Backgammon, to place men on vacant points. It often happens that on the final throw to enter, the player will bring in one piece, and have none on the space called for by the other die. However, when the player is in danger of being Gammoned, this situation does not apply.
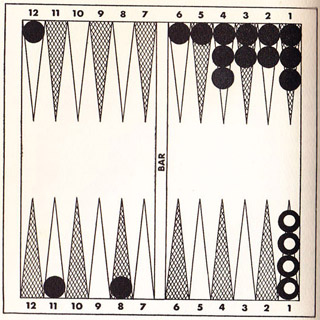
Diagram 38
In Diagram 38, black has thrown the 5 and 2. It is always advisable to advance men with minimum count into the tables past the ones in which they repose. Therefore, they are moved as is shown on Diagram 39.
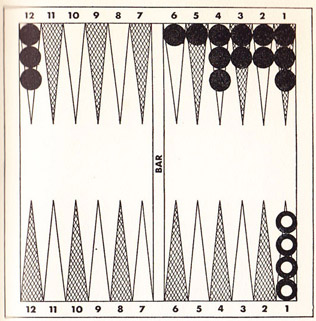
Diagram 39
Then, if on the next play, double sixes are thrown, black saves himself a Gammon unless white rolls doubles. If the man on the 11 point of the opponent’s outer table had been moved to the 9 point in white’s outer table and the man on the 8 point in white’s outer table to the 10 point, doubles sixes would not save the Gammon. The chance against throwing a double six is thirty-five to one. But the advantage of even a thirty-five to one shot is worth while as over a period of many games these long shots frequently occur.
Advanced Strategy

Diagram 40
Diagram 40 illustrates a case of advanced strategy in which a daring and well thought out play actually resulted in the winning of what seemed like a lost game. Black in this example has his board practically filled. He rolls a 3 and 2. The safe and conservative play would be to play within his board. But instead of that he moves one of his pieces from the 5 point in white’s inner table to the 10 point in white’s outer table. The theory of this is that white will probably be forced then to leave a man exposed on his 12 point in the next roll unless he throws a set of doubles. He may take up the black man on the 10 point in white’s outer table but if he does, this man may possibly be reentered on the 1 point where he will be in a position to capture any blots which white is forced to leave. If, on succeeding plays, white is forced to leave a blot and is hit, he will have a hard time reentering black’s board inasmuch as five of the points are filled. In actual play, the roll which followed black’s play was that of a 6 and 2 which white played by moving one man into the 5 point of his own inner table capturing black, but black was fortunate enough on his next throw to throw a 5, thus reentering the table, and in being able to move his man on white’s 10 point out of danger.
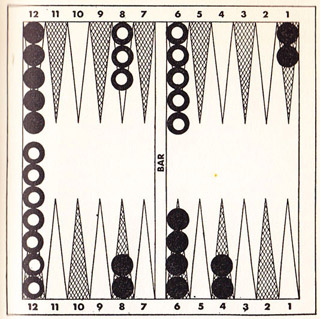
Diagram 41
One of the most common faults of the average player is stacking pieces on points. If a player has rolled 6 and 5 on his first two throws he has all his men on 3 points and is strategically in a very hazardous position. In Diagram 41 this has occurred and black should hold his men on white’s inner table as he unquestionably will have an opportunity to capture white’s men on the next few plays unless white makes exceptionally advantageous throws.
Black may now safely break his men in an effort to make points in his board on his subsequent two throws, inasmuch as stacking pieces as white has done will unquestionably result in many blots on white’s board. Black should break his men on white’s inner table because it increases the chances of hitting white’s blots. Black should not come out with these men, but should instead play his men on white’s 12 point in an effort to make more points in his own inner and outer tables immediately.
In playing the Doubling game, assuming that it is black’s throw, he should double immediately, on the theory that white will be forced to leave blots which black may hit.
Blots should be made early in the game rather than toward the end. The risk is much less at the beginning of the game and early blots frequently lead to good boards later on.
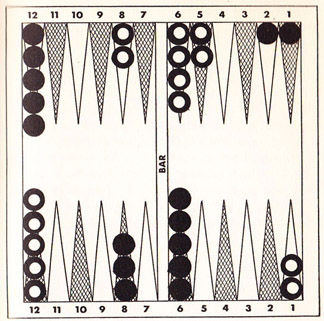
Diagram 42
One of the least valuable points on the board is the adversary’s bar point, which is frequently referred to as the booby point. It is a hard point from which to escape under usual circumstances. In diagram 42 black has just thrown a 6 and 5. This is a case where the making of the booby point is recommended, inasmuch as it will be comparatively easy to escape with one man and if the other man is captured he may easily reenter white’s table, inasmuch as there are but two points protected.
The 5 point in the opponent’s table is very valuable and it is frequently wise for the player to break his men in the adversary’s inner table, as when they are split the possibility of making this 5 point is greatly enhanced. Key points in their order of value are approximately as follows: first, and of equal value, the player’s bar point and his own 5 point; second, the adversary’s 5 point; third, the player’s own 4 point. Generally speaking, points in the player’s own inner table are of greater value than points established elsewhere.
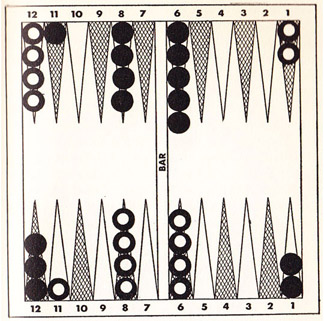
Diagram 43
In Diagram 43 white has just thrown a 6 and 1 following his original throw of 5 and 2. In this case it is a better play to make the 5 point in white’s own inner table rather than making the bar point. No man is left exposed and an additional point is thus made in white’s board.

Diagram 44
In playing pieces into the player’s own inner table, preliminary to bearing off, it is advisable to fill as many spaces as possible. Many games are won by careful application of this theory. In Diagram 44 black has thrown a 3 and 6. The correct play is to move a man on his bar point to his 4 point, the man on the 9 point to the 3 point. This balances the board better and is the winning play. It would be absolutely wrong to reverse the play and move the man on the bar point to the 1 point and the man on the 9 point to the 6 point inasmuch as a subsequent throw of a 3 and 4 would bear no men from the board.
Having men on each space in the inner table is of great value, and if it can be done at no expense, it is imperative to follow this theory. Sometimes if the player is in danger of having a Gammon scored against him, it is wise to get men into the inner table without too much regard to position, as the only object then is to get one man off to prevent the Gammon.
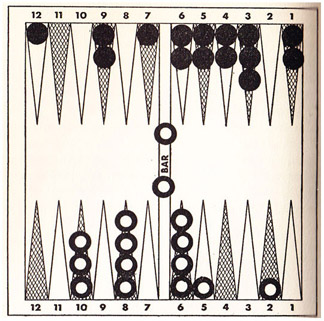
Diagram 45
In Diagram 45 black has just filled five points in his board and white still has 2 men which have been taken up and which he must reenter. Black has thrown a 3 and 1. He is unable to make the important remaining point on his board. From the general situation on the board it is obvious that black has very little chance of losing the game no matter how adverse the following plays, and he has an excellent chance of winning a double or a triple game if he can make the important 2 point on his board. Therefore it is recommended to the experienced player that he move the piece on his 3 point to the 2 point leaving the blot exposed, and moving the piece on his 9 point to his 6 point. Now on his next roll, if his opponent does not capture him by rolling a 2, he may fill this point by a roll of a 4, a 5, a 7, or a 10, and even if the blot in his board is hit, no two pieces of his can be captured. If black is captured on this 2 point, it will be a comparatively easy matter for him to reenter white’s board, perhaps taking up more of white’s pieces and eventually getting his men over to his inner table, thereby winning the game which will probably be a Gammon or a Backgammon.
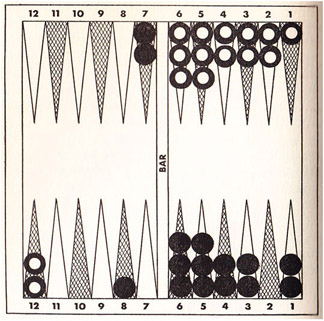
Diagram 46
In Diagram 46, black has just thrown the 5 and 1. He should play the five from the 6 point, and the one from the 5 point in his own inner table, thus leaving the piece on his own 8 point, outer table, in the event a six is thrown on the next cast of the dice. Here is a situation where the first one who is forced to expose, black one of the men on white’s 7 point, and white one of the men on black’s 12 point, will probably be hit, and quite possibly lose the game, in view of the good boards which both players have. Consequently both players should keep from playing these men until doubles are thrown, or until they have no other choice, or until a player has taken up his opponent’s exposed man. All plays which can be made inside the inner tables should be made, in an effort to make the adversary break first.
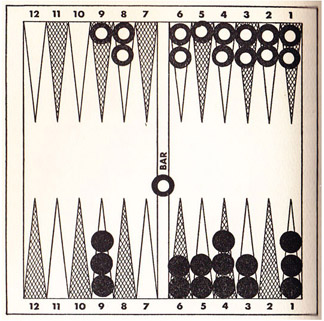
Diagram 47
Diagram 47 shows a situation which frequently arises, and is usually misplayed by the average Backgammon player. White still has a piece on the bar, and black has just thrown double fives, which necessitates his leaving a blot. The correct way to leave this blot so that it is exposed to a minimum of danger, is to move two pieces from the outer board to the 4 point, and to move the two pieces on the 6 point of the inner table to the 1 point. This leaves the blot on the 9 point of the outer board where only a throw of the 6 and 3 will capture it, and the odds against this throw are 17 to 1. Compare this with the obvious way of playing the double 5 throw — moving the three pieces into the inner table and bearing off a piece from the 5 point. This method leaves a blot on the 5 point where it is much more likely to be hit, the odds against its being hit being only 25 to 11 on the throw of a five, with the added possibility of its being hit by a 2 and 3. This theory holds throughout the game, and the player should always leave pieces exposed to the minimum danger, when he wishes to avoid having his men hit.
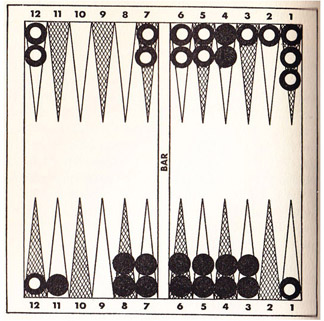
Diagram 48
The blocking game is a species of forward game which is most successful when it can be established. Diagram 48 shows black with a side prime, or six consecutive points, already made. It is now impossible for white to escape until this prime is broken. Black may bring his outside two pieces around the board with perfect safety and in doing so should endeavor to take up one or two of white’s pieces. With three men locked in by his side prime, black may easily win a Gammon. These side primes are difficult to establish, but once having been made are almost certain to win the game, barring exceptionally lucky throws by the opponent.
Black should not break his side prime unless by breaking it he can advance it a point further in his board. It is most advantageous to do this and at the same time take another of white’s men. In Diagram 48, if black were to throw a 6 and 4, he should move the man on his 11 point into his board, hitting white. Then he would leave this man open hoping to be hit in turn, as it would give black a chance to go back and perhaps capture one of the open men on the 2 and 3 points in white’s inner table. This would greatly enhance the possibility of winning a Gammon.
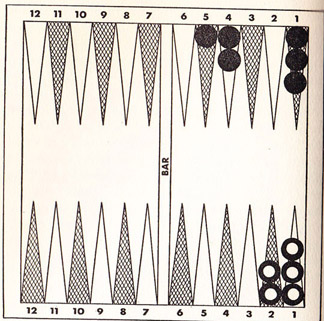
Diagram 49
In Diagram 49, black has just thrown the 5 and 3. He should move the piece on his 5 point to the 2 point and bear off one piece on his 4 point, instead of bearing off the 5 and moving a piece from his 4 point. This enables him to bear off an additional piece on the next throw if he throws a 2. Plays of this sort frequently win games that might otherwise be lost.
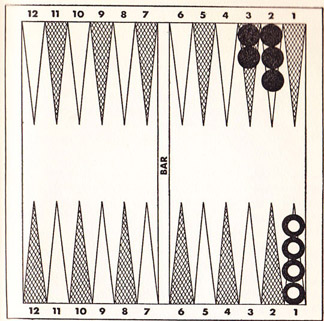
Diagram 50
In Diagram 50, black has just thrown a 5 and 1. He should bear off one man on the 3 point and move the other up to his 2 point. Now with four men on the 2 point, he can win with double twos on the next throw, in addition to double 3, 4, 5 and 6’s, providing white does not throw doubles. An additional 35 to 1 chance, but it’s worth while taking as it costs nothing!
Losing Plays
A few opening plays, frequently made, which are losing plays and which should never be made, except, perhaps, to hit blots are listed below:
Double fours. — On this opening throw never move two back men to the 9 point in the adversary’s outer table. It is a waste of one of the best throws in the game. Only one point is made and that an unimportant one.
Double threes. — Never use half of this throw to move the two back men from their original position on the 1 point to the 4 point in the adversary’s inner table. This is a negative play, constructive neither for a single game or a Gammon.
Double twos. — Never play half the throw on an original throw to advance the two back men to the 3 point in the adversary’s inner table. The other possible plays as shown are so much better that this is a losing play.
Six and four. — Never on an original throw, make the 2 point in your inner table. The point is too far advanced in your board, it takes men out of play as possible builders of more important points. This play may be the lesser of two evils on a second roll, but is never recommended in the first play.
The Back Game
The advantage in a game frequently shifts from one player to another, and when a player realizes the forward or running game is lost, he can change his method of play and play a Back Game which often wins after a player seems to be hopelessly defeated.
In the Back Game when a player realizes that he cannot win by the running game, he endeavors to get a number of his men in his adversary’s inner table establishing the 1, 2 and 3 points so that he will embarrass his adversary in entering and throwing off, and in the hope of taking up some of his adversary’s men.
It is inadvisable to start at the beginning of a game to play for Back Game; that is, exposing blots when not necessary, because by so doing you run the risk of losing a Gammon, or even a Backgammon.
You only choose a Back Game when your adversary, due to his higher and better throws, is in a much more advantageous position; then you should change your policy of play to the Back Game, and leave blots for him to take up.
The second reason you adopt the Back Game is that you are so hemmed in, in your opponent’s table, that it is practically impossible to escape — under such circumstances leave blots in the hope of being taken up.
Whenever you adopt the Back Game, retain your two men on the one spot in your adversary’s table and endeavor to make the 2 and if possible the 3 point. A Back Game can be played with other combinations of points such as 1, 2 and 4 — 1, 2 and 5 — 2, 3 and 4 — or 2, 3 and 5 — but the 1, 2 and 3 are most advantageous.
We recommend the 1, 2 and 3 points as being the most valuable in spite of the fact that many experts contend that the 3 and the 4 points are best. One of the most crucial points in a successful Back Game is to be able to stay in the Back Game until such time as it is possible to switch to a forward game and be definitely ahead at that point. If men are on the 3 and 4 points, a roll of 6 or a 5 may perhaps make it impossible for the player to remain in the opponent’s inner table. The possibility of that occurring is much less if the points are established further back in the board.
Another advantage of the 1, 2 and 3 point as against the 3 and 4 point is that the opponent may jump men over the 3 and 4 point to safety on the 1 and 2 point. Whereas if the 1, 2 and 3 point are filled it is almost impossible for the opponent to play without exposing his men.
In order to attain points in the adversary’s inner table, it is obvious that the Back Game must be adopted before your opponent has established a good table, otherwise you have small chance of entering your men and are most likely to be Gammoned.
Having adopted the Back Game you must exposed your men in the hope of being taken up. If your adversary still has men in your inner table, expose in your outer table so that if he refused to take you up, you can make points to prevent his men from escaping from your inner table. You are, of course, endeavoring to make your own table at the same time.
Bearing in mind that the Back Game is not adopted as a matter of choice, it is advisable to proceed with your forward game, blocking your adversary when possible in order to force him into a Back Game and possibly Gammon him.
When it is obvious that your adversary has decided to try a Back Game, you should not play into his hands by hitting blots left on purpose, unless necessary or to your decided advantage. Your opponent upon deciding to go into a Back Game may already have three men back. If you can now avoid sending any more of his men back, he has failed in his purpose in going into a Back Game, as it is hardly possible to succeed in a Back Game with only three pieces back.
It is of the utmost importance that once having adopted the Back Game, a player must stick to it, not lose his nerve, and not shift back to the forward game unless his throws are so decidedly advantageous that he is definitely ahead and has a good chance of winning by the forward game.
Having secured the desired points in your opponent’s table and having hit one or more of his men, if you have men outside of your home table, you should scatter these men in order to make additional points in your own table, and to hit your adversary’s men if they get out of your home table into your outer table.
Being in the position outlined above, you should avail yourself of your big shots to bring some of your men from your adversary’s inner table to his outer table in order to advance them, and further in order to have men available to hit your adversary’s men if he should succeed in getting out of your inner table with doubles.
The player of the Back Game, having sent back one or more of his adversary’s men, should compare his position with his adversary’s and weigh the chances of winning.
If you believe you have at least an even chance to win, you should avail yourself of your high dice and rush your men around, getting out of your adversary’s inner table as quickly and safely as possible without waiting to pick up additional men.
It should be borne in mind that it requires greater skill to play the Back Game than the Forward Game. Hence it is inadvisable for a novice to try the Back Game for the reason that he runs grave risk of being Gammoned or Backgammoned.
Extreme caution should be exercised in adopting the Back Game when playing the doubling game, for the reason that your adversary, as soon as he sees you are starting a Back Game, will double. As there is always danger of being Gammoned when playing the Back Game, the player is liable to lose a big stake.
On the other hand when your adversary has a lead as shown in the following diagrams, he will hesitate to double being hopeful of getting a Gammon, or a double game. If you do not adopt the Back Game, your adversary may not double and you have a chance of playing the game out without a double, and if the luck should shift decidedly in your favor, you may win. However, the soundest chance of winning in any of the situations shown is by adopting Back Game tactics.
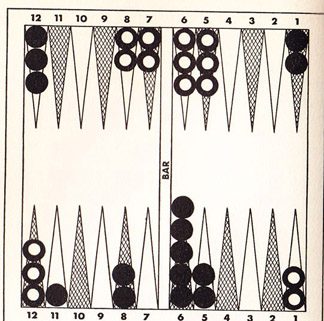
Diagram 51
In Diagram 51 the opening throws have been as follows:
| White | Black |
| 3 and 1 | 3 and 2 |
| 6 and 1 | 5 and 3 |
| 5 and 1 |
Black now throws the 3 and 2, and plays as shown in Diagram 52, exposing men on his own 4 point, inner table, and his 10 point, outer table.
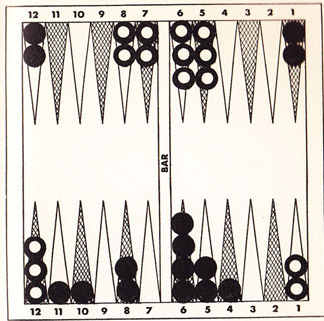
Diagram 52
These blots are almost certain to be taken and will probably enable black to make points in white’s inner table. Black should continue exposing his men until enough are hit to make the essential points in white’s inner table.
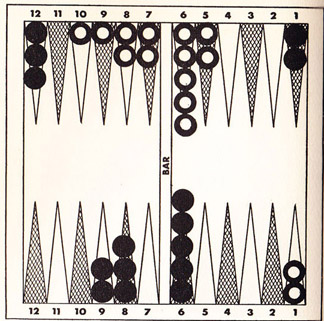
Diagram 53
In Diagram 53 the opening throws have been as follows:
| White | Black |
| 6 and 1 | 2 and 3 |
| 4 and 4 | 2 and 1 |
| 3 and 4 |
Black now throws the 5 and 1, and plays as shown in Diagram 54, exposing a man on his own bar point, thus going into a Back Game.
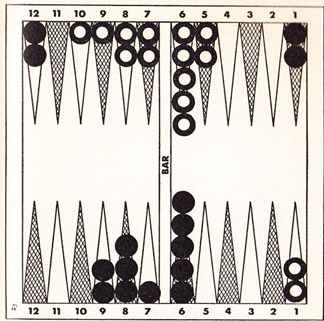
Diagram 54
If white hits this blot, it is reasonably certain that black may enter this piece and also hit white’s back man on the next play, hoping to get at least four of his black pieces on two points in white’s inner table.
Complete Play of a Back Game
The following twenty-six charts show a Back Game, play by play, from the start to the finish of the game. Black establishes a definite advantage on the first few throws and if white continued in a forward, or running game, black would almost surely win. However, white switches to a Back Game and wins. The reader may set up his Backgammon board, and follow through this interesting game.
In order to shorten the game, a fairly simple example of Back Game has been selected. In actual play, there will probably be many more plays necessary to establish the various situations.
Each chart shows the position of the pieces after the play has been made.
Black 6 and 1. Black makes his bar point. White 3 and 2. White makes the conventional opening play.
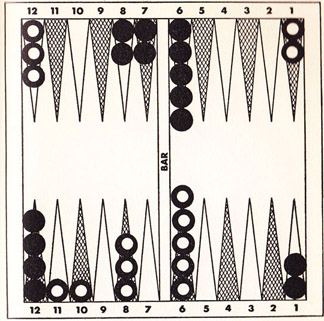
Diagram 55
Black 4 and 4. Black moves two men to the 5 point in white’s inner table, so he will be in better position to hit one of white’s blots if it is not covered — and also makes his 9 point.
White 5 and 1. White covers his blot, and brings over a builder.
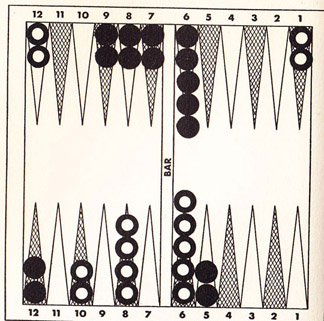
Diagram 56
Black 3 and 3. Black makes his 10 point, and also the 5 point in his inner table. He now has three of the most valuable points — his bar point, his 5 point, and his opponent’s 5 point.
White 4 and 2. White makes his own 4 point.
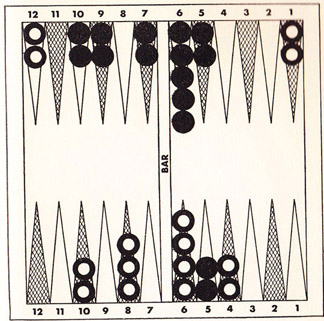
Diagram 57
Black 6 and 3. Black now decides to run with one man.
White 4 and 1. White realizes the forward game is lost and so switches to a Back Game, hitting black on the 5 point, and exposing two outside men.
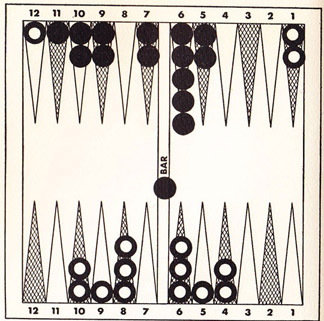
Diagram 58
Black 5 and 4. Black enters and hits two of white’s men. This play is the one which leads to his undoing.
White 1 and 1. White reenters the two men on black’s 1 point, and moves them to his 2 point. White now has the start of a successful Back Game.
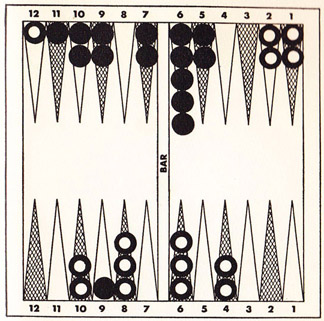
Diagram 59
Black 1 and 1. Black moves two men from his 10 to his 8 point, thus making five points in a row.
White 4 and 1. White, wishing to get more men in black’s inner table, hits black on the 9 point, and exposes another man on his own bar point.
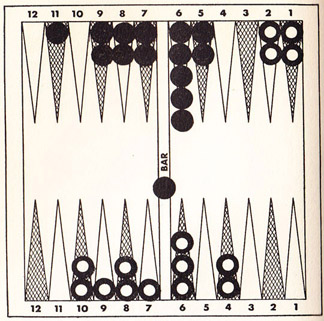
Diagram 60
Black 6 and 3. Black enters and hits white on the 9 point. He now feels that one more man back won’t hurt him for white already has two points established. This is not necessarily sound reasoning.
White 6 and 5. White cannot reenter as both these points are filled.
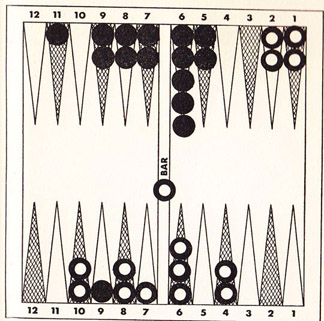
Diagram 61
Black 2 and 2. Black makes his 4 point, establishing a side prime, and moves one piece over to his outer table.
White 5 and 2. White reenters on black’s 2 point and plays a man to his 5 point. White is now trying to build points in his inner table.
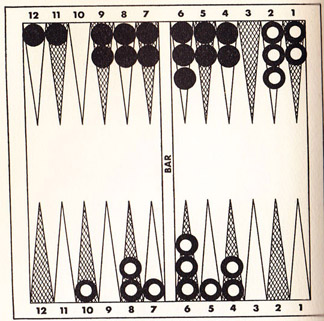
Diagram 62
Black 6 and 6. Black makes his 3 point, and moves the two exposed men into his inner table.
White 5 and 1. White covers his 5 point and also covers his bar point.
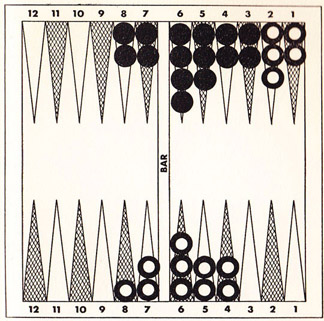
Diagram 63
Black 5 and 4. Black makes the only safe play, moving his men which are on his 8 point, into his inner table.
White 4 and 3. White makes his 3 point.
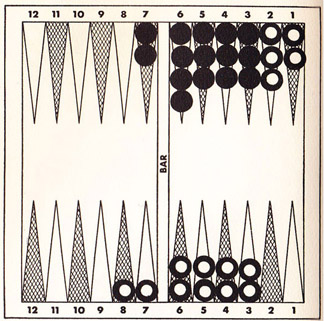
Diagram 64
Black 6 and 4. Black has only one four to play and no six. He therefore leaves a blot on his bar point.
White 5 and 1. White hits black’s exposed man on black’s bar point with the five, and covers his own bar point.
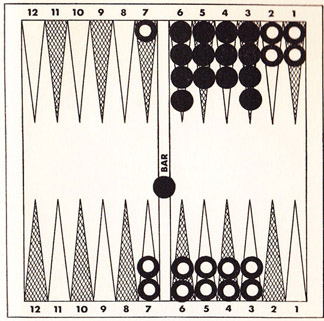
Diagram 65
Black 5 and 4. Cannot reenter.
White 5 and 5. White fills his 2 point, and moves two men out of black’s inner table.
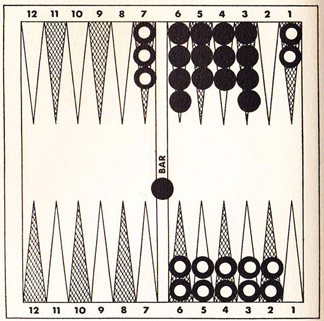
Diagram 66
Black 3 and 2. Cannot reenter.
White 5 and 3. White spreads his men in black’s outer table to have more chances to hit white if he reenters and comes out.
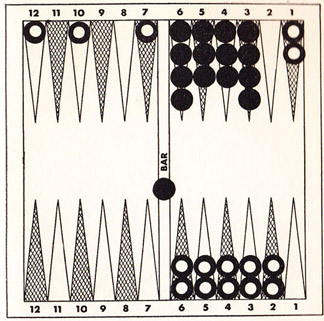
Diagram 67
Black 5 and 2. Cannot reenter.
White 6 and 2. White makes the 12 point in black’s outer table to block a possible throw of double sixes if black reenters, and moves one more man out of black’s inner table.
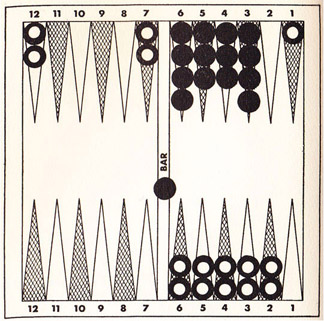
Diagram 68
Black 6 and 1. Black reenters and moves out, his only six, to white’s bar point.
White 6 and 6. White hits black’s blot with two men, and then moves them both in to his own 1 point, thus completely filling his inner table.
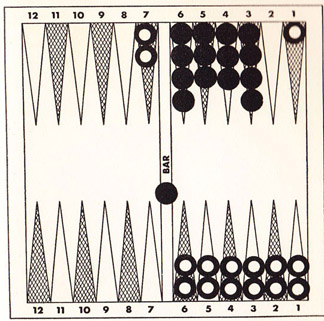
Diagram 69
Black cannot play.
White 6 and 5. White Brings his last man all the way out of black’s inner table. It is important for him to use the six for this purpose, so he won’t be left blocked there.
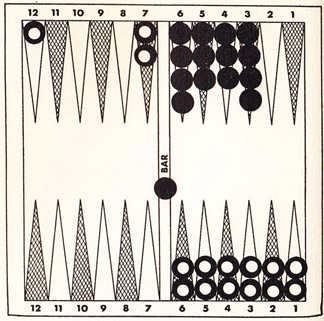
Diagram 70
Black cannot play.
White 6 and 3. White plays one piece to his bar point and moves one of the others three.
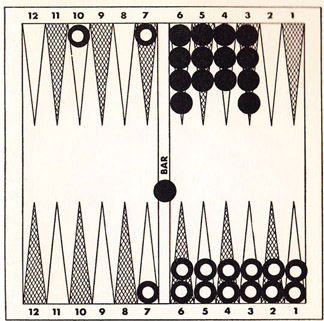
Diagram 71
Black cannot play.
White 5 and 5. White moves one man ten spaces to his 5 point, and the other man ten spaces to his 8 point. He now has his two outside men closely together, and is unlikely to expose a blot for several plays.
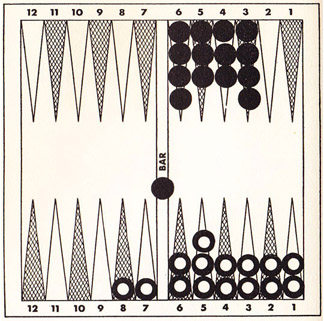
Diagram 72
Black cannot play.
White 5 and 2. White moves the back man two spaces, and the one on the bar point five. He now has an even number of men on his two highest points, and is in no danger of making a blot on the next play.
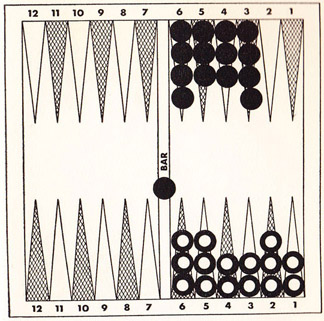
Diagram 73
Black cannot play.
White 6 and 4. Whites bears off a six, and moves the odd man on the 5 point to the 1 point. His board is still unlikely to become exposed on the next play.
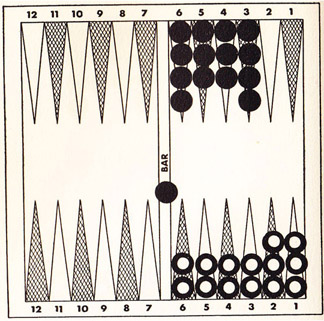
Diagram 74
Black cannot play.
White 6 and 3. White bears off a six, and moves the other man on the 6 point to the 3 point. His board is still excellent from a strategic position.
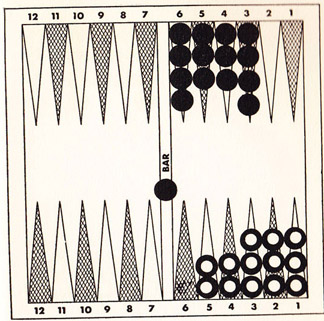
Diagram 75
Black 6 and 4. Black reenters and moves out four spaces.
White 4 and 3. With black out of his way, white now begins to bear off the maximum number of men on each throw, regardless of blots.
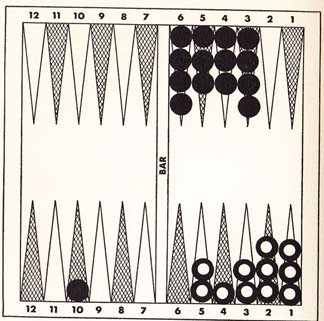
Diagram 76
Black 5 and 5. Black plays his back man to his 5 point, and bears off two pieces.
White 6 and 6. White bears off his four highest men.
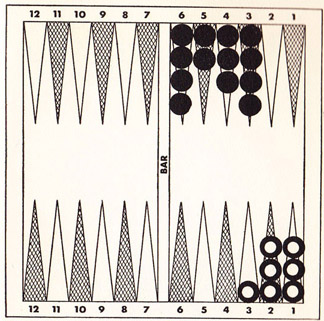
Diagram 77
Black 6 and 4. Black bears off two men.
White 3 and 1. White bears off two men.
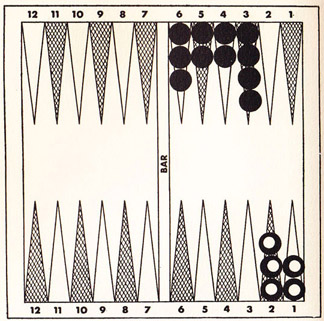
Diagram 78
Black 6 and 1. Black bears off a six, and moves one piece from his 3 to his 2 point.
White 1 and 1. White bears off two men from his 1 point, moves one man from his 2 to his 1 point and bears that off also.
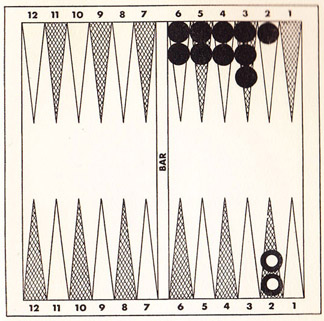
Diagram 79
Black 5 and 5. Black bears off two men on his 5 point, and moves the two men on his 6 point to his 1 point.
White 6 and 2. White bears off both men, and wins.
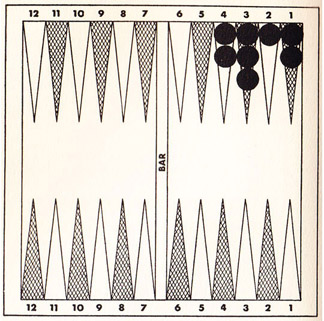
Diagram 80
Authorized Rules for Modern Backgammon
Revised, November 1930
These are the Authorized Revised Rules of Modern Backgammon as approved by the Committee of The Racquet and Tennis Club, New York, in conjunction with other leading clubs, and are the official rules of the game.
- The game may be played with (a) two dice boxes and two pairs of dice; or (b) two dice boxes and one pair of dice; or (c) one dice box and one pair of dice. In case of disagreement, the player throwing the higher die shall have the choice.
- The game shall be set up so that the inner tables are nearest the light. Decision as to position of light and choice of dice, men and seats shall be made by the player winning the throw for the first move.
- For the first move each player throws a single die. He who throws the higher number wins, and, for his first move, plays the pips upon both his own and his opponent’s die. After that each player throws and plays two dice.
- Each tie, when throwing for first move, automatically doubles the stake. This is optional. Automatic doubles may be limited in number or not played.
- Both dice must be taken up and thrown again:
- If the player has not thrown the dice into the tables on his right hand.
- If either die is upon, or “cocked” against, the other die, a man, or a side or end of the tables.
- If either die jumps into the other tables or off the board.
- If either player touches either die during the throw or before it has come to rest.
- If a player throws his dice before his adversary’s play is completed.
- If the player has not thrown the dice into the tables on his right hand.
- The player must leave his dice upon the board until his play is completed. Should he pick them up before the completion of his play, the opponent may, at his option, declare the play void and require the offender to replace the man or men moved and to throw again.
- A play is completed when the move or moves required by the dice have been made and the man or men quitted. After a play has been so completed (correctly), it cannot be changed.
- If a man has been moved the wrong number of points, or entered incorrectly, or thrown off before all are home, the opponent may, at his option, and before he has thrown, demand that the error be corrected. After the opponent has thrown, errors of play cannot be corrected except by mutual consent.
- The numbers on both dice must be played if possible. Either may be played first. If either, but only one, of the numbers thrown can be played, the higher must be played.
- Whenever a man has been moved from its position upon a point it must be played if possible.
- Either player may offer the first double of the original stake. After that the right to double the stake alternates, being always with the player who has accepted the last double.
In every case, a double may be offered only when it is the player’s turn to play and before he has thrown the dice. A double may be accepted or declined. The refusal of a double terminates the game and the player refusing then loses whatever his stake may amount to at that time.
-
- A single game is won by the player who first bears or throws off all of his men.
- A Gammon, or double game, is won if the adversary has not thrown off a single man. This doubles the amount of the stake whatever it may be.
- A Backgammon, or triple game, is won if the adversary has not thrown off a single man and has one or more men in the winner’s inner table or upon the bar. This triples the stake. It is optional whether or not triple games be played.
- A single game is won by the player who first bears or throws off all of his men.
Glossary of Backgammon Terms
| Automatic Double: | A double which results from both players throwing the same number at the start of the game.
| |
| Backgammon: | A triple game — see “Types of Games.”
| |
| Back Game: | A game in which the player gets his men intentionally captured so that he may make two or more points in his opponent’s inner table.
| |
| Bar: | The partition in the middle of the board, separating the two tables.
| |
| Bar Point: | The seven point in the player’s outer table; the one next to the bar.
| |
| Bearing Off: | The process of taking men from the player’s inner table; taking off men.
| |
| Blot: | A space on which there is but one man.
| |
| Booby Point: | The opponent’s Bar Point is the player’s Booby Point.
| |
| Box, In the: | The player, in Chouette, who plays alone against the field, is In the Box.
| |
| Capture: | To hit; or to take up an opponent’s man.
| |
| Chouette: | A game in which more than two players participate — see “Chouette.”
| |
| Doubles: | A throw in which each die has the same number of pips.
| |
| Doubling: | Increasing by double the amount of the stake.
| |
| Forward Game: | A game in which forward progress is made; a game which the player attempts to win by throwing larger dice.
| |
| Gammon: | A double game — see “Types of Games.”
| |
| Hit: | To play a man onto a space where the opponent has but one man, thereby taking up the opponent’s man; to capture.
| |
| Inner Table: | The table from which the player bears off his men.
| |
| Light: | The side of the board next to the players’ inner tables.
| |
| Outer Table: | The player’s table from which he does not bear off his men.
| |
| Pips: | The numbers or spots on the dice.
| |
| Point: | A space on which there are two or more men.
| |
| Prime: | See Side Prime.
| |
| Reenter: | To put back on the board men which have been hit.
| |
| Running Game:
| Same as Forward Game.
| |
| Space: | One of the twenty-four places on the board on which the men are placed.
| |
| Side Prime: | Six consecutive points held by one player.
| |
| Table: | One of the four quarters of the board.
| |
| Take Up: | See Hit.
| |
| Throwing Off: | See Bearing Off.
|