|
| Book Transcription |
|
|

History of Backgammon
A Fairy Tale
We hear so much about the ancient history of this game; King James the First of Scotland played it on the night before he was assassinated; the Roman Legions spread it over the then known world; the murals in the Egyptian tombs depict it; the Aztec Indians played it before Columbus discovered America; but the game is one of evolution and the way of it was like this.
Once upon a time in the earliest days of mankind there was a man named Kal En Dar. Kal En Dar was a great hunter, a bold fighter, and planned his campaigns in advance. He was the first to observe that there was a change in the moon every thirty days and, to take advantage of the dark and light nights, he commanded that fifteen white stones and fifteen black stones should be placed on a line and a record kept of the dark and moonlight nights. Later, Kal En Dar remembered that twelve moons before, there had been the same warm spell and that the same bright flowers had appeared at that time, and Kal En Dar commanded that the thirty stones should be kept on twelve lines. Such undoubtedly was the origin of the Calendar.
One dark night when Kal En Dar was seated at his camp fire, he noticed two little bones which had been charred by the fire, and he picked them up and rattled them in a cow’s horn to amuse a small child, and then threw them on the ground and noticed that certain burnt spots turned up more frequently than others. Casting his eye around the camp to discover something upon which to record the casts, his glance caught the gleam of the fire-light on the White stones of the Calendar, and Backgammon was invented.
Etiquette
In Contract Bridge we have all sorts of rules and penalties for infractions, and whilst there are no penalties for breaches of etiquette, the general principles are so established that one seldom sees anyone overstep these nicer points
In Backgammon nothing has been established as yet, covering these finer points. One thing is certain, and that is, the person playing should “have the floor” and nothing should be done in any way to disturb or distract the player until his moves have been completed and his dice actually placed back in the dice box. One of the old ways of playing this game was to use only one pair of dice and two dice cups; each player after completing his move would pick up the dice and place them in the opponent’s dice cup.
A few DON’Ts are here suggested;
- DON’T try to hurry your opponent.
- DON’T advise what moves to make.
- DON’T comment after a move has been made.
- DON’T rattle the dice unless you are about to cast.
- DON’T touch a piece unless you are going to play it.
- DON’T propose a double until just before you cast.
- DON’T argue. It is very unlucky.
- DON’T forget that the game is for amusement.
I would also suggest that all players when playing doublets, number the moves as they are made. Example: “Double fives. One five, two fives, three fives and the fourth five.”
Backgammon Tactics
There are three distinct types of Backgammon games; the Running, the Side Prime, and the Back Game.
The first type is the one which nearly everybody plays and it is the simplest form and the easiest to play. It consists of rushing the men around the board as rapidly as possible and then throwing them off with all speed. All players should play this type of game when the opportunity offers.
The Side Prime game consists of making an effort to enclose one or more of the opponent’s men with a wall of six consecutive points so that the opponent is unable to move out. To risk a man or two to accomplish this end is quite good play, but there must be some chance of achieving the objective otherwise the attempt may be most disastrous.
The third type is the Back Game which consists of having a number of men sent back and covering a number of points in the opponent’s inner table. Most players fail to get enough men sent back, and of course the opponent will try not to aid the plan. One way in which to force the opponent to send the men back is to get one of his men on the Bar and then expose Blots in your inner table. Do not try to build up your inner table until you have six or seven men in the opponent’s inner table. This type of game is explained more fully hereafter.
Do not dash into a Back Game if there is any chance of winning the game in any other way, and watch particularly for the opportunity of developing a Side Prime.
Close following of the problems given in this book will greatly aid the reader in making quick decisions as to the best way to play the most difficult casts, and should the reader play these problems out on a board, and study them for a few minutes, he cannot fail to improve his play.
The Back Game
When your opponent starts out with a number of high casts, and you are casting low numbers and unable to make much progress, and the chances are that a running game is hopeless, the best defense is a Back Game.
A Back Game consists of having a number of men sent back so that you accumulate a number of men in the opponent’s inner table, and you intentionally offer your men as a sacrifice. Your opponent will try and avoid sending a great number back and to compel your opponent to carry out your wishes, you purposely leave Blots anywhere on the board, but more particularly in your inner table if you can get one of opponent’s men on the Bar.
It is not advisable to start a Back Game unless you have a chance of securing at least two, and preferably three, points in your opponent’s inner table. Your men must also be placed so that you can make the necessary moves without accumulating your other men on the low points in your inner table, as you have to build up the higher points in your table in order to take advantage of the later phases of the Back Game.
Good judgment must be shown as to when to start a Back Game, and also when to change your tactics and start moving out of the opponent’s inner table, and yet withal, you must stick to your plan until the very last moment. One can readily judge by the above statements that a Back Game is not so easy as it sounds.
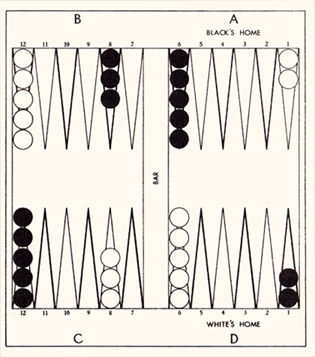
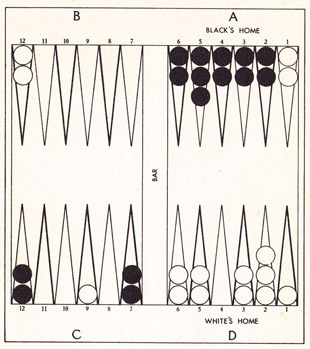
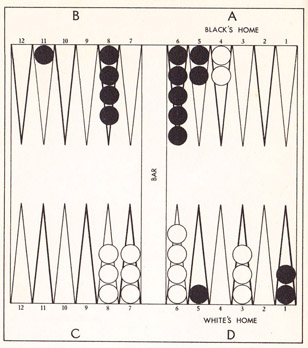
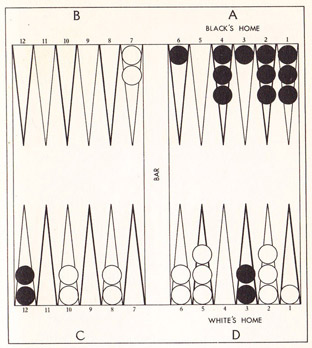
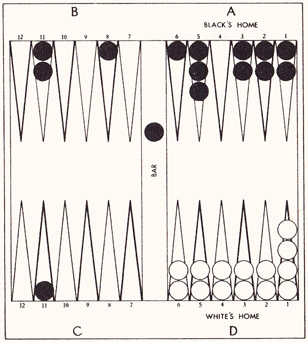
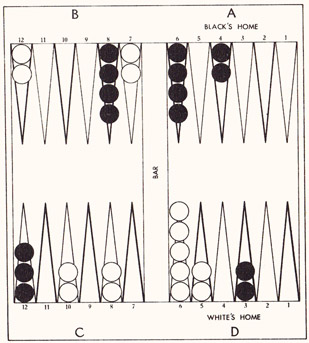
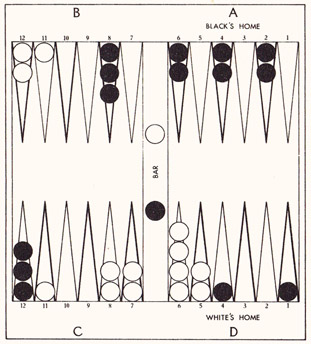
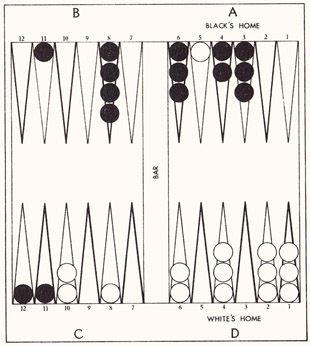
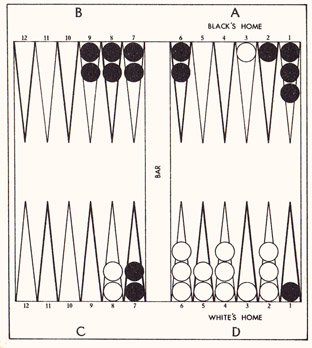
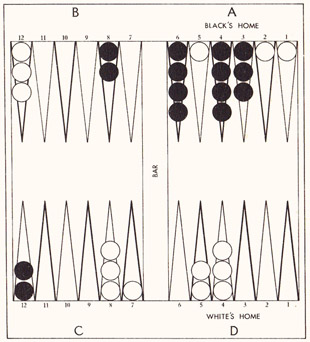
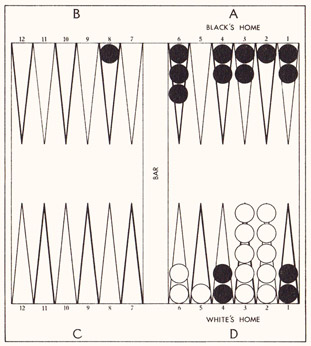
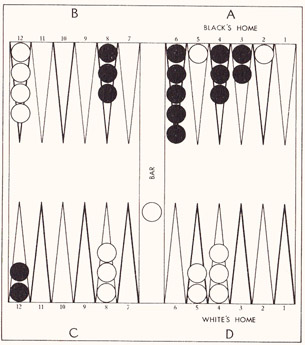
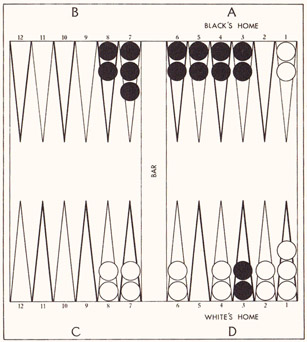
For the purposes of illustrating the game I have divided the board into four sections, each marked with a letter of the alphabet, and the points have been numbered from 1 to 12. The board should be set up with the inner tables on the right as shown in the diagram below. Two White men should be placed on the A-1-point; 5 on the B-12-point; 3 on the C-8-point and 5 on the D-6-point, and of course the Black pieces should be set up on the opposite points.
A Back Game
| Black. 6-5. | Move one man from D-1 to C-7 to C-12.
|
| White. 2-1. | One man from B-12 to C-11. One man from A-1 to A-2.
|
| Black. 5-5. | Two men from C-12 to B-8 to A-3.
|
| White. 5-1. | One man from A-1 to A-2 to B-7.
|
| Black. 6-1. | One man from C-12 to B-7 sending White to the Bar, and a man from B-8 to B-7 making the Bar-Point. At this point White began to think about starting a Back Game as if Black gets his man through from D-1, he would have every chance of winning a Running Game.
|
| White. 2-3. | This cast decided White to play a Back Game. He entered his man from the Bar on A-2 and for the 3-spot, he moved a man from D-6 to D-3.
|
| Black. 5-2. | One man from D-1 to D-3 sending White to the Bar and for the 5-spot he played from C-12 to B-8.
|
| White. 3-1. | The man on the Bar was entered on A-1 and for the 3, a man was moved from D-6 to D-3 and Black was sent to the Bar.
|
| Black. 6-3. | The man on the Bar was entered on D-3 and again White was sent back and the same man was moved from D-3 to C-9.
|
| White. 4-1. | The man on the Bar was entered on A-1 and a man was moved from B-12 to C-9 and again Black was sent back.
|
| Black. 6-5. | Black entered on D-5 and moved the same man to C-11, and sent White to the Bar.
|
| White. 5-2. | White can safely enter on A-2, but in that case, Black would be almost certain to get the remainder of his men into his inner table without the least trouble. To carry out the Back Game plan White must send Black back again and so he entered on the A-5-point and moved one man from B-12 to C-11 and sent Black back to the Bar.
|
| Black. 6-6. | As this point was covered, Black was unable to enter.
|
| White. 5-1. | White still wanted another man or two in Black’s inner table, and fearing Black would try to avoid sending another White back, White decided to expose two men in his inner table. He played from C-9 to D-4 and from D-6 to D-5.
|
| Black. 6-5. | The man on the Bar was entered on D-5 and a White man was sent back. The Black moved the same man to C-11 and sent another White to the Bar.
|
| White. 5-3. | One man was entered on A-5, but White was unable to use the 3-spot as he still had a man on the Bar.
|
| Black. 4-2. | One man was moved from C-11 to B-10 to B-8. Black could have made the 4-point in his inner table, but he decided against that as White can now only hold three points.
|
| White. 5-3. | The man on the Bar was entered on A-5 and for the 3-spot a man was moved from C-8 to D-5.
|
| Black. 6-5. | One man from C-12 to B-7, and the. other from C-12 to B-8.
|
| White. 4-3. | One man from C-8 to D-4, and the other from C-8 to D-5.
|
| Black. 5-2. | One man from B-8 to A-3 and another from B-8 to A-6.
|
| White. 5-4. | One man from A-5 to B-10 to C-11.
|
| Black. 6-3. | The 6-spot could not be played. One man from A-6 to A-3.
|
| White. 4-1. | C-11 to C-7 to D-6.
|
| Black. 6-2. | Only the 2-spot could be played. B-8 to A-6.
|
| White. 5-3. | B-12 to C-8 to D-5.
|
| Black. 4-2. | Black now had to leave a Blot somewhere. He played one man from B-8 to A-4 and another from A-6 to A-4 and covered the 4-point.
|
| White. 5-4. | D-6 to D-1, and D-5 to D-1, thereby covering the 1-point.
|
| Black. 5-1. | One man from B-8 to A-3, and another from B-7 to A-6.
|
| White. 2-1. | B-12 to C-11 to C-10.
|
| Black. 4-2. | Black again had to leave a Blot. B-7 to A-3. A-6 to A-4.
|
| White. 2-1. | A-5 to B-7 sending Black to the Bar. B-7 to B-8.
|
| Black. 5-3. | Entered on D-3 and played the same man to C-8.
|
| White. 5-2. | B-8 to C-12, and C-10 to C-8 sending Black to the Bar.
|
| Black. 6-3. | Entered on D-3 and played to C-9.
|
| White. 6-5. | A-5 to B-11 to C-9 sending Black again to the Bar.
|
| Black. 6-4. | Black was unable to enter.
|
| White. 2-1. | C-9 to C-7 and C-8 to C-7 making the Bar-Point.
|
| Black. 5-1. | Unable to enter.
|
| White. 5-2. | C-12 to C-7 to D-5.
|
| Black. 2-2. | Entered on D-2 and played three men from A-6 to A-4.
|
| White. 5-3. | C-7 to D-2 sending Black to the Bar. D-5 to D-2, making the 2-point.
|
| Black. 5-4. | Unable to enter.
|
| White. 5-5. | 2 men from A-2 to B-7. One man from B-7 to B-12 to C-8. White was rushing reinforcements up to cover the 3-point.
|
| Black. 6-1. | Unable to play.
|
| White. 3-3. | One man from C-8 to D-5. One man from C-7 to D-4. One man from B-7 to B-10 to C-12.
|
| Black. 3-2. | Entered on D-3, and played from A-4 to A-2.
|
| White. 5-2. | D-5 to D-3 sending Black to the Bar. C-12 to C-7 thereby bringing up another builder.
|
| Black. 6-5. | Unable to enter.
|
| White. 4-1. | A-1 to A-2 sending another Black to the Bar. C-7 to D-3 completing the inner table, and shutting Black out on the Bar.
|
| White. 5-4. | A-2 to B-7, and A-1 to A-5.
|
| White. 6-6. | B-7 to C-12 to D-6 and A-5 to B-11 to C-8.
|
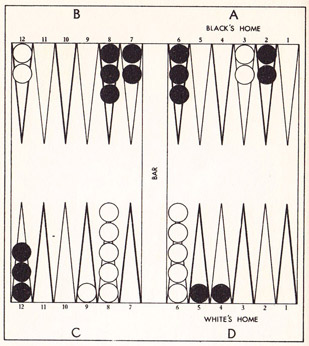
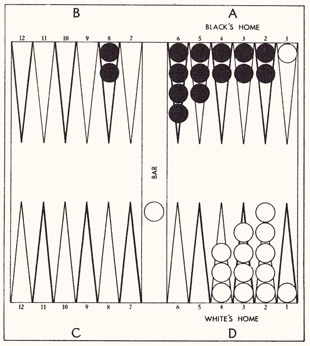
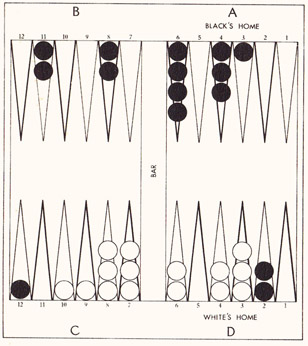
| White. 6-1. | C-8 to D-2. D-6 to D-5. White now had all his men assembled in his inner table. The only danger point being the three men on D-5. The cast of double fives or sixes would be a nuisance.
|
| White. 5-3. | One man was thrown 0H D-5 and a man was played down from D-4 to D-1. This lucky cast removed all danger.
|
| White. 6-4. | One man off D-6 and one man played down from D-6 to D-2. Black could now enter on the 6-point.
|
| Black. 6-2. | Entered one man on D-6, but could not play the 2-spot as he still had a man on the Bar.
|
| White. 6-4. | One man off D-5 and the other played down to D-1.
|
| Black. 3-3. | Unable to play.
|
| White. 5-4. | Two men were thrown off D-4.
|
| Black. 6-1. | Black entered on D-6 and played to C-7.
|
| White. 3-2. | Two more men were thrown off each of these points.
|
| Black. 5-2. | D-6 to C-11 to B-12.
|
| White. 3-3. | One man was thrown off the D-3-point and three off the D-2-point.
|
| Black. 6-2. | C-7 to B-12 to B-10.
|
| White. 4-3. | Two men were thrown off the D-2-point.
|
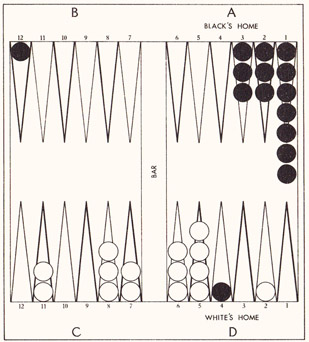
| Black. 6-1. | B-12 to A-6, and A-3 to A-2.
|
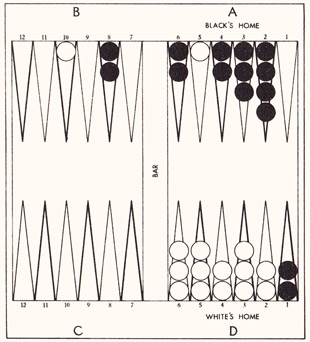
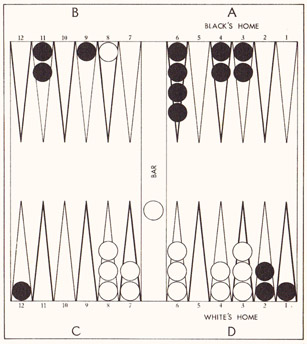
| White. 3-1. | The last two men were thrown off with this cast and White just managed to win a double game. |
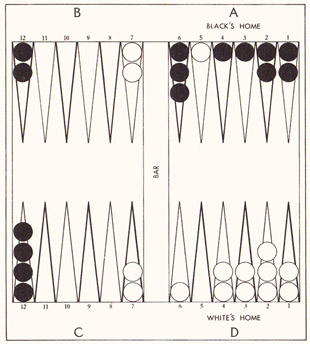
It is interesting to note that up to the time White completed his inner table, Black’s casts had been averaging thirty per cent higher than White’s, and if White had not played a Back Game, Black would have won easily.
Authorized 1931 Rules For Modern Backgammon
- The game may be played with (a) two dice boxes and two pairs of dice; or (b) two dice boxes and one pair of dice; or (c) one dice box and one pair of dice. In case of disagreement, the player throwing the higher die shall have the choice.
- The game shall be set up so that the inner tables are nearest the light. Decision as to position of light and choice of dice, men and seats shall be made by the player winning the throw for the first move.
- For the first move, each player throws a single die. He who throws the higher number wins, and for his first move, plays the pips upon both his own and his opponent’s die. After that, each player throws and plays two dice.
- Each tie when throwing for first move, automatically doubles the stake. This is optional. Automatic doubles may be limited in number or not played.
- Both dice must be taken up and thrown again:
- If the player has not thrown the dice into the tables on his right hand;
- If either die is upon or “cocked” against, the other die, a man, or a side or end of the tables;
- If either die jumps into the other tables or off the board;
- If either player touches either die during the throw or before it has come to rest;
- If a player throws his dice before his adversary’s play is completed.
- If the player has not thrown the dice into the tables on his right hand;
- The player must leave his dice upon the board until his play is completed. Should he pick them up before the completion of his play, the opponent may, at his option, declare the play void and require the offender to replace the man or men moved and to throw again.
- A play is completed when the move or moves required by the dice have been made and the man or men quitted. After a play has been completed (correctly) it cannot be changed.
- If a man has been moved the wrong number of points, or entered incorrectly, or thrown off before all are home, the opponent may, at his option, and before he has thrown, demand that the error be corrected. After the opponent has thrown, errors of play cannot be corrected except by mutual consent.
- The numbers on both dice must be played, if possible. Either may be played first. If either, but only one, of the numbers thrown can be played, the higher must be played.
- Whenever a man has been moved from its position upon a point, it must be played, if possible.
- Either player may offer the first double of the original stake. After that the right to double the stake alternates, being always with the player who has accepted the last double.
In every case a double may be offered only when it is the player’s turn to play and before he has thrown the dice. A double may be accepted or declined. The refusal of a double terminates the game and the player refusing it loses whatever his stake may amount to at that time.
-
- A single game is won by the player who first bears or throws out all of his men.
- A Gammon, or double game, is won if the adversary has not thrown off a single man. This doubles the amount of the stake whatever it may be.
- A Backgammon, or triple game, is won if the adversary has not thrown off a single man and has one or more men in the winner’s inner table or upon the Bar. This triples the stake. It is optional whether or not triple games be played.
- A single game is won by the player who first bears or throws out all of his men.
This completes the “Authorized Rules for Modern Backgammon for 1931.”
To these rules should be added the following:
Set-Up
Before play can commence, each player must set his men up as follows:
Two men on the one point in opponent’s inner table; five men on the 12 point in opponent’s outer table.
Five men on the six point in the player’s inner table and three men on the point next to the Bar point in the player’s outer table.
Bearing — Throwing Off
When Bearing (removing the men from the board in the final stage of the game), the points in the player’s inner tables are mentally numbered from 1 to 6, the 6-point being nearest the Bar. For each number cast, a player can remove a man from the corresponding point, or may play a man down a corresponding number of points. If the player has no man on the point corresponding to the number cast, a man must be played down from a higher point; if there is no man on a higher point, a man can be removed from the next highest point.
Problems
Problem No. 1
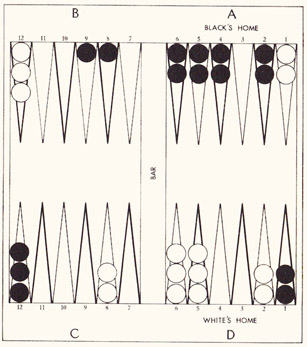
What would you do? Black has to play the cast of double aces.
Answer. The correct play is to move the man on B-8 to A-4-point.
Problem No. 2
What would you do? White has to play the cast of 6 and 5.
Answer. Play one man for the entire cast. A-1 to B7 to B-12. There is not much danger in leaving a blot on A-1 for, if Black sends him back to the bar, Black will have to leave a man exposed.
Problem No. 3
How would you play White’s cast of 5 and 1?
Answer. Play a man from C-8 to D-3 to D-2. In this way, White only leaves a man exposed to the cast of a 6-1 or 4-3. It is better to break the C-8 point than to leave a man exposed on C-7. Either dice can turn up a 6-spot, also double threes would hit a man on C-7; but C-8 requires the total off both dice. Black’s chances of hitting a man on C-8 are 1 to 8, but on hitting a man on C-7, the odds decrease to 1 to 2.
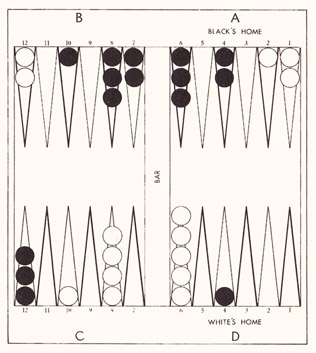
Problem No. 4
How would you play this one? Black has to play the cast of 6 and 4.
Answer. The correct play is one man from C-9 to B-10, and another from C-12 to B-9. Black has then only one man exposed to the cast of an eight, and the risks are 5 against 31.
Problem No. 5
How would you play White’s cast of double fours?
Answer. The correct play is to move 2 men from C-8 to D-4, and 2 men from D-6 to D-2. It would be very bad play to move 2 men from D-5 and send Black to the bar. Black would have no difficulty in entering, and White’s position would not be nearly so good.
Problem No. 6
How would you play this one? It is White’s turn and the dice say 6 and 3.
Answer. The correct play is to move one man from A-4 to B-10 to C-12. At this stage of the game, White should commence to get his men out of Black’s inner table, and should a White blot be hit, there will be no difficulty in reentering.
Problem No. 7
It is White’s turn to throw the dice. Should he double?
Answer. Yes. White should double. The odds are 29 against 7 that Black will not remove both men in the next cast. Whereas, White is practically certain in getting all of his men off in two casts.
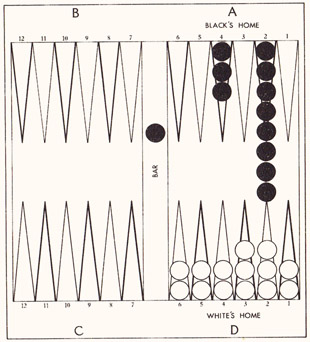
Problem No. 8
What would you do? It is White’s turn to play and he has just cast 2 and 1.
Answer. The correct play is to move one man down from D-6 to D-4 and another man down from D-5 to D-4. The reason for playing in this manner is that White is assured of game if he can remove his men without being hit, but with an odd man on the 6- or 5-point, White is left vulnerable to the casts of double fives or sixes.
Problem No. 9

It is White’s turn to play. Should he double?
Answer. Yes. Not only will White get his men in his inner table before Black can get all of his men home, White has also a much better position in having some of his men on the lower points.
Problem No. 10
How would you play White’s cast of 5 and 3?
Answer. White must throw two men off. If he plays safely, he will have no chance of winning. White must risk his men and, if hit, he will have another shot at Black as Black plays around.
Problem No. 11
How would you play White’s cast of 6 and 3?
Answer. The correct play is one man from C-10 to D-4 to D-1 and complete the one-point. There is little risk in leaving a blot on C-10 as the odds are 8 to 1 against being hit. Also, there would be little difficulty in reentering as Black’s inner table is wide open and there are two blots therein to shoot at.
Problem No. 12
How would you play this one? White has just cast 3 and 2.
Answer. The only thing to do is to play safely and hope for a good cast next time. Move one man from C-9 to D-6 and another man from C-8 to D-6.
Problem No. 13
It is White’s turn to play. Should he propose a double?
Answer. Yes. Most decidedly. Barring accidents, he should get all of his men in his inner table before Black, also, his men are in a far better position in the inner table than those of Black.
Problem No. 14
How would you play Black’s cast of double fours?
Answer. Black has an excellent chance for a double game and he should throw off two men from the A-4-point and play two men down from A-6 to A-2.
Problem No. 15

How would you play this one? Black has cast 6 and 2.
Answer. The correct play is to move one man from A-4 to A-2 and send White to the bar and for the 6-spot, move a man from B-8 to A-2 and make that point. There is little danger in leaving the blot in White’s inner table as one of White’s dice will be used in reentering and if he should also hit the blot on D-3, he will be compelled to leave another man exposed.
Problem No. 16
How would you play White’s cast of 3 and 2?
Answer. The correct play is to move the two men down from the D-6-point. White is assured of game and Black’s inner table is in far too good a shape to monkey with.
Problem No. 17
How would you play Black’s cast of double threes?
Answer. The correct play is to move three men down from A-6 to A-3 and throw one man off of that point. To play one man from A-6 to A-3 and then throw three men off, would be absurd as the next cast would probably be most inconvenient to say the least.
Problem No. 18
Here’s an interesting one. How would you play Black’s cast of 6 and 5?
Answer. Move two men from B-8 and erase the two blots in the inner table. White has too many builders to justify the breaking up of Black’s point in White’s inner table.
Problem No. 19
How would you play Black’s cast of 4 and 1?
Answer. The correct play is to move one man down from A-6 to A-2 and throw one man off of A-1-point. If the next cast was a double five or six, it would be very awkward, but this chance is more than offset by leaving only one point open for White to enter upon.
Problem No. 20
How would you play White’s miserable cast of 4 and 2?
Answer. Play safely by moving one man from C-10 to C-8 and another man from C-10 to D-6. White has the better position and barring accidents should win.
Problem No. 21
How would you play this one? Black has cast double fours.
Answer. Play two men in from B-8 to A-4 and throw two men off of that point. Black is certain of game if he plays safely.
Problem No. 22
How would you play Black’s cast of double sixes?
Answer. Move one man from C-12 to B-7 and send White to the bar, and then play the same man on to A-1 and erase the blot. For the other two sixes move two men from B-8 to A-2 and send another White to the bar.
Problem No. 23
This is a most interesting situation. How would you play White’s cast of 3 and 1?
Answer. Move one man down from D-6 to D-3 and another man from D-6 to D-5. If White used this cast in throwing a man off of D-4, his only chance of winning with the next cast is in throwing double sixes; whereas, by moving the men down from D-6, double fives would also answer the purpose.
Problem No. 24
How would you play White’s cast of 6 and 1?
Answer. Of course, White has to enter on the A-1-point, but the question refers to the six-spot. The correct play is to move the man on B-11 to C-8. No cast that Black can make, will enter his man and hit the blot on C-11, whereas, if a blot were left on B-11, there are seven casts which will enter Black’s man and hit the B-11 blot.
Problem No. 25
How would you play this one? Black has just thrown 6 and 2.
Answer. Black must not move a man out of White’s inner table as White would then be sure of a shut-out. Black’s correct play is to move one man from B-8 to A-2 and a man from A-3 to A-1 and leave a blot on B-8 as it would be better to have a man on the bar or three men on the D-1-point than to be the victim of a shut-out. Double sixes would solve Black’s problem, but the odds are 35 to 1 against such a cast being made.
Problem No. 26
How would you play Black’s cast of 5 and 3?
Answer. Black’s only chance of game is — to send White back as man times as he can. The correct play is to move one man from D-2 to D-5, sending White to the bar and then play the same man to C-10. If White should hit one of Black’s blots, Black will have no difficulty in reentering and the man on B-10 may get a shot at White’s man.
Problem No. 27
How would you play Black’s cast of 6 and 5?
Answer. The correct play is to move the man on B-12 to A-6 and send White to the bar. White will then have two men on the bar and only the cast of double sixes or double fours can upset the apple cart. Black on his next cast should be able to send another White back, or at least make a point in his inner table.
Problem No. 28
How would you play Black’s miserable cast of 2 and 1?
Answer. White is so far in the lead that Black must not allow the man on A-5 to escape. The correct play is to move one man from A-6 to A-5, sending White to the bar, and then play the same man on to A-3. Unless White reenters with the cast of a 6 and a 5, Black should be on even terms after the next cast.
Problem No. 29
How would you play White’s cast of 2 and 1?
Answer. White must not let Black’s man on C-10 get away. The correct play is to enter on A-2 and move the man on C-11 to C-10 and send Black back to the bar.
Problem No. 30
How would you play Black’s interesting cast of double fives?
Answer. The correct play is to move one man from C-12 to B-8. Two men from B-8 to A-3, and one man from A-6 to A-1.
Problem No. 31
How would you play this one? White has to play double twos.
Answer. The correct play with the men in the above positions is to throw off one man from the D-6-point, and for the fourth two-spot, move a man down from D-4 to D-2. Usually, the cast of high doublets causes a whole lot of trouble when bearing under fire, but in making the play in the manner described, the danger is avoided.
Problem No. 32
How would you play Black’s cast of double aces?
Answer. The best move under the circumstances is to play two men from B-7 to A-6 to A-5. Two men are then brought in and another point is covered. White will still have some difficulty in getting away.
Problem No. 33
What would you do with White’s miserable cast of 6 and 1?
Answer. The best play is to move the man on C-9 to D-3 and make that point. The Ace should be played by moving a man from C-8 to C-7. The man on A-5 should be kept there to protect the man on B7.
Problem No. 34
How would you play White’s cast of double fours?
Answer. Move one man from A-1 to A-5 and three men from B-12 to C-9. This play gives White a good working chance to annoy Black’s two men on D-2.
Problem No. 35
How would you play Black’s cast of 5 and 3?
Answer. Play safely by moving one man from B-12 to A-5 and another from B-9 to A-6 and then all will be safe. It is usually bad play to get so many men on one point, but in this case, Black is in the lead and if he can remain safe, he will win.
Problem No. 36
This is an interesting one. How would you play Black’s cast of 6 and 1?
Answer. Play one man from B-8 to A-2 and send White to the bar. Then move one man from A-3 to A-2 and erase that blot. Black will then have four points covered, a White man on the bar, and will only be vulnerable to White’s cast of a 5-3 or 1-3.
Problem No. 37
How would you play Black’s cast of 5 and 3?
Answer. The correct play is to move one man from D-2 to D-5 to C-10 and send White to the bar. To be sure, Black has a blot in his inner table, but it is two to one against being hit, and Black must make every effort to get his men out of White’s inner table as White has all the makings of a side prime. Even if White does reenter and hit Black, Black would have no trouble in entering and Black will also get another shot at White.
Problem No. 38
How would you play Black’s cast of 5 and 1?
Answer. Everyone will play the man on B-12 to C-8 and send White to the bar, but where will they play the Ace? The correct move is to play the same man on to B-7. In this way, Black will have four builders with which to make points. No cast that White can make will ever enter both his men and hit Black’s blot on B-9.
Problem No. 39
White has just cast double twos. What would you do with it?
Answer. The correct play is to move two men from C-7 to D-5 and send Black to the bar; then move two men from D-4 to D-2 and send another Black to the bar. White will then have four points in his inner table safely covered and before Black can get both his men on, White should be able to catch the man on C-11.
Problem No. 40
How would you play Black’s unhappy cast of 6 and 2?
Answer. Black must stick to his position in White’s inner table. The correct move is from B-8 to A-2 and from A-6 to A-4. Black will then have five points covered in his inner table, and unless White’s next cast is a very lucky one, Black will get a double-barrelled shot at a White man.
Problem No. 41
White has just cast 5 and 2. What would you do with it?
Answer. The correct play is to move one man from C-11 for the entire cast and send Black to the bar. Black must be sent back at all costs, and even though White leaves two blots in his inner table, his formation is fairly good, but to break up the bar-point to protect one of these blots would be absurd.
Problem No. 42

How would you play Black’s awkward cast of 3 and 2?
Answer. The correct, because the safer, way to play this cast is to move the man on B-11 to B-8, and a man on A-6 to A-4. No one cast can possibly get both of White’s men out of Black’s inner table, and Black will get another shot at White.
Problem No. 43
How would you play White’s cast of 3 and 2?
Answer. Black’s position is so formidable that White’s best chance for game is by playing a back game. The correct play for this cast with the above set-up is to move one man from D-6 to D-4 and send Black to the bar, and for the three-spot, move a man from C-8 to D-5, so that if Black enters on one of those numbers another White will be sent back. White should now proceed to expose as many men as possible.
Problem No. 44
This little problem should be instructive. How would you play White’s cast of 6 and 5?
Answer. Play two men down from the D-6-point. If White can get his men off without being sent back, he is practically certain of winning as it will take Black at least two casts to get home, if not more, and White’s men are so well distributed that he will be bound to get four men off before Black can continue bearing. All this, presuming Black is lucky enough to enter on the next throw.
Problem No. 45
How would you play Black’s cast of 4 and 3?
Answer. The correct play is to send White to the bar by moving a man from A-6 to A-2 and for the three-spot, play a man from A-6 to A-3. Black then has an excellent chance of making another point with his next cast and should win a double game.
Problem No. 46
White has just cast 5 and 1. How would you play it?
Answer. Move one man from A-5 to B-10 and one man from C-7 to D-6. If Black should send White to the bar, White would have an excellent chance of hitting one of Black’s blots and with five points covered, White would be certain to win.
Problem No. 47

How would you play White’s interesting cast of double fours?
Answer. Move one man from B-11 to C-10 to D-6 and two men from D-6 to D-2. White then has five points covered and an excellent chance of catching Black’s man.
Problem No. 48
How would you play Black’s cast of 4 and 1?
Answer. Play safely by moving two men down from the A-6-point. Black is then certain of game. Sending White to the bar would be absurd.
Problem No. 49
How would you play White’s cast of double twos?
Answer. The correct play is to throw one man off the D-2-point and play three men down from D-5 to D-3. White’s only chance for game is in throwing high doubles. If he throws off the man on D-4, double fives or sixes are the only casts that will win, but by playing three men down from D-5, double fours would also save the situation.
Problem No. 50
What would you do? It is Black’s play and the cast is 4 and 2.
Answer. Move one man from D-3 to D-5 to C-9. It does not matter about leaving a blot on D-3 as if White should hit, Black would get another shot at a White and with three White men on the bar there would be every chance for a triple game. Never break up a side prime if it can be avoided.