|
|
Cube Handling in Races |
End Positions in Backgammon
| |||||||||||||||||||||||||||||||||||||||||||||||||||||||||||||||||||||||||||||||||||||||||||||||||||||||||||||||||||||||||||||||||||||||||||||||||||||||||||||||||||||||||||||||||||||||||||||||||||||||||||||||||||||||||||||||||||||||||||||||||||||||||||||||||||||||||||||||||||||||||||||||||||||||||||||||||||||||||||||||||||||||||||||||||||||||||||||||||||||||||||||||||||||||||||||||||||||||||||||||||||||||||||||||||||||||||||||||||||||||||||||||||||||||||||||||||||||||||||||||||||||||||||||||||||||||||||||||||||||||||||||||||||||||||||||||||||||||||||||||||||||||||||||||||||||||||||||||||||||||||||||||||||||||||||||||||||||||||||||||||||||||||||||||||||||||||||||||||||||||||||||||||||||||||||||||||||||||||||||||||||||||||||||||||||||||||||||||||||||||||||||||||||||||||||||||||||||||||||||||||||||||||||||||||||||||||||||||||||||||||||||||||||||||||||||||||||||||||||||||||||||||||||||||||||||||||||||||||||||||||||||||||||||||||||||||||||||||||||||||||||||||||||||||||||||||||||||||||||||||
| From The Mathematics of Gambling, by Dr. Edward O. Thorp, 1985; based on a series of articles, “End Positions in Backgammon,” published in Gambling Times, October 1978, November 1978, and December 1978. |
| Edward O. Thorp examines the proper checker play and cube actions when both players have just one or two checkers left to bear off. Even in these simple games, some very tricky decisions crop up. Thorp provides tables that allow for perfect play, and gives rules of thumb to help players make correct decisions over the board. |
|
Contents |
This article will focus on several aspects of backgammon that can be solved mathematically. You will learn useful but simple odds for bearing off with only two men left. Most good players already know this. But don’t go away, good players. Later you will learn facts about backgammon that few in the world are aware of.
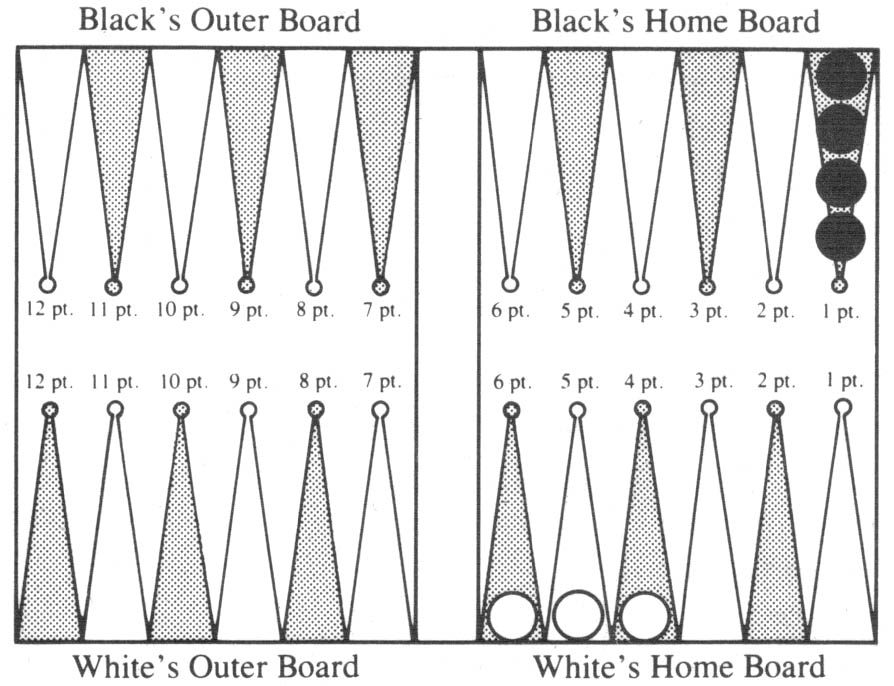
As an introduction to end positions, suppose you are White and it is your turn to roll in the position of Diagram 1. The doubling cube is in the middle.
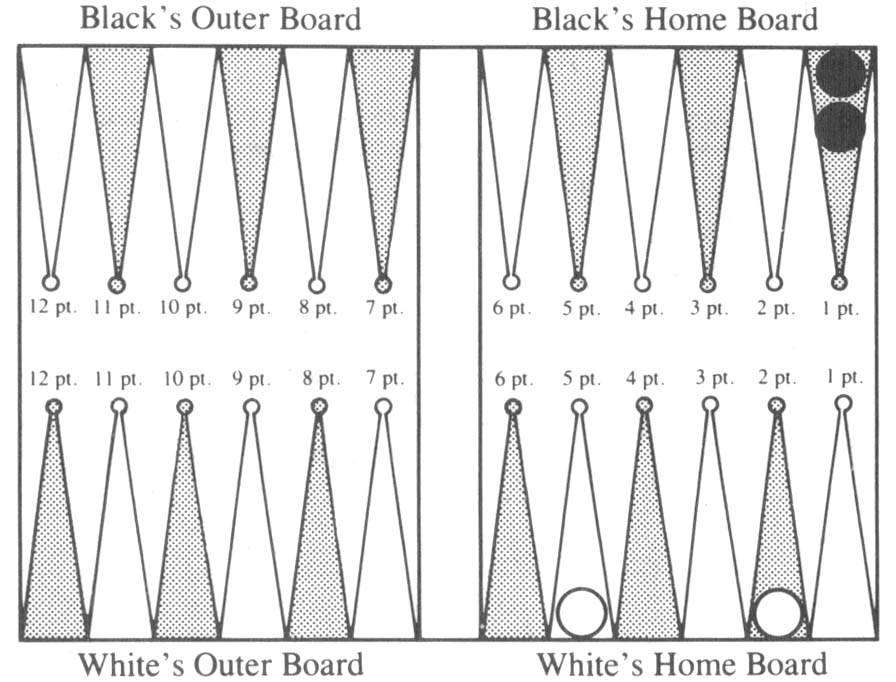
Diagram 1. White to roll. Cube is in the middle.
Questions:
White wins only if he bears off on his next roll. So to help us solve end positions of this type, we calculate a table of chances to take off men in one roll. The exact result is given in Table 1, and the chances to the nearest percent are given in Table 2.
Table 1. Chances (out of 36) to bear off one or two men with one roll.
| a man on the |
0 pt | 1 pt | 2 pt | 3 pt | 4 pt | 5 pt | 6 pt |
| 0 pt | off | 36 | 36 | 36 | 34 | 31 | 27 |
| 1 pt | 36 | 36 | 36 | 34 | 29 | 23 | 15 |
| 2 pt | 36 | 36 | 26 | 25 | 23 | 19 | 13 |
| 3 pt | 36 | 34 | 25 | 17 | 17 | 14 | 10 |
| 4 pt | 34 | 29 | 23 | 17 | 11 | 10 | 8 |
| 5 pt | 31 | 23 | 19 | 14 | 10 | 6 | 6 |
| 6 pt | 27 | 15 | 13 | 10 | 8 | 6 | 4 |
Table 2. Chances (%) to bear off one or two men with one roll.
| a man on the |
0 pt | 1 pt | 2 pt | 3 pt | 4 pt | 5 pt | 6 pt |
| 0 pt | off | 100% | 100% | 100% | 94% | 86% | 75% |
| 1 pt | 100% | 100% | 100% | 94% | 81% | 64% | 42% |
| 2 pt | 100% | 100% | 72% | 69% | 64% | 53% | 36% |
| 3 pt | 100% | 94% | 69% | 47% | 47% | 39% | 28% |
| 4 pt | 94% | 81% | 64% | 47% | 31% | 28% | 22% |
| 5 pt | 86% | 64% | 53% | 39% | 28% | 17% | 17% |
| 6 pt | 75% | 42% | 36% | 28% | 22% | 17% | 11% |
As you can see from Table 1, the exact chances of winning if you have a man on the five point and a man on the two are 19 in 36 or 0.5277. Table 2 gives your chances to the nearest percentage, or 53%. Now you have the answer to question 1.
To see how Table 1 is calculated, recall that there are 36 equally likely outcomes for the roll of two dice. These are listed in Table 3.
Think of the two dice as labelled “first” and “second.” It might help to use a red die for the “first” die and a white one for the “second” die. Then if the red (first) die shows 5 and the white (second) die shows 2, we call the outcome 5-2. If instead the first die shows 2 and the second die shows 5, this is a different one of the 36 rolls and we call it 2-5. Outcomes are named x-y where x is the number the first die shows and y is the number the second die shows.
To see that White has 19 chances in 36 to win in the situation presented in Diagram 1, we simply count winning rolls in Table 3. If either die shows at least 2 and the other shows at least 5, White wins. He also wins with 2-2, 3-3, and 4-4. This gives the 19 (shaded) winning outcomes in Table 3.
Table 3. The 36 possible (equally likely) rolls.
| second die shows | |||||||
| 1 | 2 | 3 | 4 | 5 | 6 | ||
| first die shows |
1 | 1-1 | 1-2 | 1-3 | 1-4 | 1-5 | 1-6 |
| 2 | 2-1 | 2-2 | 2-3 | 2-4 | 2-5 | 2-6 | |
| 3 | 3-1 | 3-2 | 3-3 | 3-4 | 3-5 | 3-6 | |
| 4 | 4-1 | 4-2 | 4-3 | 4-4 | 4-5 | 4-6 | |
| 5 | 5-1 | 5-2 | 5-3 | 5-4 | 5-5 | 5-6 | |
| 6 | 6-1 | 6-2 | 6-3 | 6-4 | 6-5 | 6-6 | |
| The 19 shaded squares are the rolls that bear off White’s two checkers in Diagram 1. |
As another example, suppose the two men to bear off are both on the six point. Then if two different numbers are rolled, White can’t come off in one turn. Of the six doubles, only 3-3 or higher works. This gives four ways in 36, or 11%, in agreement with Tables 2 and 3. This simple counting method produces all the numbers in Table 1.
Now we are ready to answer question 2. Should White double in Diagram 1? The answer is yes, and here’s why. We have seen that White wins, on average, 19 times in 36. If we say the stake is one unit, then if he does not double, in 36 times he wins one unit 19 times and loses 1 unit 17 times for a gain of two units/36 times = 1/18 = 0.0555. If White does double, Black can either accept or fold. Suppose Black accepts. Then the stakes are two units and a calculation like the previous one shows White gains an average of four units/36 times = 1/9 = 0.1111 units per time. White gains twice as much by doubling as by not doubling. If Black folds instead, then White wins one unit at once, which is even better.
This also answers the rest of the questions. In answer to question 3, White gains an extra 5.55% of a unit, on average, by doubling. In answer to question 4, Black should accept. He loses 1/9 unit on average by accepting and one unit for sure by folding. This answers question 5: if Black makes the error of folding, he loses an extra 8/9 unit or 89%.
The usefulness of Table 2 is generally limited to situations where you have just one or two rolls left before the game ends. But it is surprising how often the Table is valuable. Here are some more examples to help alert you to these situations. In Diagram 2, Black has the doubling cube. White has just rolled 2-1. How does he play it?
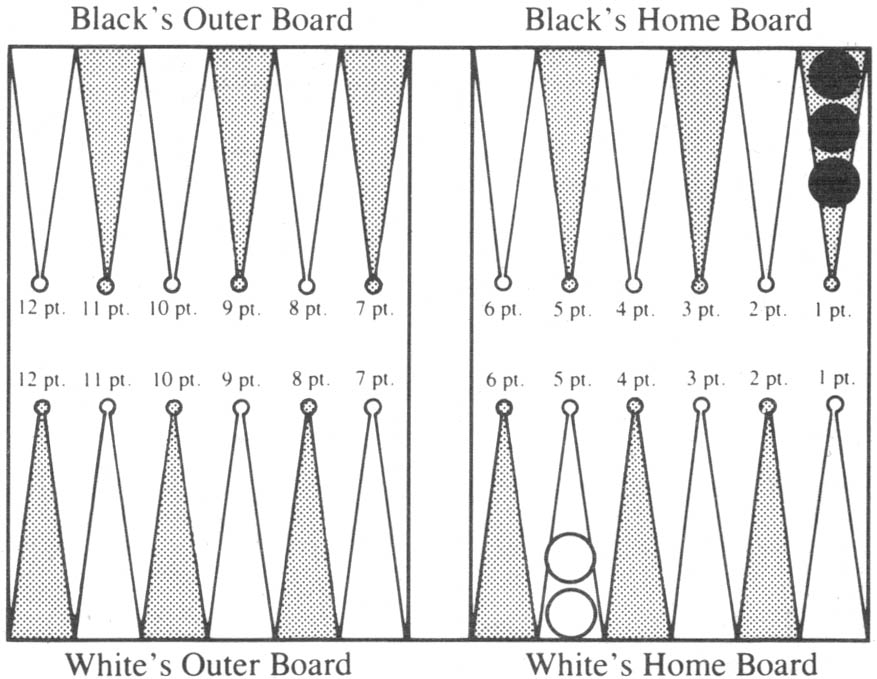
Diagram 2. White to play 2-1. Black owns the cube.
If Black rolls doubles on the next turn, he wins at once and it won’t matter what White did. So White only needs to consider the case where Black does not roll doubles. Then White will have one more turn, and he wants to leave himself with the greatest chance to bear off on that turn. White can move one man from the 5 point to the 4 point and one man from the 5 point to the 3 point. By Table 2, this gives him a 47% chance to win if Black does not roll doubles. Or, White can move one man from the 5 point to the 2 point, leaving the other man on the 5 point. This gives him a 53% chance to win if Black does not roll doubles, so this is the best way to play the 2-1.
In Diagram 3, White’s problem is to avoid a backgammon: if Black wins before the White men escape from Black’s home board, Black will win 3 units. Otherwise, he will only gammon White for two units.
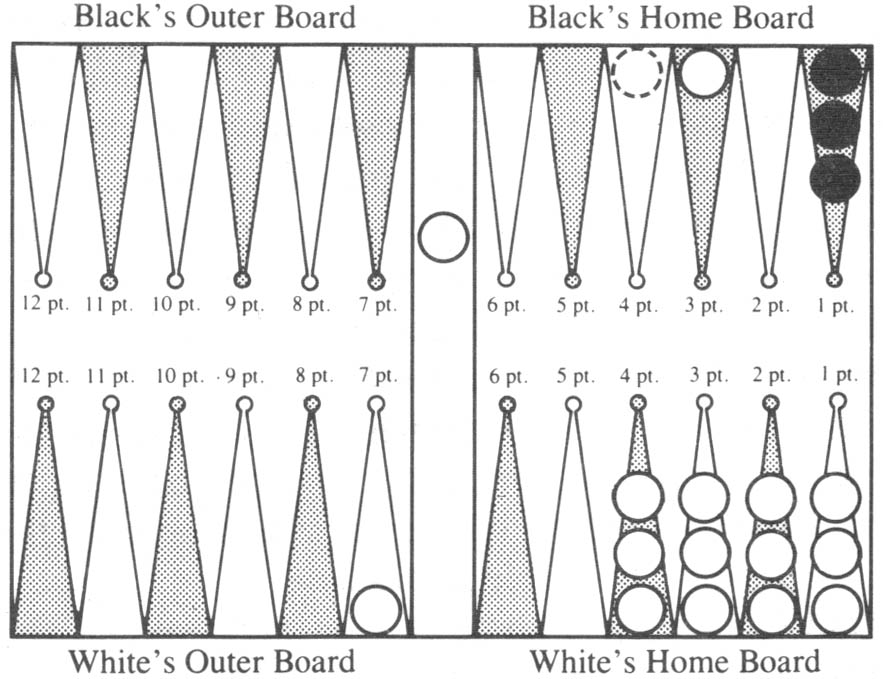
Diagram 3. White (with a man on the bar) to play 4-1.
White has just rolled 4-1. He must use the 4 to move the man on the bar to the Black 4 point (dotted circle). White can then move this man on to the Black 5 point, in which case, if Black does not roll doubles, White’s situation on his last turn is shown in Diagram 3a.
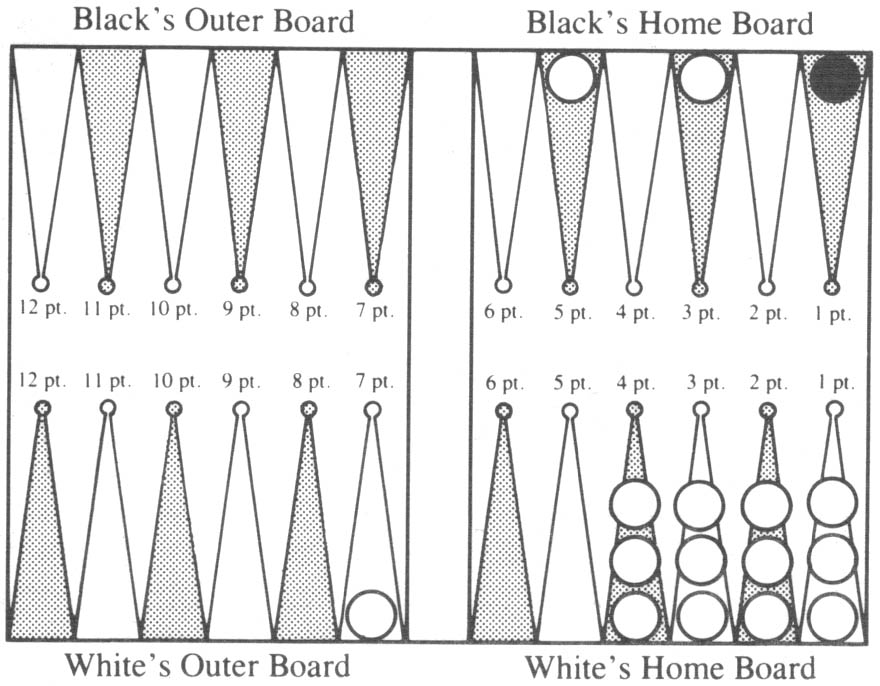
Diagram 3a. After playing bar/20.
The chance for White to remove both men from Black’s home board on the next roll is the same as the chance to bear off both men when one is on the 4 point and the other is on the 2 point. According to Table 2, this is 64%.
Suppose instead White plays both men to the Black 4 point. Then Diagram 3b shows the board if he survives Black’s next roll.
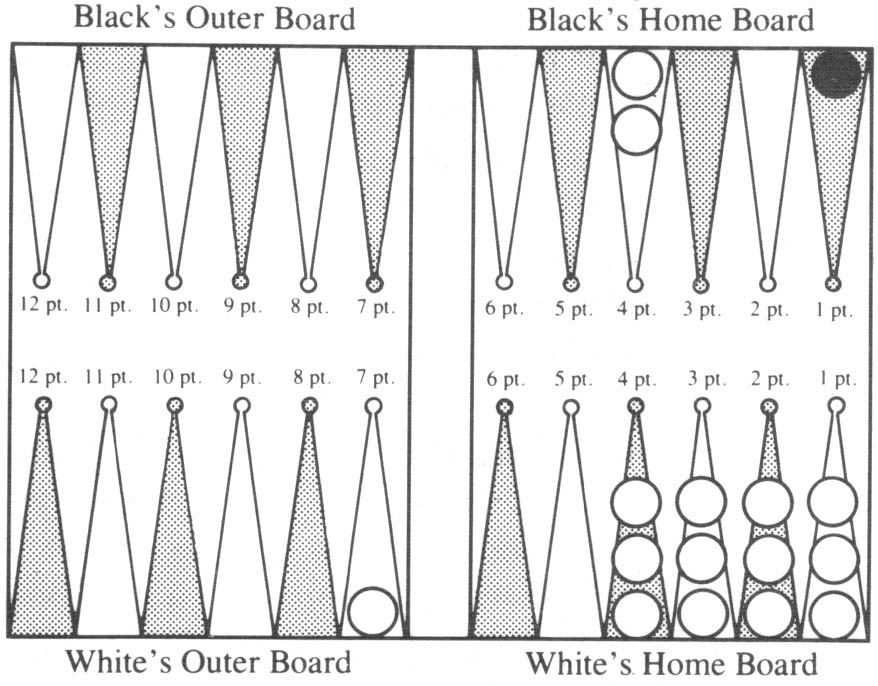
Diagram 3b. After playing bar/21, 22/21.
His chance to save himself from backgammon is the same as bearing off two men from the 3 point in one roll. Table 2 gives 47%. Therefore, the play in Diagram 3a is best.
If instead White rolled 4-2 in Diagram 3, he could enter on 2 and move his other man to the 7 point, giving an 86% chance (Table 2, man on 5 point and man on 0 point) to escape Black’s home board on the next roll. Or he could play to leave his two back men on the Black 5 and 4 points. This gives only a 69% chance and is the inferior choice.
An outstanding reference work is Backgammon by Paul Magriel, The New York Times Publishing Company, 1977, $20. Most of Table 1 appears there on page 404. A convenient reference for practical play is the “Backgammon Calculator,” Doubleday, 1974, $1.95. This handy cardboard wheel has most of Table 2 on the back.
Here are some questions to check your understanding. Refer to Diagram 2, assuming Black has the doubling cube and White has just rolled 2-1.
We solved this same problem earlier when discussing Diagram 2. We saw then from Table 2 that leaving men on 5 and 2 is best because it gives White a 53% chance to get off on the next turn, whereas leaving men on 4 and 3 gives only a 47% chance. Now consider the general question: If you have to leave one or two men after your turn, what is the best “leave”? Assuming that the positions between which you must choose have the same pip count, the correct rules, which Sheinwold gives, is:
|
Rules for Leaving One or Two Men
|
It is easy to prove these rules correct by using Table 2. This is shown again here in condensed form as Table 4.
Table 4. Chances to bear off one or two men with one roll.
| a man on the |
1 pt | 2 pt | 3 pt | 4 pt | 5 pt | 6 pt |
| 0 pt | 100% 1 pip |
100% 2 pips |
100% 3 pips |
94% 4 pips |
86% 5 pips |
75% 6 pips |
| 1 pt | 100% 2 pips |
100% 3 pips |
94% 4 pips |
81% 5 pips |
64% 6 pips |
42% 7 pips |
| 2 pt | 72% 4 pips |
69% 5 pips |
64% 6 pips |
53% 7 pips |
36% 8 pips |
|
| 3 pt | 47% 6 pips |
47% 7 pips |
39% 8 pips |
28% 9 pips |
||
| 4 pt | 31% 8 pips |
28% 9 pips |
22% 10 pips |
|||
| 5 pt | 17% 10 pips |
17% 11 pips |
||||
| 6 pt | 11% 12 pips |
|||||
To check the rules, we simply check Table 4 for each pip count to see if it always tells us which of two “leaves” to pick. For example, with a pip count of 6, part (1) of the rule says correctly that 0-pt/6-pt is best. Then (2) says correctly that among the three remaining two-men positions, 3-pt/3-pt is worst. In a similar way the rule is verified in turn for positions with pip counts of 4, 5, 6, 7, 8, and 10. There’s nothing to check for pip counts of 2, 3, and 9 because the choices are equally good for these pip counts. There’s nothing to check for counts of 1, 11, and 12 because for these pip counts there is only one choice of position.
More examples illustrating the rule appear in 75 Challenging Test Situations by Nicolaos and Vassilios Tzannes, Simon and Shuster, 1974. You can use these rules to solve at once test situations 40, 41, 42, and 43. The authors give a rule (page 94) but it is neither as clear nor as simple as ours.
We proved the rule for leaving one or two men just for the case where you will have at most one more turn to play. In that case, the percentages in Table 4 let us compare two positions to see which is better. What if there is a chance that you’ll have more than one turn? This could happen, for instance, if we change Diagram 4 so that Black has five men on the one point instead of four. Then Black could roll non-doubles on his next turn, leaving three men on the 1 point; White could roll 1-2 on his next turn, reducing his 5-pt/2-pt position to one man on the 4 point; Black could roll non-doubles again, leaving one man on the 1 point; and White then gets a second turn. It turns out that the rule gives the best choice against all possible positions of the opponent, not just those where you will have at most one more turn to play. (Note: There is one possible, unimportant exception that might arise, but the error is at most a small fraction of a percent.)
We will label home board positions as follows: 5+3 where there is a man on the 5 point and a man on the 3 point, with the largest number first. With both men on, say, the 4 point, we call the position 4+4. With only one man on the 5-point we write 5+0. Think of the 0 as indicating that the second man is on the 0 = “off” point.
There are six home board positions with one man, namely 1+0, 2+0, . . ., 6+0. There are 21 home board positions with two men. Thus there are 27 one- or two-man positions for each player.
(In general, there are exactly (5 + r)!/5!r! home board positions with exactly r men. There are exactly (6 + r)!/6!r! − 1 home board positions with from one to r men. Thus, since r = 15 is possible in the actual game, there are a total of 21!/6!15! − 1 = 54,263 different home board positions for one player. The symbol r!, read “r factorial,” means 1 × 2 × 3 × . . . × r. Thus 1! = 1, 2! = 2, 3! = 6, 4! = 24, etc.)
Table 5 gives the first part of our solution. It tells Player One’s “expectation,” rounded to the nearest percent, if One has the move and Two owns the cube. By One’s expectation we mean the average number of units One can expect to win if the current stake is “one unit” and if both players follow the best strategy. Of course, if a player doesn’t follow the best strategy, his opponent can expect, on average, to do better than Table 5 indicates.
Table 5. Two-man vs. two-man expectation for Player One (%) when Player Two owns the cube.
| One has |
Two has | |||||||||||||||
| A, C 6+0 |
2+2 | 3+2 | 4+2 5+1 |
5+2 | 3+3 4+3 |
6+1 | 5+3 | 6+2 | 4+4 | 6+3 | 5+4 | 6+4 | 5+5 | 6+5 | 6+6 | |
| 2+1, A | 100 | 100 | 100 | 100 | 100 | 100 | 100 | 100 | 100 | 100 | 100 | 100 | 100 | 100 | 100 | 100 |
| 3+1, 4+0 | 89 | 90 | 90 | 91 | 94 | 95 | 95 | 96 | 96 | 97 | 97 | 97 | 98 | 98 | 98 | 99 |
| 5+0 | 72 | 74 | 75 | 78 | 85 | 87 | 88 | 89 | 90 | 92 | 92 | 92 | 94 | 95 | 95 | 97 |
| 4+1 | 61 | 63 | 65 | 70 | 78 | 82 | 84 | 85 | 86 | 88 | 89 | 89 | 91 | 94 | 94 | 96 |
| 6+0 | 50 | 53 | 56 | 61 | 72 | 76 | 79 | 81 | 82 | 85 | 86 | 86 | 89 | 92 | 92 | 94 |
| 2+2 | 44 | 48 | 51 | 57 | 69 | 74 | 77 | 78 | 80 | 83 | 85 | 85 | 88 | 91 | 91 | 94 |
| 3+2 | 39 | 42 | 46 | 52 | 66 | 71 | 75 | 76 | 78 | 81 | 83 | 83 | 86 | 90 | 90 | 93 |
| 4+2, 5+1 | 28 | 32 | 36 | 44 | 60 | 66 | 70 | 72 | 74 | 78 | 80 | 80 | 84 | 88 | 88 | 92 |
| 5+2 | 6 | 11 | 16 | 27 | 48 | 55 | 60 | 63 | 66 | 71 | 73 | 73 | 79 | 84 | 84 | 89 |
| 3+3 | −6 | 0 | 6 | 18 | 41 | 50 | 56 | 59 | 62 | 68 | 71 | 71 | 77 | 82 | 82 | 88 |
| 4+3 | −6 | 0 | 6 | 18 | 41 | 50 | 56 | 59 | 61 | 67 | 70 | 70 | 76 | 82 | 82 | 88 |
| 6+1 | −17 | −10 | −4 | 9 | 35 | 45 | 51 | 54 | 57 | 64 | 67 | 67 | 74 | 80 | 80 | 87 |
| 5+3 | −22 | −15 | −9 | 5 | 32 | 41 | 48 | 51 | 54 | 61 | 64 | 64 | 71 | 78 | 78 | 85 |
| 6+2 | −28 | −21 | −14 | 1 | 29 | 38 | 45 | 49 | 52 | 59 | 63 | 63 | 70 | 77 | 77 | 84 |
| 4+4 | −39 | −31 | −23 | −8 | 22 | 33 | 40 | 44 | 48 | 55 | 59 | 59 | 67 | 74 | 75 | 82 |
| 6+3 | −44 | −36 | −28 | −12 | 18 | 28 | 36 | 40 | 44 | 51 | 55 | 55 | 63 | 71 | 71 | 79 |
| 5+4 | −44 | −37 | −30 | −14 | 17 | 28 | 35 | 39 | 43 | 51 | 54 | 55 | 62 | 70 | 70 | 78 |
| 6+4 | −56 | −48 | −40 | −23 | 6 | 17 | 25 | 29 | 33 | 42 | 46 | 46 | 55 | 63 | 63 | 72 |
| 5+5 | −67 | −59 | −51 | −35 | −2 | 10 | 19 | 24 | 28 | 37 | 41 | 42 | 51 | 59 | 60 | 70 |
| 6+5 | −67 | −59 | −51 | −36 | −7 | 3 | 11 | 15 | 19 | 28 | 32 | 33 | 43 | 51 | 53 | 63 |
| 6+6 | −78 | −71 | −64 | −50 | −25 | −17 | −9 | −5 | −1 | 7 | 12 | 12 | 23 | 32 | 36 | 48 |
|
“A” includes 1+0, 2+0, 1+1, 3+0, and 2+1. “C” includes 4+0, 3+1, 5+0, and 4+1. |
The A above 6+0 means this column also applies to any count of up to 3 pips: 1+0, 2+0, 1+1, 3+0, or 2+1. The C above 6+0 means that this column also applies to 4+0, 3+1, 5+0, or 4+1. The A for Player One means the same as for Player Two.
We will illustrate the use of the table with Diagram 5.
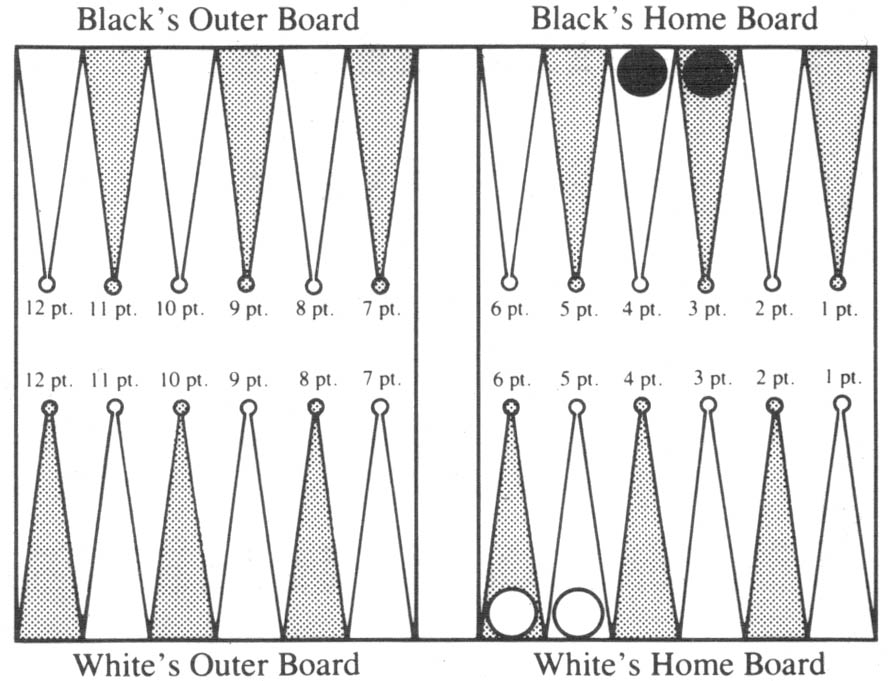
Diagram 5. White to roll. Black owns the cube.
It is White’s turn to move so he becomes Player One. Player Two, or Black, has the cube. We look along the row 6+5 and the column 4+3. Table 5 shows Player One’s (White’s) expectation as 3, so White has a 3% advantage. He expects to win on average 3% (more exactly, 2.54%) of the current stake. If the current stake is $1,000, White should accept a Black offer to “settle” the game if Black offers more than 25.40. If black offers less, White should refuse.
Table 6 gives the expected gain or loss (to the nearest percent) for Player One when he has the move and the doubling cube is in the middle.
Table 6. Two-man vs. two-man expectation for Player One (%) when the cube is in the middle.
| One has |
Two has | |||||||||||||||
| A, C 6+0 |
2+2 | 3+2 | 4+2 5+1 |
5+2 | 3+3 4+3 |
6+1 | 5+3 | 6+2 | 4+4 | 6+3 | 5+4 | 6+4 | 5+5 | 6+5 | 6+6 | |
| 6+0, A, C | 100 | 100 | 100 | 100 | 100 | 100 | 100 | 100 | 100 | 100 | 100 | 100 | 100 | 100 | 100 | 100 |
| 2+2 | 89 | 95 | 100 | 100 | 100 | 100 | 100 | 100 | 100 | 100 | 100 | 100 | 100 | 100 | 100 | 100 |
| 3+2 | 78 | 85 | 91 | 100 | 100 | 100 | 100 | 100 | 100 | 100 | 100 | 100 | 100 | 100 | 100 | 100 |
| 4+2, 5+1 | 56 | 64 | 72 | 88 | 100 | 100 | 100 | 100 | 100 | 100 | 100 | 100 | 100 | 100 | 100 | 100 |
| 5+2 | 11 | 22 | 32 | 53 | 95 | 100 | 100 | 100 | 100 | 100 | 100 | 100 | 100 | 100 | 100 | 100 |
| 3+3, 4+3 | −6 | 1 | 12 | 36 | 83 | 100 | 100 | 100 | 100 | 100 | 100 | 100 | 100 | 100 | 100 | 100 |
| 6+1 | −17 | −10 | −4 | 19 | 70 | 89 | 100 | 100 | 100 | 100 | 100 | 100 | 100 | 100 | 100 | 100 |
| 5+3 | −22 | −15 | −9 | 10 | 63 | 82 | 95 | 100 | 100 | 100 | 100 | 100 | 100 | 100 | 100 | 100 |
| 6+2 | −28 | −21 | −14 | 1 | 57 | 77 | 91 | 98 | 100 | 100 | 100 | 100 | 100 | 100 | 100 | 100 |
| 4+4 | −39 | −31 | −23 | −8 | 44 | 66 | 81 | 88 | 96 | 100 | 100 | 100 | 100 | 100 | 100 | 100 |
| 6+3 | −44 | −36 | −28 | −12 | 36 | 57 | 72 | 80 | 88 | 100 | 100 | 100 | 100 | 100 | 100 | 100 |
| 5+4 | −44 | −37 | −30 | −14 | 34 | 55 | 71 | 78 | 86 | 100 | 100 | 100 | 100 | 100 | 100 | 100 |
| 6+4 | −56 | −48 | −40 | −23 | 13 | 34 | 50 | 58 | 67 | 83 | 91 | 92 | 100 | 100 | 100 | 100 |
| 5+5 | −67 | −59 | −51 | −35 | −1 | 21 | 39 | 47 | 56 | 74 | 83 | 83 | 100 | 100 | 100 | 100 |
| 6+5 | −67 | −59 | −51 | −36 | −5 | 8 | 21 | 30 | 38 | 56 | 65 | 66 | 86 | 100 | 100 | 100 |
| 6+6 | −78 | −71 | −64 | −50 | −22 | −10 | −2 | 3 | 7 | 16 | 24 | 25 | 46 | 65 | 71 | 96 |
|
“A” includes 1+0, 2+0, 1+1, 3+0, and 2+1. “C” includes 4+0, 3+1, 5+0, and 4+1. |
Unlike Table 5, in this case One has the option of doubling before he moves. If One does not double, Two will be able to double on his turn. If One doubles, Two then has the choice of accepting the double or folding. If Two accepts, play continues with doubled stakes and Two gets the cube. If Two folds, he loses the current (undoubled) stakes and the game ends.
Table 7 gives the expected gain or loss for Player One when he has the move and the doubling cube. The columns for 6+4, 5+5, 6+5, and 6+6 are the same as for Table 6 so they have been omitted.
Table 7. Two-man vs. two-man expectation for Player One (%), Player One owns the cube.
| One has |
Two has | |||||||||||||||
| A 2+1 |
3+1 4+0 |
5+0 | 4+1 | 6+0 | 2+2 | 3+2 | 4+2 5+1 |
5+2 | 3+3 4+3 |
6+1 | 5+3 | 6+2 | 4+4 | 6+3 | 5+4 | |
| 6+0, A, C | 100 | 100 | 100 | 100 | 100 | 100 | 100 | 100 | 100 | 100 | 100 | 100 | 100 | 100 | 100 | 100 |
| 2+2 | 89 | 89 | 89 | 89 | 89 | 95 | 100 | 100 | 100 | 100 | 100 | 100 | 100 | 100 | 100 | 100 |
| 3+2 | 78 | 78 | 78 | 78 | 78 | 85 | 91 | 100 | 100 | 100 | 100 | 100 | 100 | 100 | 100 | 100 |
| 4+2, 5+1 | 56 | 56 | 56 | 56 | 56 | 64 | 72 | 88 | 100 | 100 | 100 | 100 | 100 | 100 | 100 | 100 |
| 5+2 | 11 | 11 | 19 | 24 | 29 | 32 | 34 | 53 | 95 | 100 | 100 | 100 | 100 | 100 | 100 | 100 |
| 3+3, 4+3 | −6 | 0 | 9 | 15 | 21 | 24 | 27 | 36 | 83 | 100 | 100 | 100 | 100 | 100 | 100 | 100 |
| 6+1 | −17 | −10 | −0 | 6 | 13 | 16 | 19 | 25 | 70 | 89 | 100 | 100 | 100 | 100 | 100 | 100 |
| 5+3 | −22 | −15 | −5 | 2 | 8 | 12 | 15 | 22 | 63 | 82 | 95 | 100 | 100 | 100 | 100 | 100 |
| 6+2 | −28 | −21 | −10 | −3 | 4 | 8 | 11 | 18 | 57 | 77 | 91 | 98 | 100 | 100 | 100 | 100 |
| 4+4 | −39 | −31 | −20 | −12 | −4 | −0 | 4 | 11 | 44 | 66 | 81 | 88 | 96 | 100 | 100 | 100 |
| 6+3 | −44 | −36 | −24 | −16 | −8 | −4 | 0 | 8 | 36 | 57 | 72 | 80 | 88 | 100 | 100 | 100 |
| 5+4 | −44 | −37 | −25 | −17 | −9 | −5 | −1 | 7 | 34 | 55 | 71 | 78 | 86 | 100 | 100 | 100 |
| 6+4 | −56 | −47 | −35 | −26 | −18 | −14 | −10 | −1 | 16 | 34 | 50 | 58 | 67 | 83 | 91 | 92 |
| 5+5 | −67 | −58 | −45 | −36 | −27 | −23 | −18 | −10 | 8 | 21 | 39 | 47 | 56 | 74 | 83 | 83 |
| 6+5 | −67 | −58 | −45 | −37 | −29 | −24 | −20 | −12 | 5 | 14 | 22 | 30 | 38 | 56 | 65 | 66 |
| 6+6 | −78 | −70 | −57 | −49 | −41 | −37 | −33 | −25 | −8 | 0 | 8 | 13 | 17 | 25 | 30 | 30 |
|
“A” includes 1+0, 2+0, 1+1, 3+0, and 2+1. “C” includes 4+0, 3+1, 5+0, and 4+1. |
In this case, One has the option of doubling before he moves. However, in contrast to Table 6, if One does not double, he keeps the cube so Two cannot double on his next turn. If One does double, Two can accept or fold. If he accepts, the stakes are doubled, play continues, and Two gets the cube. If instead Two folds, he loses the current (undoubled) stake and the game ends.
Table 8 tells whether One should double and whether Two should accept when One owns the cube or the cube is in the middle.
Table 8. Two-man vs. two-man cube action with Player One to roll.
| One has |
Two has | ||||||||||||||||
| A 2+1 |
3+1 4+0 |
4+1 5+0 |
6+0 | 2+2 | 3+2 | 4+2 5+1 |
5+2 | 3+3 4+3 |
6+1 | 5+3 | 6+2 | 4+4 | 5+4 6+3 |
6+4 | 5+5 | 6+5 6+6 |
|
| 2+1, A | |||||||||||||||||
| 3+1, 4+0 | |||||||||||||||||
| 4+1, 5+0 | One should double Two should fold |
||||||||||||||||
| 6+0 | May accept or fold | ||||||||||||||||
| 2+2 | |||||||||||||||||
| 3+2 | One should double Two should accept |
||||||||||||||||
| 4+2, 5+1 | |||||||||||||||||
| 5+2 | JP | JP | |||||||||||||||
| 3+3 | |||||||||||||||||
| 4+3 | |||||||||||||||||
| 6+1 | |||||||||||||||||
| 5+3 | |||||||||||||||||
| 6+2 | |||||||||||||||||
| 4+4 | One should not double Two should accept |
||||||||||||||||
| 5+4, 6+3 | |||||||||||||||||
| 6+4 | |||||||||||||||||
| 5+5 | |||||||||||||||||
| 6+5 | |||||||||||||||||
| 6+6 | |||||||||||||||||
| “A” includes 1+0, 2+0, 1+1, 3+0, and 2+1. | ||
|
| = Player One should double only if the cube is in the middle. | |
| JP = Jacoby Paradox (see this section) | ||
Doubling strategy is the same whether One has the cube or it is in the middle except for the regions shaded in brown. In those situations, One should double only if the cube is in the middle (and Two should accept the double).
I earlier referred to a book entitled How Good Are You at Backgammon: 75 Challenging Test Situations by Nicolaos and Vassilios Tzannes, Simon and Shuster, 1974. Consider first Situation 74 from the Tzannes’ book. This is shown in Diagram 6.
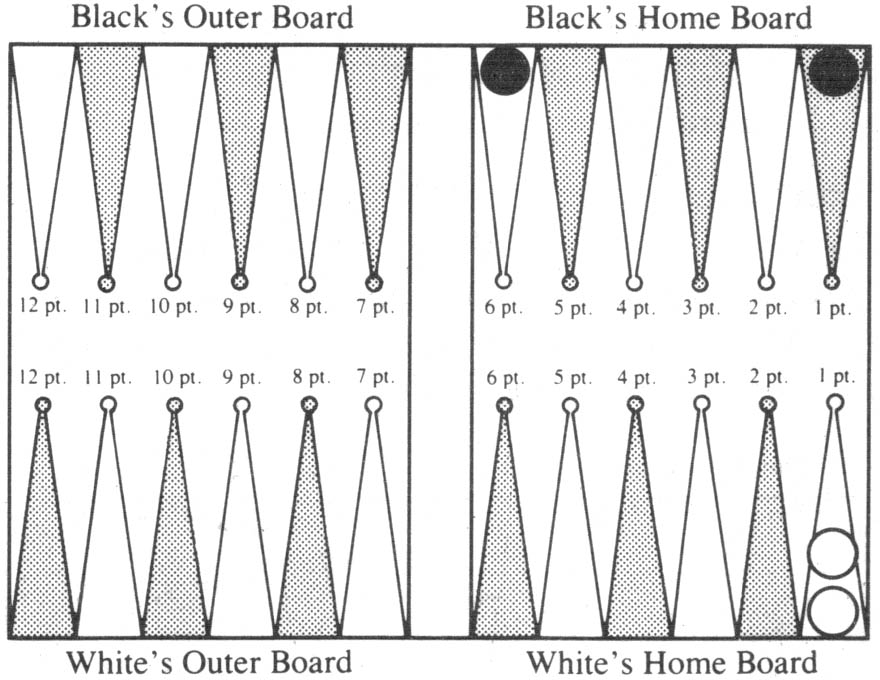
Diagram 6. Black to roll. Cube is in the middle. Cube action?
It is Black’s turn so he is Player One. Black doubles. Should he? If he does, should White accept? The cube is in the middle. We look in Table 8, row 6+1, column 1+1. Black should not double. If he does, White should accept. (This is correctly recommended by Tzannes’ book.) Table 6 shows that Black’s expectation under best play, which means not doubling, is −17%. If instead Black has the cube, we use Tables 7 and 8. In this example we get exactly the same answer. This isn’t always the case, though, as we will see.
This example is also easy to analyze directly. If Black bears off in his next turn he will win. The chances are 15/36 (Table 1). If he does not bear off at once, White will win and Black will lose. So if the current stake is 1 unit, and Black does not double, Black’s expected gain is +1 unit × 15/36 − 1 unit × 21/36 = −6/36 = − 162/3%. Now suppose Black doubles and White accepts. Then Black’s expected gain is +2 units × 15/36 − 2 units × 21/36 = −12/36 = −33%. On average Black will lose an extra 162/3% of a unit if he makes the mistake of doubling and White accepts.
It’s easy to see from this type of reasoning that if Player One has any two-man position and Player Two will bear off on the next turn, then Player One should not double (if he can) when his chance to bear off in one roll is less than 50%. If his chance to bear off is more than 50%, he should double. Referring to the same Table 1 proves this rule which the Tzannes cite for these special situations:
|
With double three, six-one, six-two (or anything worse), Keep dumb, hope for the best. Anything better, don’t delay, Double the stakes with zest. |
The Tzannes’ Situation 73 is similar.
Here is a trickier situation that I don’t think you could figure out without help from the tables. Suppose White has 6+6, Black has 4+4, White is to roll and the doubling cube is in the middle. This is shown in Diagram 7. Should White double? How does the game proceed for various rolls?
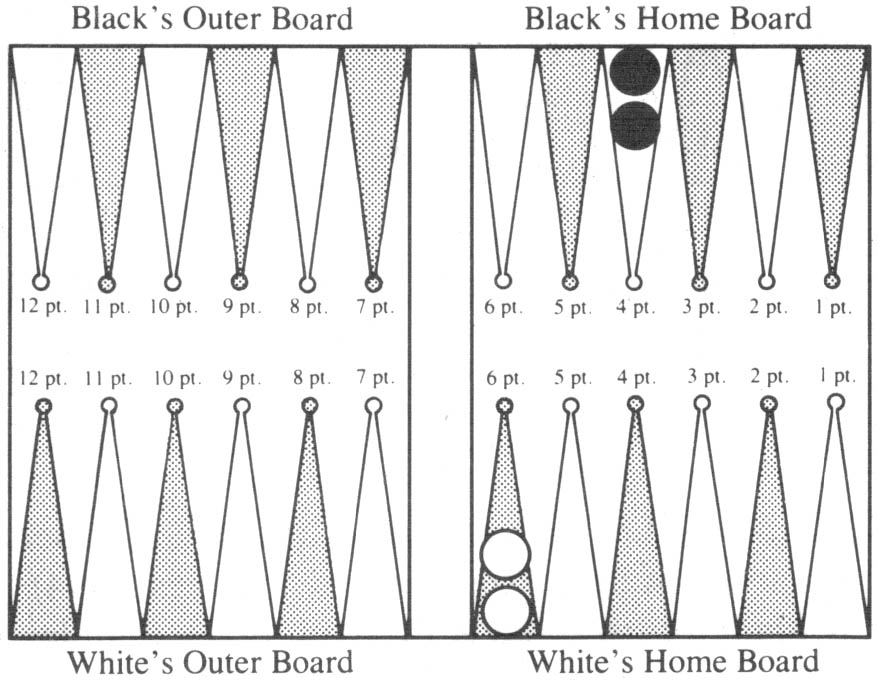
Diagram 7. White to roll. Cube is in the middle. Cube action?
White is Player One. He consults Table 6 and sees his expectation is 16%. But Table 8 tells White not to double. We now show how to use that table to play optimally for a sample series of rolls. Suppose White rolls 3-1. How does he play it? He can end up with 6+2 or with 5+3.
The rule stated earlier says that 5+3 looks better because it gives him a greater chance to bear off on the next turn. This is proven by the tables as follows: after White plays, it will be Black’s turn. Black will be Player One with 4+4, White will be Player Two with either 5+3 or 6+2. The cube will be in the middle. Which is best for White? Consult Table 6. We find Player One (Black) has an expectation of 88% if White has 5+3 whereas Black has 96% if White has 6+2. White wants to keep Black’s expectation down so he plays to leave 5+3.
The situation after White makes this move is shown in Diagram 8.
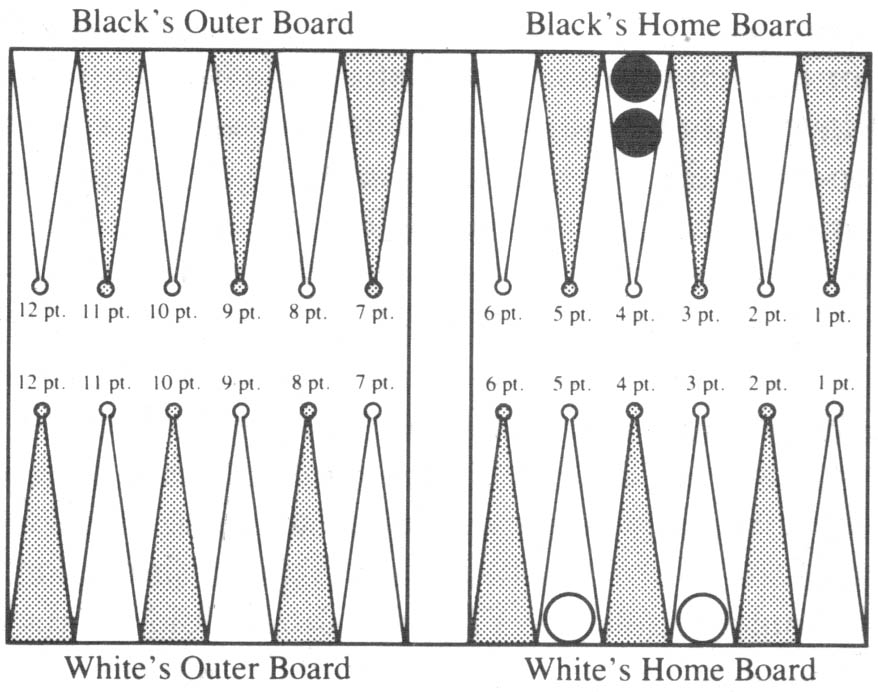
Diagram 8. Black to roll. Cube is in the middle. Cube action?
Black is to roll and the cube is in the middle. Should Black double? Should White accept? Table 8 says Black should double and White should accept. Table 6 says Black’s expected gain is 88% of the one-unit stake.
Next Black rolls 2-1. He can leave 4+1 or 3+2. The rule mentioned says 4+1 is better. To confirm this, note that after Black moves, White will be Player One with 5+3, Black will be Player Two with either 4+1 or 3+2 and White will have the cube. Therefore we consult Table 7, not Table 6. If Black leaves 4+1, White’s expectation is 2% of the current two-unit stake. If Black leaves 3+2, White’s expectation is 15%. Therefore Black leaves 4+1.
It is now White’s turn. The situation is shown in Diagram 9.
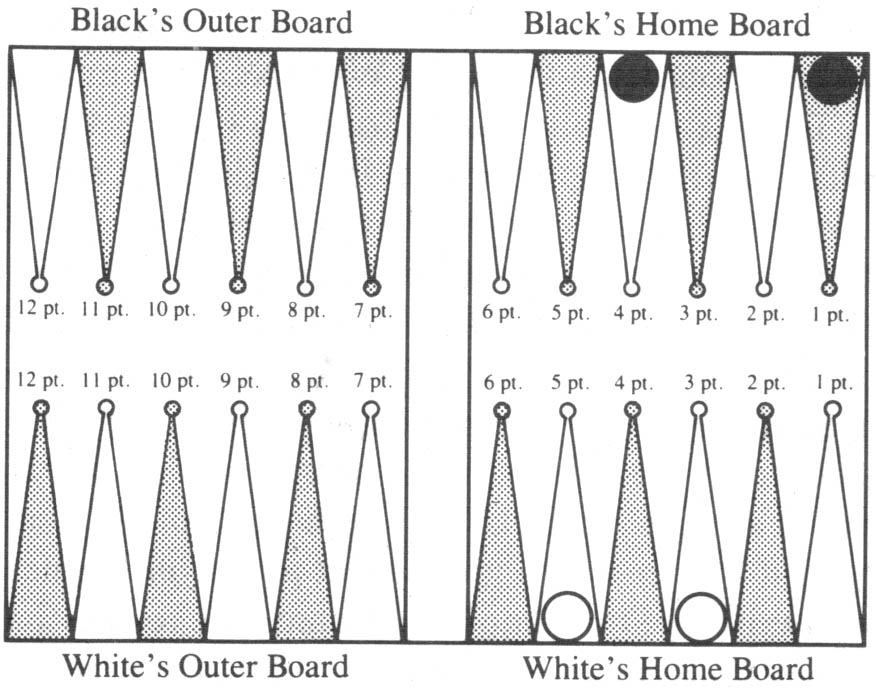
Diagram 9. White to roll. White owns the cube. Cube action?
The stake is 2 units, White’s expectation is 2% of 2 units or 0.04 unit and White has the cube. What should he do? Table 8 tells us White should not double.
White now rolls 5-2, leaving 1+0. Black does not have the cube. Table 5 gives his expectation as 61% of 2 units or 1.22 units. He wins or loses on this next roll.
Sometimes two or even all of the expectations are the same. For instance, if Player One has 6+6 and Player Two has 6+5, Player One’s expectation is 71% if he has the cube or if it’s in the middle. If Player Two has the cube Player One’s expectation drops to 36%.
Examination of the doubling strategies in Table 8 shows that the positions where Player One should double and Player Two should fold are the same whether Player One has the cube or the cube is in the middle. Although this happens for the two-man end positions we are analyzing here, it is not always true in backgammon. The positions where Player One should double and it doesn’t matter if Player Two accepts or folds also are the same in Table 8. But some of the positions where Player One should double and Player Two should accept are different. If Player One has the cube, Table 8 shows that he should be more conservative. Intuitively, this is because if he has the cube and does not double, he prevents Player Two from doubling, whereas if the cube is in the middle, Player Two cannot be prevented from doubling.
Wrong! The only correct answer, from Table 8 is: double 1+0 but don’t double 6+0. Try this on your expert friends. They will almost always be wrong. If they do get it right they probably were either “lucky” or read this article. In that case if you ask them to explain why their answer is correct, they probably won’t be able to.
You may think that the loss would be slight by doubling 6+0 erroneously. But you have an expected gain of 29% by not doubling (Table 7) whereas by doubling it can be shown that your expectation drops to only 11%.
The exact explanation is complex. The basic idea, though, is that if Player One doesn’t win at once, Player Two can use the cube against Player One with great effect at Player Two’s next turn.
Jacoby and Crawford discuss what is essentially the same example (they give Player Two 4+1 instead of 6+0) on pages 116–117 of their excellent The Backgammon Book, Viking Press, New York, 1970. Table 8 shows that essentially the same situation occurs when Player One has 5+2 and Player Two has 4+1, 5+0, 6+0, 2+2, or 3+2 and for no other two-man end positions.
The backgammon board is divided into two rectangles by the bar. Each side of the board contains six points of alternating colors. The game is played with light and dark pieces called stones, with the light color designated “White” and the darker color “Black.” Each player has fifteen stones.
The stones are initially arranged as shown in the diagram above. In this case, the Black player would be seated at the bottom of the board, while White would be at the top. The points are numbered on the diagram for the sake of clarity; no numbers appear on an actual backgammon board. The six points in the upper right hand corner constitute Black’s inner table. The six points at the lower right are White’s inner table. The object of the game is to move your stones around the board until they are all in your inner table. In this case, White would move his stones counterclockwise and Black would progress clockwise. Once your stones are all in your inner table, you begin to bear them off, and the first player to remove all of his stones from the board wins the game.
Backgammon is played with two dice, which are shaken in and rolled from a cup. To begin play, each player rolls one die, and the high roll gets the first turn. The first move is determined by the two numbers which the opponents rolled. From then on, each player rolls two dice when it is his turn to move. The two numbers rolled dictate the players’ moves as follows. Suppose the numbers on the dice are 5 and 3. The player may (a) move one stone five points and then three more, (b) move one stone three points then five more, or © move one stone five points and another stone three. When a double number is rolled, the player may make four moves. A roll of 3-3 would allow moving one stone 12 points, four stones 3 points each, or any other pattern involving groups of three.
When moving his stones around the board, no player may land on a point occupied by two or more opposing stones. Such a point is considered made by the opponent and often interferes with the way in which a player intended to take his turn. On the other hand, a point occupied by a single stone is a blot. This point is vulnerable to being hit by an opposing stone that lands on it. When a stone is hit, it is sent off the board and onto the bar, where it must remain until it can be entered on the opponent’s inner table. The player whose stone has been hit is forbidden to make any other moves until he has entered his stone from the bar.
In order to enter, the player must roll a number which allows him to move to a point on his opponent’s inner table which is not made. For example, say White has hit one of Black’s blots, sending it to the bar. White has made points 3, 5, and 6 on his inner table. In this situation, Black must roll a 1, 2, or 4 in order to enter his stone.
Once a player has succeeded in moving all fifteen of his stones into his inner table, he may begin bearing off. This consists of removing stones from the points and off the board according to the numbers rolled. For example, a roll of 3-4 means that a player may remove stones from positions 3 and 4. If he has no stones on one or both of these points, he bears off from the next lowest point. The “race” to bear off continues until one player has taken all his stones off the board. He, of course, is the winner.
A player is credited with having won a double game, or a gammon, if he bears off all his stones before his opponent has borne off any. If a player wins a game while his opponent still has a stone on the winner’s inner table or on the bar, he has made a backgammon and wins triple the stakes.
If you play backgammon for money, a doubling cube is used. This cube bears the numbers 2, 4, 8, 16, 32, and 64. At any point during the game, one player may double the stakes. His opponent must either accept the double or forfeit the game. If he accepts, the opponent gains possession of the cube and may “turn the cube” back at his opponent whenever he feels he has the upper hand in the game. It’s not hard to see that high stakes games can result very easily from a game in which the lead changes hands frequently.
![]()
|
| Articles by Edward O. Thorp |
|
| Articles on cube handling in races |
|
| "Curing Your Short Bearoff Blues," by Bob Koca, 2007. (Rules for memorizing Table 8.) |
|
Return to: Backgammon Galore |
|