 Today we'll start to look at some problems from the recent Party Gammon Millions tournament in the Bahamas. With a field that included most of the world's best players, the tournament was exceptionally hard-fought. Every round featured multiple matchups between top-rated pros, of the sort that would be the highlight of any normal tournament. With so much high-level backgammon being played, there was no shortage of exceptionally interesting positions being generated for future study.
For the next few columns, we'll look at some positions from the Consolation semi-final match between Kent Goulding of the U.S.A. and Lars Traboldt of Denmark. Kent has been a fixture on the American backgammon scene for the last four decades, and has had particular success in the Bahamas, winning the Tournament of Champions on Paradise Island in the 1970s, the North American Championship in the 1980s, and the Bahamas Pro-Am in the 1990s. Lars Traboldt is considered one of the top four or five Danish players, with many successes on the European scene.
Consider the following position from early in their match:
|
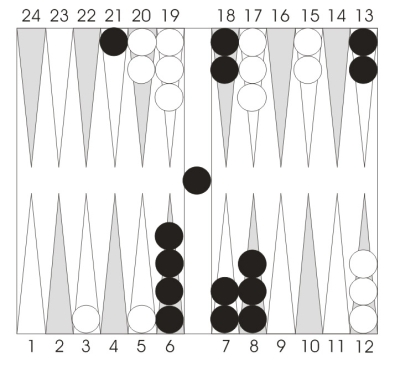
Position 1.
Black to play 4-4.
|
The first four is easy of course. Black will enter bar/21, then look around for three more fours. With White's two blots and so many checkers in the attacking zone, it looks at first like some sort of attacking play must be the right idea. But the various alternatives are underwhelming.
If Black plays 7/3*(2), he's a little stuck for the last four. 6/2 and 8/4 are both silly, while 13/9 breaks the midpoint and leaves White two blots to shoot at. This play only works if White dances.
Black can try the aggressive 13/5* and 7/3*, good if it works, but also a play likely to shove Black into some sort of feeble back game.
Another approach is 13/9(2), coupled with either 8/4 or 6/2. This play builds a little structure, but leaves the back men disconnected from the front position. In addition, the follow-up is likely to be awkward.
Although 4-4 at first seemed like a very good roll (Black certainly wouldn't roll over!), none of these ways of handling the roll seem especially effective. What's wrong?
Black's real problem lies on the other side of the board. With two men on the 21-point and two men on the 18-point, Black has 78 pips tied up in those two points. Not only is that a lot of pips, but Black is unlikely to be able to move those checkers anytime soon without rolling a fortuitous double (like the one he just rolled). The right idea for Black is to free two of those checkers with 18/14(2), then simply play 6/2 with the last four. Now he has a better balanced and more efficient position, with one anchor holding back White's checkers while the rest of his men can maneuver more easily.
When players make two high anchors early in the game, like the 18-point and the 21-point, or the 18-point and the 20-point, they often have the impression that they are restraining the opponent. Actually, they are the ones being restrained! They have too much force tied up in a small area of the board, and as a result their front game becomes harder to develop. The key to playing efficiently is to have checkers working optimally all around the board.
[Two additional comments need to be made here. The 20-point and 21-point combination early in the game actually works fairly well. Although the points are high and close together, they prevent the opponent from building his board. And of course in the later game, after the opponent has escaped all the back men, a combination like the 18-point and the 21-point do offer some extra defensive chances.]
Now take a look at this next position and see if you can find the flaw in Black's play.
|
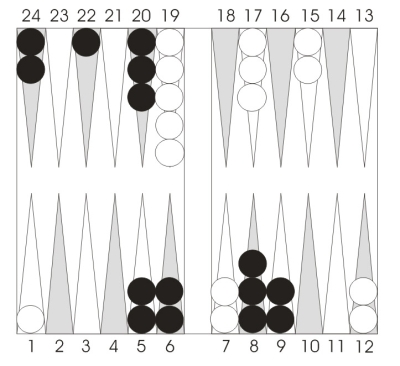
Position 2.
Black to play 5-1.
Black moves 24/18. Correct?
|
The obvious play here for Black is 24/18, which seems to leave him in good shape to make the 18-point in the next couple of turns. But does he want the 18-point at all? As we just saw, the 18-point and the 20-point perform duplicate work in the early stages. The best way not to tie up too many checkers on the points is to ignore the 18-point once you have secured the 20-point.
The right idea for Black is 22/16! If Black can make the 16-point he will have achieved some real progress, as the 20-point and the 16-point are farther apart, and securing the 16-point will make up in part for Black's loss of the midpoint. And since White's 13-point and 10-point are both stripped, White can't hit without giving up a point that he'd very much like to keep.
Next time: Checker Play in Back Games
|