 Among the many relatively unexplored position types in backgammon is one I call the late game blitz. The general idea is pretty simple. One side has a blitz in progress. The other side, unlike the case in the basic opening blitz, has some sort of structure in place, which might range from a few scattered points to an imposing five-prime. The blitzer has some number of checkers to extricate before he can claim the game.
These late game blitz positions are common, intricate, often incredibly difficult, and always extremely important. As a group, in fact, they are by far the most important positions in backgammon. More points are swung with errors in this type of game than any other.
If you're looking to work hard to improve your play and results, forget about match equity tables and rollouts of opening positions. That stuff is trivial. These weird blitz positions are the ones that will make a big difference in your play. Master these positions (no one has, that I know of, although some are better than others) and you will lower your Snowie error rate by a tenth of a point per game. (Hint—that's huge.)
|
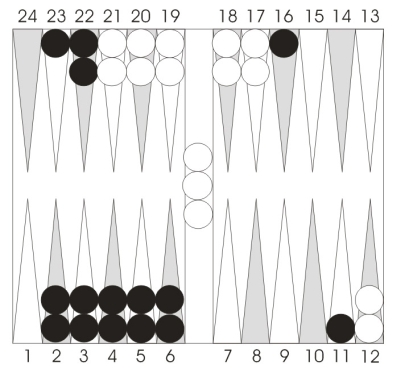
Position 1.
Should Black redouble?
Should White take
if Black does redouble?
|
Position 1 illustrates a sub-category of position in the late game blitz world. Black has three of White's checkers trapped on the bar against a 5-point board. (That's the good news.) But on the other side, he has to escape three checkers from behind a 5-prime, and one of those checkers is not at the edge of the prime. What to do? Gammons are certainly floating in the air, but that 5-prime could be hard to jump.
There's a crude rule of thumb that applies to positions where your opponent is trying to enter against a 5-point board, and you have a 5-prime to leap. Count the number of checkers your opponent has to enter. (Here it's 3.) Now count the numbers you have to roll exactly to escape his prime. Here Black needs an ace plus three sixes—four numbers in all.
If your count is the same as his count, and your spare checkers aren't all used up yet (here the two spares on the 16-point and 11-point have several rolls to burn) then the position is probably double-take. If your count is higher than his (the case here), don't double. If your count is lower than his, it's a big pass and perhaps too good.
Answer: Black shouldn't redouble, and White has an easy take if doubled.
Next time: Proto-Back Games
|