|
| Book Transcription |
|
|

THE SPHINX
But you can read the Hieroglyphs
on the great sandstone obelisks,
And you have talked with Basilisks
and you have looked on Hippogriffs.
Foreword
In these problems, some of which are taken from actual games, no attempt is made to show an inevitable or even very general triumph of skill over luck. Such an attempt is futile and experience teaches that it may be most expensive.
It is nevertheless true, that it is only through skill or intelligent play that one may secure for oneself every advantage, safeguard as well as benefit, which the opportunities of the dice afford. This is perhaps the only “luck insurance.”
In these problems, most interesting of all is the tremendous difference which may result from plays seemingly of insignificant importance. While skill has been actually the determining factor, it is skill in such minor detail that it may frequently pass unnoticed.
As these details or finer points are so nearly imperceptible, ignorance of them is not to be too hastily condemned. Furthermore, while ignorance may be expensive, many can afford the expense, and if, as we are told, it is also bliss, what more is there to be desired? After all, there is a pleasing quality — practically pleasing — in those individuals who, confident that their defeats are all due to bad luck, continue on and on with the cheering thought that, in the long run, their luck will be equal.
Our respectful homage to luck. It is most important. Possibly, however, dice, like cards, never forgive. Luck may weary of blunders and neglected opportunities. Woe to the unappreciative — to those for whom she has offered her smiles in vain and then has only the super-Satanic fury of her frown.
It is real experience only that is of value. There must be intelligent and thoughtful observation as well as the playing of a great number of games. In backgammon it is really surprising how many plays of vital importance, although often apparently quite insignificant and, when learned, so very obvious, are unknown to many who have played the game for years.
If these problems seem to you to be simple, and you have played them as given in the play analyses (or have a sound reason for not having done so), we shall be glad to have you write us, as we are interested in compiling a list of expert backgammon players.
In selecting dice throws for these problems we have endeavored to give ordinary throws. Also, for the sake of brevity, many games have not been played out and remote contingencies, such as a series of large doublets, have not been considered in stating which player wins. If certain of the throws given seem to be arbitrarily selected, it is because they serve best to illustrate a principle, sometimes of great practical importance, or a point in a given situation which may often arise.
C. W. V.
Explanation
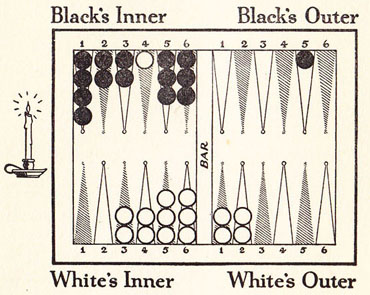
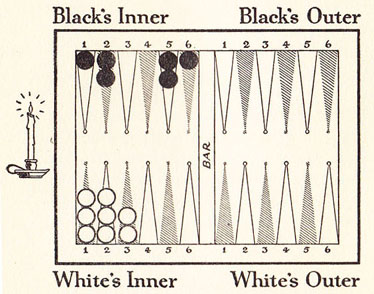
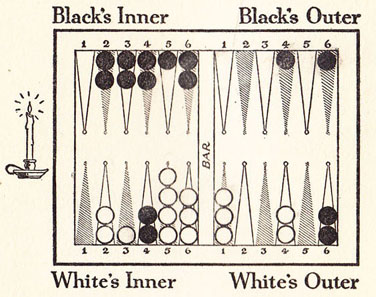
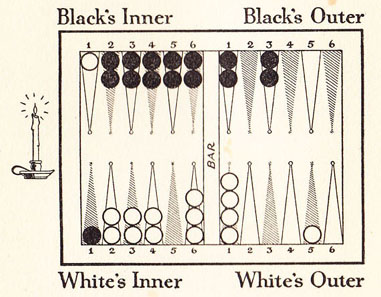
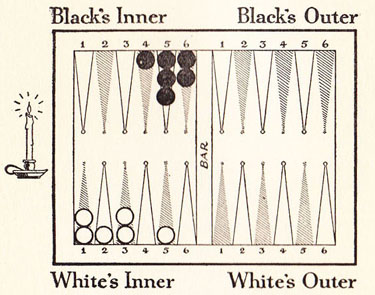
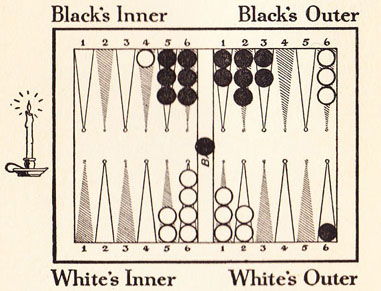
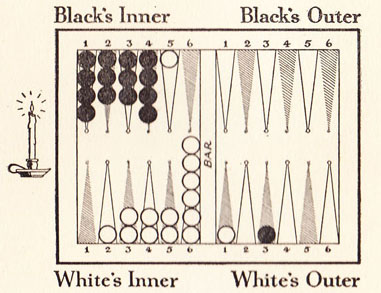
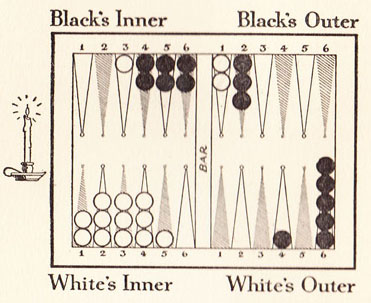
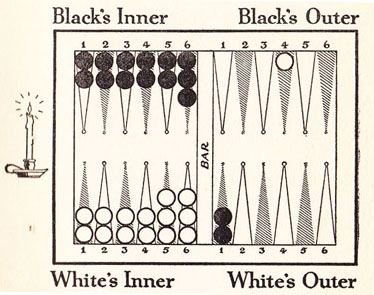
In the play analyses abbreviations are given to designate the various points in the tables. These are the initial letters of the names by which the points are generally known. Thus:
BO1 = Black’s Outer (table) 1 point or bar point.
WI1 = White’s Inner (table) 1 point.
WO1 = White’s Outer (table) 1 point or bar point.
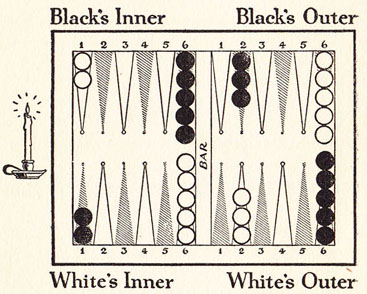
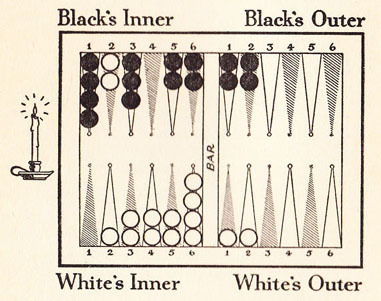
Accordingly the opening set up shown in the diagram would be described as follows:
Black has five men on WO6.
Black has three men on BO2.
Black has five men on BI6.
White has two men on BI1.
White has five men on BO6.
White has three men on WO2.
White has five men on WI6.
Attention
To be entertained and to derive the most profit, it is imperative that the reader shall play the dice throws in turn without looking ahead. An advance knowledge of the throws which are to come or of the play analyses, which follow and explain each problem, will only detract from the interest.
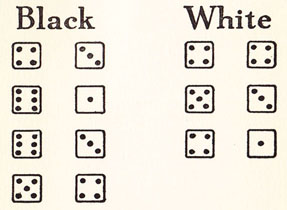
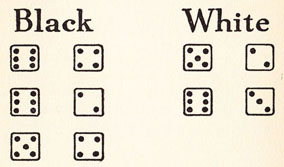
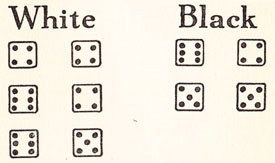
I
A Close Finish
Place the men on your board as shown on this diagram and play as soundly as you can the following throws. These must be taken one at a time without looking ahead.
When you finish compare your play and results with the Play Analysis.
Black doubled last.
Who wins and why?
Situation reviewed and suggestions for good play made on the following page.
Play Analysis
| BLACK | WHITE | |||
| (4-2) | Two men off. | (4-3) | Two men off. | |
| (6-4) | BI6 to BI2. Man off BI5. | (6-4) | Two men off. | |
| (3-2) | Two men off. | (3-2) | Two men off. | |
| (5-3) | Two men off. Black wins. | |||
If Black on the second throw takes off a six and moves the four he loses the game instead of winning.
This error is seen daily even among old players who have never learned the value of filling a vacant point as shown.
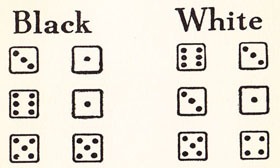
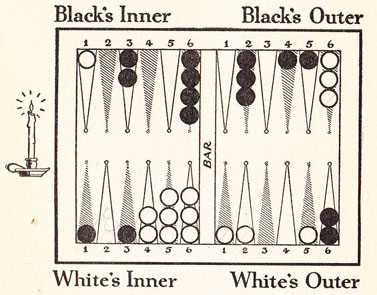
II
The Home Stretch
Place the men on your board as shown on this diagram and play as soundly as you can the following throws. These must be taken one at a time without looking ahead.
When you finish compare your play and results with the Play Analysis.
Black doubled last.
Who wins and why?
Situation reviewed and suggestions for good play made on the following page.
Play Analysis
| BLACK | WHITE | |||
| (4-1) | BO5 to BI6. | (4-1) | WI6 to WI2. WI5 to WI4. | |
| (2-1) | Do not play BI6 to BI4 and BI5 to BI4. Black wins. | |||
With no double game probable it would be unsound for Black to point on BI4. closing his table. This would leave an odd man on Black’s six point and many throws would result in a blot. The risk is great and unnecessary.
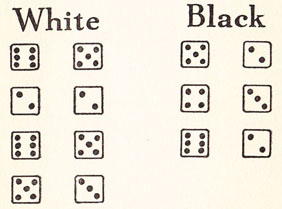
III
Double Sixes
A loser one day complained that his opponent threw too many double sixes. The latter, a distinguished player, offered to play him and give him double sixes every throw.
Bets were made and it was agreed the opponent should have the first throw each game.
There was to be no doubling.

Who wins and why?
Situation reviewed and suggestions for good play made on the following page.
Play Analysis
If White can take up a man he should win as Black can only enter on WI6.
White knows he can play to make Black expose a man so he plays to WO1 to be taken up, and hopes to spread his men if possible on BI3, BI4 and BI5. This gives him a 3 to 1 shot when Black leaves a blot on BO1 as he must do.
| WHITE | BLACK | |||
| (3-1) | BO6 to WO4. WO2 to WO1. | (6-6) | WI1 to WO1 (2). WO6 to BO1 (2). | |
| (4-3) | Enter on BI3. BO6 to WO3. | (6-6) | WO6 to BO1. BO2 to BI2 (3). | |
| (5-2) | BO6 to WO2. WO4 to WO2. | (6-6) | WO6 to BO1 (2). No other play. | |
| (4-3) | BI1 to BI5. BI1 to BI4. | (6-6) | BO1 to BI1 (4), leaving blot. | |
| (5-3) | BI4 to BO1, hitting blot. | |||
White having taken up Black’s man has only to move in his home table, keeping his men on the upper points, especially his inner six point. He then takes most of his men off before he moves from WI6. Attention must be given to the number of men on WI6 to avoid leaving a blot there if doubles are thrown.
Of course, throughout the game, blots may be left at will where a six will not hit them.
If on his first throw White is unable to place a man on WO1 to be taken up, he still has two men on BI1 to move to bear on Black’s prospective blot with better than an even chance to hit it.
IV
Prophets And Profits
Place the men on your board as shown on this diagram and play as soundly as you can the following throws. These must be taken one at a time without looking ahead.
When you finish compare your play and results with the Play Analysis.
Black doubled last.
Who wins and why?
Situation reviewed and suggestions for good play made on the following page.
Play Analysis
White has eight men to Black’s six.
Eliminating doublets which either may throw (and should they occur White has the first chance to throw them) White should get his men off in four throws.
Black may require only three throws, but the probabilities favor at least one miss owing to his unfilled points (even double fours or threes would not save him). Black would then have to move, which would leave him with an odd number of men. The extra man would require a full throw, making four throws in all. Should this happen the situation would be obvious and Black would refuse a double.
White, to take advantage of the odds in his favor, should double at once.
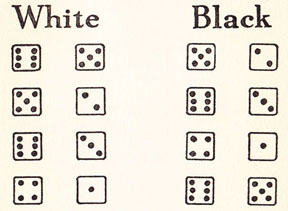
V
Penny Wise And Pound Foolish
Place the men on your board as shown on this diagram and play as soundly as you can the following throws. These must be taken one at a time without looking ahead.
When you finish compare your play and results with the Play Analysis.
Black doubled last.
Who wins and why?
Situation reviewed and suggestions for good play made on the following page.
Play Analysis
| BLACK | WHITE | |||
| (2-1) | BI6 to BI4. BI6 to BI5. Black wins. | (6-2) | Enters on BI6. | |
With no double game in prospect Black gains nothing by delaying the entry of White’s man. On the other hand by opening his six point and permitting White’s entry there, he may eliminate his only danger. The danger may seem to be remote but, in view of White’s perfect position, overlooking it may change the result of the game.
If Black delays White’s entry, and then is compelled to expose a blot and this is hit, White would redouble and win.
VI
“The More Haste The Less Speed”
Game played in a tournament at a New York city club.
Place the men on your board as shown on this diagram and play as soundly as you can the following throws. These must be taken one at a time without looking ahead.
When you finish compare your play and results with the Play Analysis.
White doubled last.
Who wins and why?
Situation reviewed and suggestions for good play made on the following page.
Play Analysis
| WHITE | BLACK | |||
| (3-1) | WI5 to WI1. | (4-1) | BO4 to BI5. | |
| (5-1) | WI6 to WI1. WI3 to WI2. | (5-2) | BO6 to BO1. WO6 to BO5. | |
| (6-3) | WO1 to WI1. WI5 to WI2. | (6-3) | WO6 to BO1. BO5 to BO2. | |
| (6-2) | WO1 to WI1. WO1 to WI5. | (6-1) | B02 to BI1. | |
| (5-4) | WO4 to WI5. WO4 to WI6. White wins. | |||
White is decidely ahead. As there is no reasonable prospect of a double game, White’s only object is to conclude the game with as little risk as possible. White’s chief danger results from Black’s point in White’s inner table and the fact that White’s two men upon the three point in his outer table can only be moved to safety by a 5 and 4, a 5 and 3 or by appropriate doublets.
Accordingly, White should give himself as many chances as possible for such a throw. By playing his first throw from WI5 to WI1, not from WO1 to WI3 (as so many players might do), he gives himself one more chance and wins the game.
VII
Double Game?
Place the men on your board as shown on this diagram and play as soundly as you can the following throws. These must be taken one at a time without looking ahead.
When you finish compare your play and results with the Play Analysis.
Black doubled last.
Who wins and why?
Situation reviewed and suggestions for good play made on the following page.
Play Analysis
| BLACK | WHITE | |||
| (4-1) | WO2 to WO6. BI2 to BI1. | (5-2) | Cannot enter. | |
| (3-1) | WO6 to BO3. | (4-4) | Enters on BI4 (2). WO4 to WI6 (2). | |
| Black wins. | ||||
The more one plays backgammon the more one realizes that the long shots do happen. It may pay to ignore them when some advantage is derived, but if there be none all unnecessary risks should be avoided as one essential of winning backgammon.
If Black moves the 4-1 throw from WO2 to BO6, double fours thrown by White would probably win the game. On his next throw Black must avoid BO2 even if he played the first throw wrong and escaped.
On the set-up shown in the diagram Black could be hopeful of Winning a double game. If White should hit a blot with double fours, Black Would doubtless fill the room with jeremiads when he had the opportunity in his hands to take out “luck insurance” by avoiding points which could be hit.
VIII
“There’s Many A Slip”
Game occurring in chouette played at Southampton, L. I.
Place the men on your board as shown on this diagram and play as soundly as you can the following throws. These must be taken one at a time without looking ahead.
When you finish compare your play and results with the Play Analysis.
Black doubled last.
Who wins and why?
Situation reviewed and suggestions for good play made on the following page.
Play Analysis
| BLACK | WHITE | |||
| (6-3) | BO3 to BI3. BO3 to BI6. | (6-5) | WO5 to WI5. WO1 to WI2. | |
| (3-1) | BI6 to BI2. | (5-4) | WO1 to WI2. WI6 to WI2. | |
| (6-5) | BO1 to BI1, hitting blot. BO1 to BI2. | (2-1) | Enters BI1, hitting blot. WO1 to WI5. | |
| (4-2) | Cannot enter. | (6-1) | BI1 to BO1. WO1 to WI6. | |
| (3-2) | Cannot enter. | White redoubles and wins. | ||
On his first throw, if White makes his one point (WO1 to WI1 and WI6 to WI1) hitting Black’s blot, Black will enter upon an advanced point, escape without difficulty and probably win the game. On his second throw the same opportunity occurs a second time (WI6 to WI1 and WI5 to WI1) and, if tempted, the result will be again disastrous to White.
White’s daring play in leaving a blot for two throws is rewarded when Black is forced to break his side prime, leaving a blot, which White is lucky enough to hit and win the game.
IX
An Eye To Windward
Place the men on your board as shown on this diagram and play as soundly as you can the following throws. These must be taken one at a time without looking ahead.
When you finish compare your play and results with the Play Analysis.
Black doubled last.
Who wins and why?

Situation reviewed and suggestions for good play made on the following page.
Play Analysis
| WHITE | BLACK | |||
| (4-2) | BO6 to WO1, hitting blot. | (3-1) | Enters WI1. BO2 to BI5. | |
| (6-1) | BI2 to BO2. WO1 to WI6. | (4-3) | BI6 to BI2. BI5 to BI2. | |
| (4-4) | BO6 to WI1. WI5 to WI1. | (6-1) | Cannot enter. | |
| (5-3) | BO2 to WO3. | (6-3) | Cannot enter. | |
| (4-1) | WO3 to WI5. WI6 to WI5. | (5-4) | Cannot enter. | |
| White wins. | ||||
White has an interesting situation on his 6-1 throw. Filling his board is the worst of his three choices, making a side prime probably is next, but by not taking his man out of Black’s table he perhaps runs the greatest chance of losing the game if Black plays soundly.
It may be a temptation for White to make a side prime on WO1 or fill his board by pointing on WI1. However, it is perhaps better play to move out and risk Black’s throwing a double six, a 35 to 1 shot.
If Black throws a single 6, and moves the man out of White’s inner table, he may still be hit and thrown back.
X
Another Eye To Windward
Illustrating another point in Problem IX if White had played differently.
Place the men on your board as shown on this diagram and play as soundly as you can the following throws. These must be taken one at a time without looking ahead.
When you finish compare your play and results with the Play Analysis.
White doubled last.
Who wins and why?
Situation reviewed and suggestions for good play made on the following page.
Play Analysis
In Problem IX, if White decides to close in Black’s man instead of moving out from Black’s table, he would point on WO1. Doing this instead of filling his table gives him a better chance of getting his man out of Black’s table, for Black may have to move in and let White’s man free with a lower throw.
We then would have the situation shown in this diagram where the same throws are given.
| BLACK | WHITE | |||
| (4-3) | BI5 to BI1. BI4 to BI1. | (4-4) | Cannot move out of Black’s table — must break side prime. | |
| Black wins. | ||||
If Black makes BI2 point, taking up White’s man, White should win the game. Obvious, perhaps, but players (and not beginners) do it every day.
XI
Skill Or Luck
Place the men on your board as shown on this diagram and play as soundly as you can the following throws. These must be taken one at time without looking ahead.
When you finish compare your play and results with the Play Analysis.
White doubled last.
Who wins and why?
Situation reviewed and suggestions for good play made on the following page.
Play Analysis
| BLACK | WHITE | |||
| (3-1) | Takes man off BI4. | (6-3) | Two men off. | |
| (6-1) | Takes man off BI6. BI6 to BI5. | (3-1) | Two men off. | |
| (5-5) | Clears table and wins. Black wins. | |||
With a moment’s thought it is obvious that White will win the game unless Black throws doublets. Black, therefore, must try to place his men so as to reduce if possible the size of the doublets needed.
If on his 6-1 throw he takes a man from BI6 and moves BI5 to BI4 (and in other situations this would be the desirable play), only double sixes can win for him.
Played as shown double fives would also win, and yet every day players fail to give themselves this extra chance.
XII
“Waste Not, Want Not”
Place the men on your board as shown on this diagram and play as soundly as you can the following throws. These must be taken one at a time without looking ahead.
When you finish compare your play and results with the Play Analysis.

Black doubled last.
Who wins and why?
Situation reviewed and suggestions for good play made on the following page.
Play Analysis
All that is left for White to try for is to save a double game. Hence he must not play his 6-5 from Black’s outer table to his own inner 5 point. While this play moves a man two tables, it moves it one more point than is actually necessary to get it in his inner table. This is wasteful and may cost him a double game. In the present case if he makes this play, there is no possible way he can save a double game.
On the other hand if White plays the throws given without wasting a pip, in other words playing every shot to just get over the bar on to his 6 point, he is left on his fourth throw so that a 4 or over will save a double game.
The principle involved is that, in running, never waste a step or a pip or neglect to play a man which can be moved to the nearest point in the next table.
XIII
Out To Win
Place the men on your board as shown on this diagram and play as soundly as you can the following throws. These must be taken one at a time without looking ahead.
When you finish compare your play and results with the Play Analysis.
Black doubled last.
Who wins and why?
Situation reviewed and suggestions for good play made on the following page.
Play Analysis
| BLACK | WHITE | |||
| (2-2) | BO2 to BI6 (2). BO1 to BI5 (2). | (3-1) | WI6 to WI2. | |
| (6-5) | Two men off. | (5-1) | WI6 to WI1. WO2 to WO1. | |
| Black should win. | ||||
It would not be winning backgammon for Black to move two men from BO2 to make a point on BI4. He probably would win but he would not have taken out “luck insurance” against a bad throw.
Black is far enough ahead to let White out of his home table; in fact, with no double game visible, to wish he were out. Played as shown above, Black is absolutely safe for one throw and probably a number more.
This situation occurs frequently and it is interesting to see supposedly good players make the more dangerous move.
XIV
Luck Helps Them That Help Themselves
Place the men on your board as shown on this diagram and play as soundly as you can the following throws. These must be taken one at a time without looking ahead.
When you finish compare your play and results with the Play Analysis.
Black doubled last.
Who wins and why?
Situation reviewed and suggestions for good play made on the following page.
Play Analysis
| BLACK | WHITE | |||
| (5-4) | Two men off, leaving blot. | (4-3) | BI1 to BI4, hitting blot. BI4 to BO2. | |
| (6-1) | Enters WI1, cannot move. | (6-5) | BO2 to WO5. WI6 to WI1, hitting blot. | |
| (2-1) | Enters WI1, hitting blot. Must play BI3 to BI1, leaving blot. | (4-1) | Enters both men, taking up Black’s man. | |
| (5-2) | Cannot enter. | Redoubles. White wins. | ||
After Black’s first play he has only six men remaining and may win even after White has taken up Black’s first blot. Accordingly White should play for a second blot and a second Black man up. If White plays his second throw (6-5) to fill his inner table, he loses his chance to capture a second man and secure almost certain victory.
The same principle applies when Black has more or less men remaining. Even if Black has but two remaining, if they are upon the bar and White’s inner table filled, White has the better chance and may redouble.
XV
Military Precepts
Place the men on your board as shown on this diagram and play as soundly as you can the following throws. These must be taken one at 21 time without looking ahead.
When you finish compare your play and results with the Play Analysis.
Neither has doubled.
Who wins and why?
Situation reviewed and suggestions for good play made on the following page.
Play Analysis
| BLACK | WHITE | |||
| (6-4) | Enters WI4. WO6 to BO1. | (5-2) | WI6 to WI4, hitting blot. BO6 to WO2. | |
| (6-2) | Enters WI2. BO2 to BI2. | (6-3) | BI4 to BO4. WO1 to WI4. | |
| (5-4) | Any play. | White doubles and wins the game. | ||
White on his 5-2 throw cannot get out of Black’s inner table and the man there is in a most dangerous position. In fact, Black may win the game on the next throw with five men to combine to make a point and take up White’s man. With four of these men Black might make the point and a side prime.
The military principle, when in great danger attack, is successfully and luckily followed by White. By taking up Black’s man he prevents Black from using both dice and leaves the way open for Black to make a throw which will cost him the game.
XVI
Choice Of Evils
Place the men on your board as shown on this diagram and play as soundly as you can the following throws. These must be taken one at a time without looking ahead.
When you finish compare your play and results with the Play Analysis.
White doubled last.
Who wins and why?
Situation reviewed and suggestions for good play made on the following page.
Play Analysis
| WHITE | BLACK | |||
| (2-1) | WI3 to WI1, hitting blot. WI3 to WI2. | (6-2) | Cannot enter. | |
| (5-4) | WI6 to WI1. BO2 to BO6, hitting blot. | (5-3) | Enters one man only. | |
| White wins. | ||||
Realizing that desperate situations justify and, in fact, require desperate measures, White should move the two men upon the three point of his inner table. One is moved two points to take up Black’s blot and the other is moved one point to safety. This exposes a blot to a 1 and gives Black two points or a five to four chance of entering. Bad as this is, it is decidedly the lesser of two evils. Played in this way White has almost an equal chance of winning. Played in any other way he has not one chance in five.
White may win a double game.
XVII
Foresight
Place the men on your board as shown on this diagram and play as soundly as you can the following throws. These must be taken one at a time without looking ahead.
When you finish compare your play and results with the Play Analysis.

Neither has doubled.
Who wins?
Situation reviewed and suggestions for good play made on the following page.
Play Analysis
| WHITE | BLACK | |||
| (6-5) | Two men off. | (5-2) | Two men off. | |
| White should double at this point. | ||||
With his 6-5 he has thrown off the man on WI6 which makes his position much less uncertain. Now, although White has ten men to Black’s nine, barring doublets, it requires only five throws by each side to throw off and it is White’s first throw.
If we take doublets into consideration, White has still the advantage, for he has the first chance for them also.
White should not wait a throw or two more before doubling. Black’s chances of winning would then have further diminished, and so obviously that he would refuse a double.
XVIII
Insurance
Place the men on your board as shown on this diagram and play as soundly as you can the following throws. These must be taken one at a time without looking ahead.
When you finish compare your play and results with the Play Analysis.
Black doubled last.
Who wins and why?
Situation reviewed and suggestions for good play made on the following page.
Play Analysis
| BLACK | WHITE | |||
| (3-1) | With the odds 17 to 1 against being hit the best move would seem to be BI4 to BI1. BI2 to BI1. | (5-2) | WI6 to WI1. WI6 to WI4. | |
| (2-1) | BI4 to BI1. | (6-1) | WO1 to WI1. WI6 to WI5. | |
| (4-2) | WO3 to BO6. BI3 to BI1. | (3-2) | WI5 to WI2. WI4 to WI2. | |
| (4-3) | BO6 to BI5. | (5-3) | White enters, hits Black’s blot and redoubles. White wins. | |
On White’s 5-2 it is tempting to make a point on WI2 to have a better table in case he can hit Black’s blot. However, White’s best chance for the game is to lie back and wait for Black’s odd man to be forced into easy range. Playing winning backgammon, White would realize that his man on WO1 is his only reserve against a 6 forcing his man on BI5 out of ambush and giving Black’s man a chance to get by safely.
If White had not insured against this contingency by keeping his man on WO1, he would probably have lost the game instead of winning it.
XIX
Backgammon Finesse
Place the men on your board as shown on this diagram and play as soundly as you can the following throws. These must be taken one at a time without looking ahead.
When you finish compare your play and results with the Play Analysis.

Black doubled last.
Who wins and why?
Situation reviewed and suggestions for good play made on the following page.
Play Analysis
| WHITE | BLACK | |||
| (4-4) | Four men off. | (5-1) | Enters on WI5, cannot play the 1. | |
| (6-1) | Man off WI6. WI6 to WI5, hitting blot. | (3-3) | Cannot enter. | |
| (1-1) | WI6 to WI4, WI5 to WI4. Man off WI1. | (3-2) | Cannot enter. | |
| (5-4) | Two men off. | (4-1) | Enters and moves to WI5. | |
| Redoubles. White wins. | ||||
If White with his 6-1 throws off two men, Black wins the game easily. White’s sole opportunity is to take up Black’s man on WI5. Although this play exposes two blots, White risks nothing. He cannot lose a double game because after his 4-4 he has already thrown off five men.
White can only win by Black’s poor dice throws. Good dice by Black will probably beat him in any event. Having one of his blots hit makes his unequal chances no worse. On the contrary, the blot hit may, in entering and returning, hit either one or even both of Black’s men.
XX
The Best May Err
Game played at a New York club between two good players.
Place the men on your board as shown on this diagram and play as soundly as you can the following throws. These must be taken one at a time without looking ahead.
When you finish compare your play and results with the Play Analysis.
White doubled last.
Who wins and why?
Situation reviewed and suggestions for good play made on the following page.
Play Analysis
With White’s WI5 and WI6 points open, he can hardly hope for a double game but should win easily if he gets safely by Black’s men. Instead of advancing his men for this purpose, White could not resist playing the man from BI3 all around to WO4 and taking up Black’s man there. Then for his remaining four he had to play WI5 to WI1, leaving Black a combination shot if he enters. Worst of all, however, is leaving two men on BO1 in a dangerous place to get safely home. Black entered with a six and four, luckily taking up man on WO4. After making another point with his double fives he redoubled.
White lost a game he should have won. His error in taking up an opponent’s man when it was of no advantage and might be disastrous, is something which may be seen every day. Perhaps it is just a primitive love of slaughter.
Suggested Play:
| WHITE | BLACK | |||
| (4-4) | BI3 to BO1. BO1 to BO5 (3). | (6-4) | WO6 to BO1. BO2 to BI4. | |
| (6-4) | BO5 to WO2. WI5 to WI1. | (5-5) | WO6 to BI3 (2). | |
| (6-5) | BO5 to WO2. BO5 to WO3. White should win. | |||
XXI
Take Your Choice
Place the men on your board as shown on this diagram and play as soundly as you can the following throws. These must be taken one at a time without looking ahead.
When you finish compare your play and results with the Play Analysis.
White doubled last.
Who wins and what?
Situation reviewed and suggestions for good play made on the following page.
Play Analysis
On the first play given White is confronted with a choice which would give any player thought. Though White is ahead, a run with this man from BI1, with two blots in his outer table, is out of the question. To make a point on WI2 with his two blots is probably the least desirable of his other choices. To move two men from BO6 to cover these blots and make points on WO1 and WO2 is sound backgammon.
There is another possibility which is tempting and has some merit. That is, moving from BO6 to WO1, making White’s bar point, and then from WO2 to WI3, taking up Black’s blot.
This is a gamble for a double game. Making the two points WO1 and WO2 is safer and should win a single game. However, obliging Black to use one of his dice to enter restricts his ability to dispose of his other blots which, with two dice, he might use to make some excellent point. The play increases the hazard, but at the same time increases the chances of a double game. The chances are in favor of Black’s entering but against his hitting White’s blot on WI3. Black’s table is, of course, not formidable and if hit White may have a better chance for a third man.
“Take your choice,” but some skilled backgammon players would take the gamble and keep up the pressure in future plays.
XXII
“According To Hoyle”
“The following question is worth attention as being critical and instructive.”
Place the men on your board as shown on this diagram and play as soundly as you can the following throws. These must be taken one at a time without looking ahead.
When you finish compare your play and results with the Play Analysis.
Where and why?
Situation reviewed and suggestions for good play made on the following page.
Play Analysis
Play the one BO4 to BO5, risking a seven instead of an eight, for the following reasons:
“First. Because the chances of being hit by 7 or 8 are equal.
“Second. If he does not hit 7 you will then have in your favor twenty-three chances to thirteen, that by your next throw you either hit him or pass beyond him.
“Third. In case your second throw should be under 7, and you cannot hit him, yet you may play that cast at home and consequently leave the blot upon double dice.
“Whereas if, on the contrary, you had left the blot upon 8, you would have made a bad choice, for the following reasons:
“1. Because the chances of being hit by 7 or 8 are equal only.
“2. Because if you should escape being hit by 8, yet then you would have but seventeen chances in your favor, against nineteen for either hitting him or passing beyond him by your next throw.
“Now in case your second throw should be six-ace, which is short of him, you would then be forced to play the man that is out of your tables, being unable to play the six at home, and consequently to leave a blot to be hit by a single die (or flat), in which event, computing that you play for eighteen shillings a game, he would be entitled to eleven shillings of the whole depending stake.”
XXIII
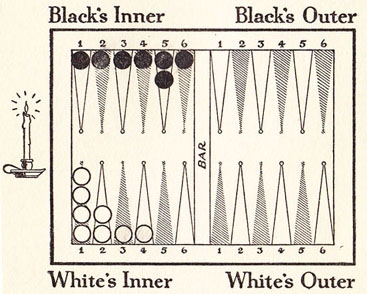
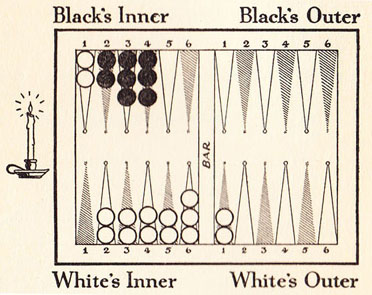
Who Is Ahead
In considering whether or not to double or to accept a double one frequently has to decide which player is ahead. That is, which player has advanced his men more or nearer his home table and in the better throwing off position.
The greater experience a player has had the better should be his judgment, but often one would like to know the exact position irrespective of interference by the opponent’s men.
This can, of course, be done by counting the points each man has advanced or the points each man is away from his inner one point. Doing the same thing with one’s opponent’s men (figuring his advances or distances from his inner one point), the difference would give the precise situation from a running standpoint.
Practically this would be too much mental arithmetic and delay the game. However, a rough estimate may be made in a simple way as follows:
Count the men you have outside your home or inner table, giving an increasing value to each table as you go farther away. Thus, count one for each of your men in your own outer table, two for each of your men in your opponent’s outer table and three for each of your men in your opponent’s inner table. Do the same with your opponent’s men, counting one for each of his men in his outer table, two for each of his men in your outer table and three for each of his men in your inner table.
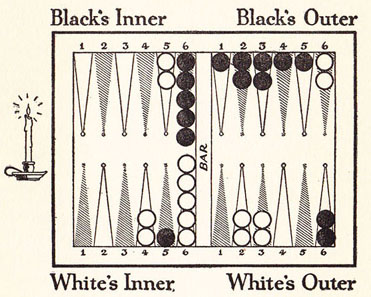
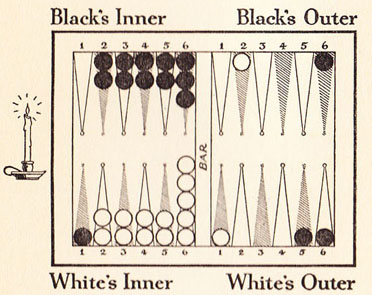
In the diagram Black has seven men in his outer table (counting 7), two men in White’s outer table (counting 2 apiece equals 4) and one man in White’s inner table (counting 3), or a total of 14.
White has four men in his outer table (counting 4), two men in Black’s outer table (counting 2 apiece equals 4), and two men in Black’s inner table (counting 3 apiece equals 6), or a total of 14.
Disregarding position of men in the tables, they are, therefore, equally advanced. However, the position of the men in the tables must be taken into consideration. Obviously men which a 2 or a 3 will move from one table to another are better than those needing a 5 or a 6.
The eye can be trained to see approximately to what extent the position of the men in the tables affects the rough estimate secured as above. However, whenever it is desired, the precise situation can be ascertained by adding to your rough estimate the fraction 1/6 for each point every man is away from the most advanced point in the table it is in.
This may seem complicated, but can readily be done by counting these points and dividing by six. This result is added to the figure of the rough estimate.
Thus Black’s man in White’s inner table is one point back and counts 1. Black’s men in White’s outer table advanced to the limit count nothing. Black’s one man in his outer table four points back counts 4, one man three points back counts 3, two men two points back 4, two men one point back 2, one man not to be counted, and, in his inner table, five men five points back counting 25. This makes a total of 39, which divided by 6 is 63/6 . Add this to the rough count of 14 and you get 203/6 , which is the exact position of Black’s game including his throwing off position in his home table.
White’s two men in Black’s inner table one point back count 2. White’s men in Black’s outer table advanced to the limit count nothing. In his outer table White’s two men two points back count 4 and the two men one point back 2. In his inner table the five men five points back count 25 and the two men three points back count 6. This makes a total of 39, which divided by 6 is 63/6 . Add this to the rough count of 14 and you get 203/6 for White.
Accordingly Black and White are exactly even. In this instance the rough count instantly arrived at happens to give the correct indication.
Duplicate Backgammon
There are many instances where, given the dice throw and the position of the men, all good players would agree on the correct move. However, these instances are almost negligible compared with the limitless possibilities of position and dice, each of which is a problem in itself so uncertain that to estimate the choice of play must be sensed rather than calculated.
The best players often disagree on a move without much chance for an immediate correct decision, as the result of any one game depends more on the dice than on the soundness of any theory.
However, study and observation do give us definite reasons for making choices in an increasing number of situations, based on calculable mathematical chances. Perhaps best of all, over a period of years, a real backgammon sense may be developed which inclines us to a choice on most plays and this is one of the charms of advanced backgammon.
Some of the variations in opinion are doubtless based on the type of tactics favored. Army leaders are known to disagree, some preferring ponderous units and entrenched positions, while others place greater reliance on speed and mobility.
Doubtless the best general and the best backgammon player should be familiar with all known strategies but committed to none. He should be able to select the best for any situation and have the flexibility to change quickly to meet varying conditions.
A good way to appreciate some of the involved problems of the game and the complications of play is by duplicate backgammon. This may be played somewhat awkwardly by two players and two boards, each opponent playing Black on one board and White on the other, using the same dice throws for both boards.
The duplicate game is best played, however, with partners or sides, four players and two boards (or any multiple of this unit). The partners play opposite positions on different boards, one playing Black on one board and his partner playing White on the other.
Dice throws are made at only one board and communicated to the other where the same throw is played by an opponent. There may be as many units of two boards each as desired, half of the players on each side playing Black and the other half playing White, the same throws being used at every board.
The dice being identical, the result depends entirely on the play and how the dice fit in with any variations in play at the different boards.
The developments are a revelation of complicated possibilities. In one instance a player won all his games, while all of his partners and opponents, playing the same position with the same throws, lost some games. It is needless to say he was a player of renown.
Authorised Rules For Modern Backgammon
REVISED
- The game may be played with (a) two dice hoxes and two pairs of dice; or (b) two dice boxes and one pair of dice; or (c) one dice box and one pair of dice. In case of disagreement, the player throwing the higher die shall have the choice.
- The game shall be set up so that the inner tables are nearest the light. Decision as to position of light and choice of dice, men and seats shall be made by the player winning the throw for the first move.
- For the first move each player throws a single die. He who throws the higher number wins, and, for his first move, plays the pips upon both his own and his opponcnt’s die. After that each player throws and plays two dice.
- Each tie, when throwing for first move, automatically doubles the stake. This is optional. Automatic doubles may be limited in number or not played.
- Both dice must be taken up and thrown again:
- If the player has not thrown the dice into the tables on his right hand.
- If either die is upon, or “cocked” against, the other die, a man, or a side or end of the tables.
- If either die jumps into the other tables or off the board.
- If either player touches either die during the throw or before it has come to rest.
- If a player throws his dice before his adversary’s play is completed.
- If the player has not thrown the dice into the tables on his right hand.
- The player must leave his dice upon the board until his play is completed. Should he pick them up before the completion of his play, the opponent may, at his option, declare the play void and require the offender to replace the man or men moved and to throw again.
- A play is completed when the move or moves required by the dice have been made and the man or men quitted. After a play has been so completed (i.e., made correctly), it cannot be changed.
- If a man has been moved the wrong number of points, or entered incorrectly, or thrown off before all are home, the opponent may, at his option, and before he has thrown, demand that the error be corrected. After the opponent has thrown, errors of play cannot be corrected except by mutual consent.
- The numbers on both dice must be played if possible. Either may be played first. If either, but only one, of the numbers thrown can be played, the higher must be played.
- Whenever a man has been moved from its position upon a point it must be played if possible.
- Either player may offer the first double of the original stake. After that the right to double the stake alternates, being always with the player who has accepted the last double.
In every case, doubles may be offered only when it is the player’s turn to play and before he has thrown the dice. A double may be accepted or declined. The refusal of a double terminates the game and the player refusing then loses whatever the stake may amount to at that time.
-
- A single game is won by the player who first bears or throws off all of his men.
- It is a Gammon, or double game, if the adversary has not thrown off a single man and this doubles the amount of the stake whatever it may be.
- It is a Backgammon, or triple game, if he has not thrown off a single man and has one or more men in the winner’s inner table or upon the bar. This triples the stake, but it is optional whether or not triple games be played.
- A single game is won by the player who first bears or throws off all of his men.