|
| Book Transcription |
|
|

MY MOTHER
in memory of many happy hours
spent with her over the
backgammon board
Forward
This world of ours moves in cycles. Fashions and customs change. Sooner or later the ugly and worthless are discarded, but whatever is beautiful or worth while eventually reasserts itself, and is adapted to the needs of another generation.
Games which have attained great popularity in the past, but which for one reason or another have been almost forgotten, sometimes come to life with renewed vigor and with added features of interest which adapt them to the requirements of a later day.
Backgammon is a game with a background. Twenty-five to fifty years ago, in its quiet and dignified way, it was one of the fashionable games of the country. The older members of the family took great pride in teaching the younger generation the principles of play, which had in turn been taught them by their elders.
The popularity of Backgammon at that time was increased by the prejudice which existed in many circles against card-playing. It is a strange coincidence that, in trying to escape from the so-called evils of playing-cards, the people of that day should have hit upon a game played with dice, which are the greatest of gambling implements, and which have been handed down to us from antiquity. As card-playing increased in favor the popularity of Backgammon declined, until it practically disappeared after the introduction of Bridge into this country. The excitement of Bridge well suited the temperament of the time, and its popularity has exceeded that of all other indoor games. This interest has been sustained by the changes into Auction and now Contract.
Games like Mah Jong have appeared from time to time, and, after taking the country by storm, have been found wanting in some respect or another, and have been discarded. Vogues of this sort have tended to force Backgammon into comparative obscurity, until today there are people who do not know that such a game ever existed.
Yet there are many homes where Backgammon has always been played and is still being played. One of New York’s leading clubs has maintained a Backgammon room where the game has been enjoyed for the past thirty years.
About eighteen months ago Backgammon awoke from its Rip Van Winkle sleep, and suddenly became the mode at the smart summer resorts in the East. During the past winter the game has been strengthening its hold on the public, and today this fine old game, which combines the chance of the throw with the skill of the play, seems to be on its way back to its former position among society’s leading games.
The New Backgammon of today is equipped with two modifications which have done much to augment its appeal and help it find a place in this restless gambling age. The first of these changes allows more than two people (even as many as six) to take an interest in the game. Only two actually play, and the others act in an advisory capacity, sharing in the winnings or losses. When more than two people take part in the game, it is called a chouette.
The second modern innovation is the introduction of doubles, which add much to the zest and greatly increase the chance of the game.
While Backgammon will probably never supplant Contract Bridge, it may serve as a delightful relief from the responsibilities of Partnership, which today are complicated by the many Conventions creeping into the latter game.
My reason for offering the public a book on Backgammon is that this fascinating game has always been a happy institution in our family, and I hope that some of the hints passed down to me from my forebears will be of help to those now taking up the game for the first time.
New York, June 5, 1930.
1
The History Of Backgammon
Backgammon in its many different forms has been played for centuries and is one of the oldest games of which we have record. The derivation of the word “backgammon” is not certain, but it is supposed to have come either from the Welsh bach — little, and cammaun — battle, a little battle; or from the Saxon bac or baec — back, and gamen or gamone — game, a game in which the player is sent back.
This game was played in England at a very early date. The name “Backgammon” has apparently been given to it since the days of Chaucer as he always referred to it as “Tables,” derived from the Latin tabulae. The game of Tables was played on a board with lines on which men were moved according to the throw of dice. At this period three dice were used, instead of the two used in the present game.
How Tables came to old England cannot be proved, but the Roman game Ludus Duodecim Scriptorum, the twelve-line game, closely resembles it. The Roman game was played on a table with the same number of lines, with the same number of counters, and the moves were controlled by means of dice. In all probability this game was spread throughout Western Europe by the Roman armies and was carried into England in this way. It is played in France as Tric-Trac, in Germany as Bretspiel, and in Spain as Tablas Reales — the royal table.
No doubt the Romans, in turn, took the game from Greece where a game was played on a board or tablet on which lines were traced and counters of some sort moved according to the throw of dice. Plato alludes to a game in which “dice are thrown and men are placed after due consideration.”
Games similar to Backgammon were played in early Asia, and the game may originally have come from there. It is interesting to find, in an article by Honda in the Japan Magazine, that the Japanese have a game called Sugoroku (or Backgammon) which is centuries old. It originally was played on a board marked by twelve horizontal, instead of perpendicular, lines. Fifteen black and fifteen white pebbles were used, and they were moved according to dice thrown from bamboo tubes. In late years this game has been so changed that it no longer resembles the present European game.
Dice are of very early origin, and their appearance seems to have remained the same through all the centuries. Homer mentions them, and they have been found among Egyptian Hieroglyphics.
The game of Backgammon always has been referred to in literature as a game of refinement. References to the game are found in Shakespeare, and in the works of many famous writers.
To romen by the see, but discomfort,
And schopen for to playen somewhere elles.
They leden hire by ryveres and by welles,
And eek in other places delitables;
They daunce and playe at chesse and at tables.”
“The Frankeleynes Tale.”
2
Equipment
Backgammon is played on a board especially designed for the game. Custom for some reason has decreed that the Backgammon Board and the Checker or Draught Board shall be made together. Rome is said to have originated the idea of the double board with Backgammon on one side and Checkers on the other.
Today the usual board is made with a fold in the center, the inside or box part with the raised sides being used for Backgammon and the outer or flat side being marked for Checkers. This board is accompanied by two sets of fifteen men each, of contrasting colors; two dice boxes, one for each player, and usually a set of two dice for each player. Sometimes only one set of two dice is used alternately by both players. The dice are the ordinary dice with which we all are familiar and which are used in so many different games. They are six-sided and the faces are numbered from one to six. Many writers use the French terms (ace, deuce, trois, quatre, cinque, six) in referring to the dice, but in this book the English equivalents are used.
Each backgammon board is divided in the middle by a fold, or partition, which is called “the Bar.” Each side of this bar is divided into two tables of six “points” each. These points alternate in two contrasting colors. The two tables nearest each player, separated by the bar, are known as that player’s tables and are called his inner or outer tables according to the set-up of the men. (See Chapter 3.)

| Diagram 1. — The board |
3
Description Of The Game
I. Setting up the Table
In the Regulation Backgammon the men or counters are placed upon the board, prior to the commencement of the Game, in one of the two following definite patterns. (Note: For convenience the players and their corresponding counters will be referred to as Black and White. Black always plays the black counters and White the white counters.)
With the counters set up in the proper form the board will look like Diagram 2 or Diagram 3, depending upon whether the inner tables are set up on the right or on the left. Each player has an inner or “home” table located on his side of the board. This is directly opposite and on the same side of the bar as the Opponent’s home table. Upon examining Diagrams 2 and 3, it is seen that the home tables are always set up with two men on the outer edge. Black. always has two men in White’s home table and vice versa.
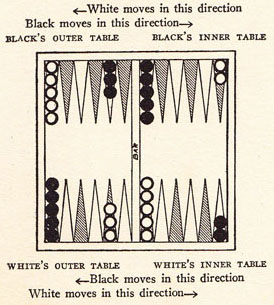 Diagram 2 |
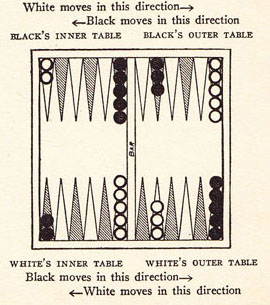 Diagram 3 |
The home table can be set up on either the right or the left side of the board, but the relative distribution of the men must be the same as shown in Diagrams 2 or 3. Notice that if one player has his inner table on his right, it must of necessity be on the left of the player sitting opposite. Players should accustom themselves to play in either position.
The space on the other side of the bar from a player’s inner table is called his outer table.
In setting up the original table, note that there are always the same number of black and white men directly opposite each other.
The old custom to set up the men with the inner tables nearer the light is still followed. But in these days where the direction of the light is of so little importance, I venture to suggest that the player throwing the high die shall be given the privilege of deciding whether he prefers the black or the white men and whether he prefers the men set up so that his inner or home table is at his right or left.
II. Object of the Game
Briefly, each player moves his men into his inner or home table and then removes them entirely from the board. All moves are made according to the throw of the dice, and the player who first removes all his men from the board wins. The two opponents move their men in opposite directions so that they meet and pass each other as they travel around the board.
III. Throw of the Dice
The usual practice is for each player to throw the dice on the player’s right side of the bar.
There are two variations on the method of beginning to play:
- Each player throws one die. In case both players throw the same number, they throw again. (Note: See Chapter on Doubles.) High wins, and the usual custom is for the winner to play his own and his Opponent’s throw for the first move. Exception: Some permit the winner to throw a second time, allowing the throw of his own pair of dice to govern the opening move.
- Some throw two dice for the opening move, and the winner is given the option of playing his first throw or throwing a second time.
The players alternately throw the dice and move until the game is completed.
IV. Method of Moving the Counters
From the position in which the board is set each player starts to move his men toward his own inner table. The path followed must be from the Opponent’s inner table through the Opponent’s outer table, then through the Player’s outer table into the Player’s inner table. See Diagrams 2 and 3. Men already part way home have only the remaining distance to travel.
Men may be moved only according to the numbers turned up at each throw of the dice. The count begins on the point next to the one on which the man to be moved is resting; thus an even number moves to a corresponding color and an odd number to a point of the opposite color.
Players are permitted to move their men in two ways:
- The same man may be moved twice: once according to the number on one of the dice and once according to the second number thrown. (Note: A player is not allowed to add the two numbers and then play the total in one move.)
- Two different men may be moved: one man according to one of the numbers, and a second man according to the other number.
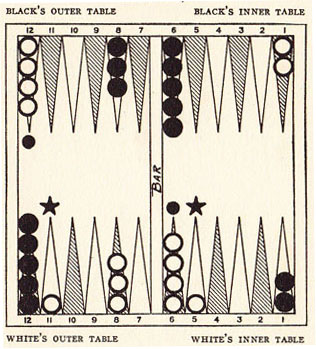
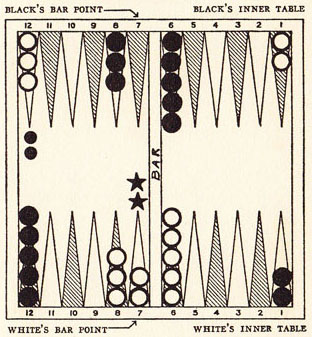
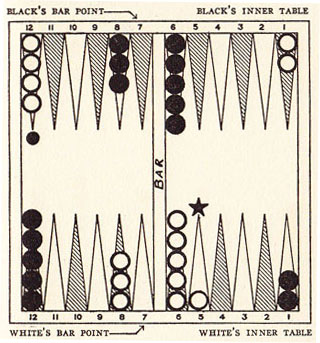
Example 1: Diagram 4.

Diagram 4
(Note: The numbers are added here for reference, and are not found on the actual playing boards.)
White throws a three and one. He plays the three from point 8 in his own outer table to point 5 in his inner table, and plays the one from point 6 to point 5 in his inner table. This covers or blocks point 5 so that his opponent cannot play on it. Such a move is called “making a point.” (Note: Diagram 4 is pictured with the above play completed.)
V. Blocked Points
There is no limit to the number of his own men which a player can put upon one point, provided that point is not already occupied by two or more of the Opponent’s men.
A point on which two or more men are resting is said to be “blocked,” and an Opponent cannot play a man upon that point.
It is allowable to jump a man over a blocked point, provided the number that is being played brings the man to a free point. If one man is being played for both numbers thrown, these numbers must be played separately so that either one number or the other will allow the man to rest on a free point.
Example 2: Diagram 4.
Black throws a four and six. He cannot move a man from point 1 in White’s inner table with a four, as this would bring him to White’s point 5 which is blocked. He may, however, first play a six which will bring him to point 7 in White’s outer table, a point which is not blocked, then he can play his four from that point.
(Note: Diagram 4 is pictured with the above play completed.)
If doublets are thrown, double the number of moves are made. All four of these moves may be made by the same man, or by four different men, or in any combination the player wishes, provided none of the moves bring a man on a blocked point.
If it is impossible to play either or both of the numbers thrown, because of blocked points, the player loses that move. If he can play either number, he must do so; and if playing one of them first enables him to play the other, he must play them in the order which allows him to make both moves. Some players maintain that if a player can play only one number he must play the higher.
VI. Blots
Any single man resting upon a point is called a “blot.” If an Opponent gets the proper throw, and if he wishes to do so, he may play a man to such a point. In that case the blot is removed from the board and placed upon the bar. This is called “hitting” a blot. When a player has had a man hit or “taken up” by his Opponent, he must reenter that man in his Opponent’s inner table before making another move. He enters the Opponent’s table according to the throw of the dice. If the points corresponding to the numbers thrown on the dice are blocked, he cannot enter. If both points are vacant, he may choose either one to enter, and play the other number elsewhere. If there is a blot on the Opponent’s inner table, he can enter and take up that blot at the same time.
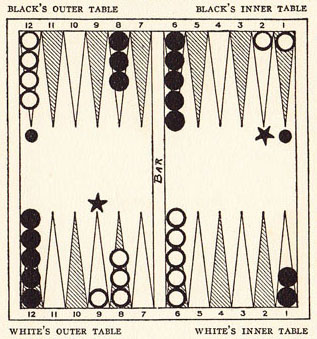
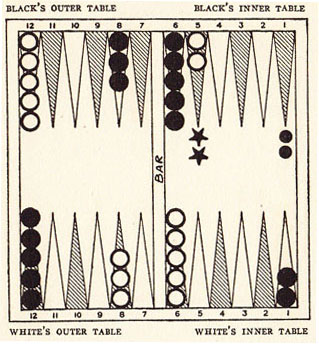
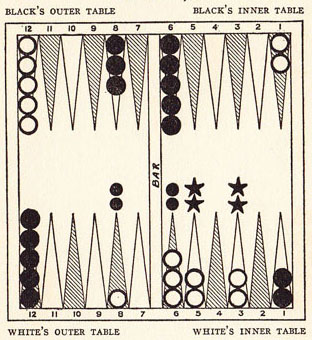
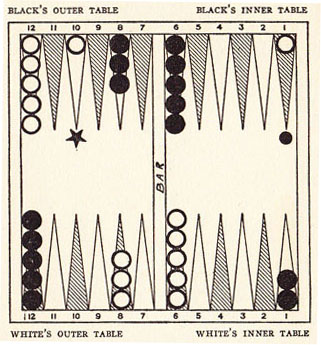
Example 1: Diagram 5.
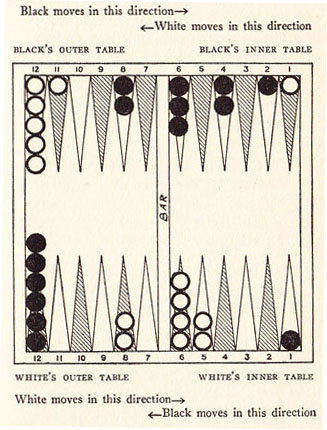
Diagram 5
White has left a blot on point 11 in Black’s outer table. Black throws a two and five. He plays first the two, hitting White’s blot on his point II and placing the blot on the bar. He then plays the five, which allows him to place his man safely on point 6 in his inner table.
Example 2: Diagram 5.
White now must reenter his man in Black’s inner table. He throws a four and six. As Black has both these points in his inner table covered, White cannot enter and loses his throw. After Black has played again, White throws a two and five. He enters on point 2, at the same time hitting Black’s blot. The blot is placed on the bar, and White plays the five elsewhere. Black must now enter this man in White’s inner table before he can play again.
(Note: This table is set merely to illustrate the mechanics of play. Whether or not Black should have had a blot in his home table does not enter into the discussion at this time.)
VII. Bearing off the Men
When either player succeeds in placing all of his men in his home table he then can begin to “throw off” or remove them entirely from the board, in accordance with the numbers thrown; i.e., if a two and six is thrown, a man may be removed from point 2 and another from point 6. In the same manner four men instead of two may be removed if doublets are thrown. The player may choose whether to throw off a man or to move to a lower point in the table, but he must do one or the other whenever possible.
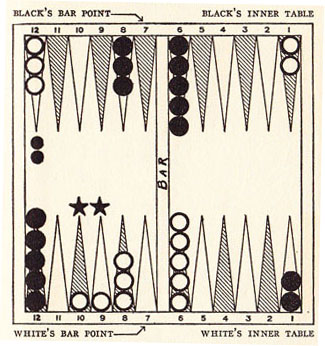
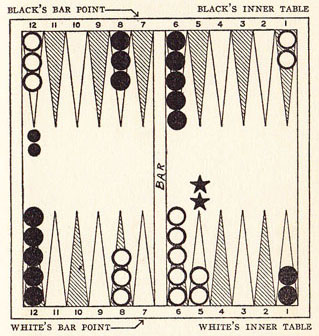
Example 1: Diagram 6.
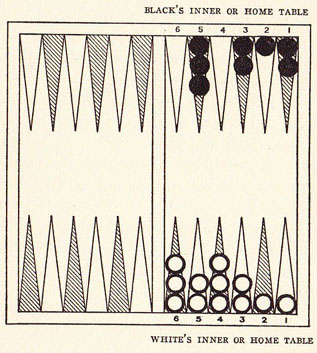
Diagram 6
White is “bearing off” his men from his home table. He throws a six and three and has a man on each of these points. He must throw off the six as he cannot play it, but he may choose whether to throw off or move up the three as he is able to do both.
Whenever a player throws a number higher than any point on which there is a man in his table, he may throw off a man from the highest point where a man is located. He cannot, however, throw off a man, if the point indicated is vacant, if there is any man on a higher counting point in the table.
Example 2: Diagram 6.
Black is bearing his men from his home table and throws a six and four. For the six throw he bears a man from point 5 as point 6 is vacant. For the four throw he cannot bear off a man since point 4 is vacant and there still are men on the higher counting point 5. He is, therefore, obliged to move a man from point 5 to point 1. This might work to his disadvantage as it leaves a blot which could be taken up if White still had a man in Black’s table. In the above example if there were no men on point 5, Black could play his four by throwing off a man from point 3.
If, while bearing off, a man is taken up or hit by the Opponent, that man has to be reentered in the Opponent’s home table, and he must travel all the way around the board before any more men can be borne from the home table.
The player who first bears all his men from the board wins.
If the Opponent has borne any one of his men from the board, it is a single game.
If the Opponent has not borne a single man from the board, it is a “gammon” or double game.
If the Opponent still has a man in the winner’s inner table and he has not borne a man from the board, it is a “backgammon” or triple game. (Note: If a player is taken up after he has borne a man from the table, his Opponent cannot score a gammon or backgammon.)
When consecutive games are played by two people, it is customary for the winner of the first game to take the first throw for the next game. If, however, a gammon or backgammon is won, the players throw again for the first move of the next game.
4
Doubles
The introduction of doubles into Backgammon is equally responsible with Chouette for the renewed popularity of the game.
I. Automatic Doubles
1. When two people are throwing for the first move and each player is using a single die, it sometimes happens that they throw the same number. This constitutes an Automatic Double, and a game which was worth one point now is worth two points. When the score is based on so much a checker (see Chapter on Scoring), each checker now is worth two points instead of one. This may happen again on the next throw, in which case the score again automatically doubles. Since these doubles may continue indefinitely, and thus reach a very high point, many players consider it wise to limit the number of these Automatic Doubles allowed in any one game. (Note: When playing Chouette, the first throw of the dice decides which player sits in the box and which is the Active Partner. These two players then throw again for the first move; the Automatic Doubles do not begin until the player in the box is decided upon and the game actually is started.)
2. A gammon (winning a game before the Opponent has borne a single man from the board) automatically doubles a player’s final score.
3. A backgammon (winning a game while the Opponent, who has not borne a man from the board, still has a man in the winner’s home table) automatically triples (or multiplies by three) the player’s final score.
4. Automatic doubles of the men, when the score is based on the number of checkers remaining on the board, will be explained in the Chapter on Scoring.
II. The Optional Double
At any time during the game a player may, if he wishes, say “I double,” provided he does so immediately before throwing his dice. His Opponent may decline or accept this double. If he declines the double, the game stops; it is scored as it stands at the moment the double was offered, and the player refusing the double is the loser.
If the Opponent accepts the double, the game proceeds. The player who accepted the double may at any time now offer another double, which the first player may accept or decline; and the game again automatically stops or proceeds. This doubling may continue alternately throughout the entire game or until one player declines to accept an offered double. Bear in mind that one player, after doubling, cannot double again until after his Opponent has in turn offered a double.
III. General Advice on Doubling
It usually is unwise to double too early in the game. Fortune changes so rapidly that conservatism is the better general policy. If, however, a player has two advantageous throws in succession, such as double ones followed by double fours, he should double at once; and the Opponent, unless he, also, has had two good throws, would be wise to decline the double. Thus, by accepting defeat at once, the Opponent might save the loss of a gammon. A lover of the back-game (see Chapter 8, Section III), however, will seldom decline a double early in the game, as he naturally is eager to try his skill against a forward Opponent.
As the game progresses, a player can tell whether or not he is ahead or behind by comparing the distance his own men are from his home table with the distance the Opponent’s men are from the Opponent’s home table. As it is impossible to predict future throws of the dice, “the chance of the throw” can change the fortune of a player at almost any stage of the game. For this reason it is not uncommon to have several Optional Doubles in one game, made by the two players as the probabilities of winning seem to favor first one and then the other. Again, there is the psychological or bluff double, made with the hope that the other player may not dare to accept and therefore will give up while he still has some chance of winning.
(Note: When playing Chouette, the partners may consult as to offering, accepting, or declining doubles; and if they disagree, the Active Partner has the final decision. When one of the inactive partners wishes to decline, and the Active Partner decides to accept a double, the player who wishes to decline is allowed to retire from the game. In this case he loses the amount of the game, as it now stands, to the Active Partner, who then wins or loses the amount of the retired partner’s full share when settling with the man in the box at the end of the game.)
All doubles in backgammon operate as follows:
- The first double increases the unit of play from one to two.
- The second double increases the two to four.
- The third double increases the four to eight, etc.
Doubles mount up very rapidly, as is seen in the following table based on a unit value of one.
| One double equals | 2 |
| Two doubles equal | 4 |
| Three doubles equal | 8 |
| Four doubles equal | 16 |
| Five doubles equal | 32 |
| Six doubles equal | 64 |
| Seven doubles equal | 128 |
| Eight doubles equal | 256 |
| Nine doubles equal | 512 |
| Ten doubles equal | 1,024 |
5
“Chouette”
Chouette (to play alone against two or more) is the modern way of introducing sociability into a game which formerly could interest only two people.
When more than two people take part in a game of Backgammon today, the player throwing the high die is said to “sit in the box” or play la chouette. The other players combine against him as follows:
The player throwing the second highest die is the first Active Opponent of the player in the box. He sits opposite and plays the first game. He consults with his inactive partners as to plays, doubles, and whether to accept or decline a double made by the player in the box. In case of disagreement the Active Partner has the final decision. When the partners disagree as to doubles, some can accept and the others decline. (This has been taken up more fully in the Chapter on Doubles.)
If the player in the box is the winner of the game, when playing Chouette, he collects the amount of the game, together with all doubles, from each of the remaining players. The player who originally threw the third highest die now takes his place opposite the man in the box and becomes the Active Opponent for the second game. The defeated active partner now becomes the lower ranking of the inactive partners and acts in an advisory capacity until such time as it is again his turn to play.
If a player joins the game after the original throw of the dice, he takes his place at the foot of the list. Each player takes his turn as the Active Player against the man in the box, in accordance with his original throw, and moves up in turn after rejoining the inactive players.
The player in the box continues to play against each of the others in turn, until one of them succeeds in defeating him. This winning player then sits in the box and plays against the others.
When the player in the box is defeated, he loses the amount of the game to each of the inactive partners as well as to the Active Opponent. He then joins the inactive partners for the next game, taking his position at the foot of the list.
Chouette can be played by any number of people; but the game is cumbersome when too many participate, and if there are more than five it is wise to break up into two groups.
When a large number are playing, it sometimes is arranged so that one or more are permitted to join with the man in the box and play with him against the others.
6
Scoring
Scoring in Backgammon consists mainly in keeping a record of the doubles and then in applying them to the type of game which is being played.
At the present time the popular method of counting the doubles is by the use of common matches. A match is placed upon the bar whenever an Automatic or Optional Double is made. When the game is finished, the score is reckoned on the basis of a double for each match on the bar. The matches are then removed.
There are at least three methods of scoring being used today, and each of these will be considered in turn.
I. Scoring by Games
When playing games, gammons, and backgammons, the scoring is very simple. Assuming one as a unit for the game, the final score for that game is one, doubled as many times as there are matches on the bar.
In the case of a gammon, this score is again doubled.
In the case of a backgammon, multiply by three.
Let us assume that White succeeds in gammoning Black. There are two matches on the bar. One for an Automatic Double, occasioned by the Opening Throw; the other an Optional Double, made by White and accepted by Black. The score is as follows:
One for game.
Doubled once becomes two.
Doubled again becomes four.
Doubled again for the gammon which makes the final score for the game eight points.
If they are playing Chouette and Black is sitting in the box, he loses eight points to each of the Partners. If White is sitting in the box and playing against Black and Brown, he wins eight points from each of the others. The score would be kept with a plus and minus as follows:
| White | +16 |
| Black | −8 |
| Brown | −8 |
Had White succeeded in winning a backgammon, the score would have been three times four or twelve, instead of eight as for the gammon.
II. Scoring by Checkers
There are two methods of scoring, based on the number of checkers still left on the board at the end of the game.
Method 1. The winner scores:
- One point for every man the loser has left in the loser’s inner table and
- Two points for every man the loser has left in the loser’s outer table and
- Three points for every man the loser has left in the winner’s outer table and
- Four points for every man the loser has left in the winner’s inner table or on the bar.
The result of the above is doubled in accordance with the number of matches on the bar. There are no additional doubles for gammons or backgammons. If a double is declined during play, the game stops and the score is made up at so much a checker, in the manner explained above — based on the number of men in each table at the time the double is refused. Any previous Doubles, whether Automatic or Optional, apply in making up the score. (See Example 1: Diagram 7.)
Method 2. A variation of the above manner of scoring seems to be coming into vogue, and is as follows:
The winner scores:
- One point for every man the loser has left in the loser’s inner table and
- Double the above (two points) for every man the loser has left in the l0ser’s outer table and
- Double again (four points) for every man the loser has left in the winner’s outer table and
- Double again (eight points) for every man the loser has left in the winner’s inner table.
No additional doubles for gammons or backgammons are allowed. Regular doubles may be made during play, and they are scored as explained in Method I. (See Example 2: Diagram 7.)
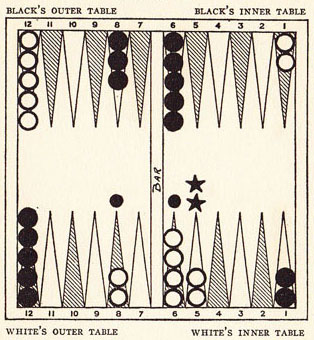
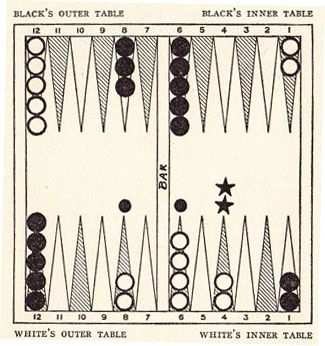
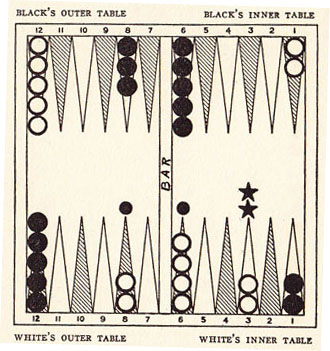
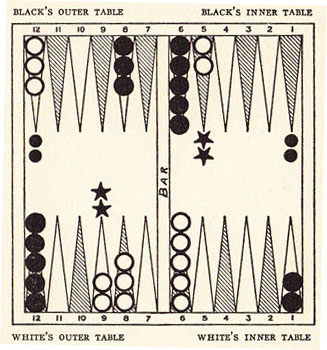
Example 1: Diagram 7.
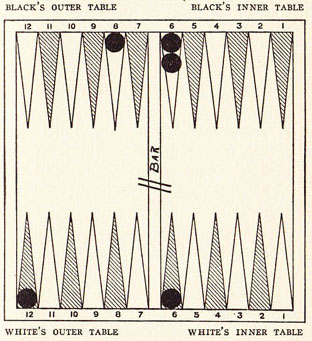
Diagram 7
White has won the game. There are two matches on the bar.
Score by Method 1.
| Count one point for each man in Black’s inner table | 2 |
| Count two points for the man in Black’s outer table | 2 |
| Count three points for the man in White’s outer table | 3 |
| Count four points for the man in White’s inner table | 4 |
| Total score for checkers | 11 |
| Double once for first match | 22 |
| Double again for the second match | 44 |
| Final score for the game | 44 |
Example 2: Diagram 7.
White has won the game. There are two matches on the bar.
Score by Method 2.
| Count one point for each man in Black’s inner table | 2 |
| Count two points for the man in Black’s outer table | 2 |
| Count four points for the man in White’s outer table | 4 |
| Count eight points for the man in White’s inner table | 8 |
| Total score for checkers | 16 |
| Double once for the first match | 32 |
| Double again for the second match | 64 |
| Final score for the game | 64 |
III. Scoring by Combination of Games and Checkers
There are two systems of scoring, based on the number of checkers left on the board and at the same time allowing the doubles for gammons and backgammons to count.
System 1. Make up the score according to games, gammons, and backgammons with any Automatic or Optional Doubles. In addition, double this result if the loser has one or more men in his outer table, or multiply by three if the loser has one or more men in the winner’s outer table, or multiply by four if the loser has one or more men in the winner’s inner table.
Example 3: Diagram 7.
White has won the game. He cannot score a backgammon as Black has borne a man from the table. He scores as follows:
| Game equals | 1 |
| Multiply by four because Black has a man left in White’s inner table | 4 |
| Doubled for the first match | 8 |
| Doubled for the second match | 16 |
| Final score | 16 |
System 2. The winner scores one point for every man the loser has not borne from the board at the end of the game, regardless of the table in which the men are located. In the case of a gammon, double; in the case of a backgammon, triple the final score.
Example 4: Diagram 7.
White has won the game. He scores as follows:
| One point each for the five men Black has not borne from the board | 5 |
| No doubles for gammons. | |
| Double once for the first match | 10 |
| Double again for the second match | 20 |
| Final score | 20 |
It is difficult to say which system or method is best. Undoubtedly, the large majority of players still score by games, gammons, and backgammons. This is true in spite of the fact that this method does not give quite as accurate a reward for the actual defeat as does the score by the position of the checkers. Gammons and backgammons have been an institution in the game for so many years that it is rather a shame to eliminate them. Possibly, one of the two variations explained in Section III of this Chapter presents a happy combination of the two methods of scoring.
7
Initial Plays
Since they are not influenced by the constantly changing position of the men, the best initial moves in Backgammon can be suggested with reasonable accuracy. These opening moves will be given in detail, following general advice regarding the important principles to keep in mind.
I. General Strategy for Initial Moves
When the first throw will allow a player to cover a point, it usually is wise to do so. (Note: To cover a point means to place two men upon it so that it becomes a blocked point.) This prevents needless exposure of a blot, and makes one less point on which the Opponent can play and one more point to which the Player later can move a man with safety.
Exception: The throw of four and six would allow a player to cover point 2 in his inner table. This would bring the men so far into the table that they could not be played again, and this would be likely to be disadvantageous so early in the game. It also would separate the men too much. It is, therefore, better policy to take one of the two men on point 1 in the Opponent’s inner table to point 11 in the Opponent’s outer table. It then is possible that on the next throw this man can be used to cover a point in the Player’s outer table.
II. Leaving “Blots”
When obliged to leave a blot:
- Leave it on a point which is very advantageous to block, and hope to cover it on the next play. This should be done freely when playing games and gammons.
- Leave it on the least dangerous point. It is more dangerous to leave a man where he can be taken up with a number from one to six (called a single throw) than to leave one where a double throw (the numbers on two dice) is required in order to take up. Example: To take a man from point 1 in the Opponent’s inner table to point 9 in the Opponent’s outer table would require a double throw; i.e., three and five, two and six, or double fours.
If a blot is left where it can be taken up with a single throw, it is safer if it is close to the Opponent’s men. If it is left where the Opponent requires a double throw to take it up, it is safer when it is as far as possible from the Opponent’s men. (See Chapter 8, Section V.)
- Everything else being equal, leave the blot on the point which is nearest the Opponent’s inner table; for if it is taken up, it will have only a short distance to retravel.
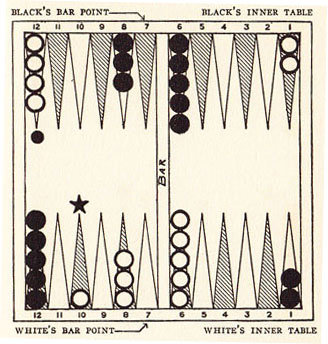
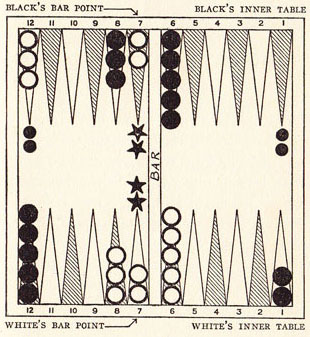
III. Strategic Points to Cover
1. The Bar Point.
The “bar point” is the point next to the bar in a player’s outer table. (See Diagram 8.) This point is considered by many players to be the most valuable point to block quickly — thus preventing the Opponent from getting one of his two men out of the Player’s inner table with a single throw. Covering the bar point in the Player’s own outer table early in the game blocks three adjoining points and makes it extremely difficult for the Opponent to get his two men out of the inner table. It also keeps the Player’s men together, which is excellent strategy at all times.
2. Point 5.
Point 5 in the inner table is such an important point to cover that many players give it first consideration and deliberately place a blot on this point, hoping it will not be hit and that they can cover it on the next play. It has the blocking advantage of the bar point and has the added advantage of leaving one less point on which the Opponent can enter if one of his men is taken up; it also establishes a point in the home table for bearing off.
IV. Advantageous Opening Throws
When only one die is thrown by each player for the opening throw and the two numbers are played by the winner, that player can never have a doublet since if the players throw the same number they are obliged to throw again. In this case the two most advantageous throws are one and three, played to cover point 5, and one and six, played to cover the bar point.
Many players, however, allow the winner to throw again with his own dice; and when only two people play, the winner of the first game has the first throw for the second unless it is a gammon or backgammon. In these two cases doublets can be thrown, and the two best throws are:
1. Double ones. This throw permits a player to cover both the bar point and point 5 in his inner table.
2. Double sixes. This throw permits a player to cover both his own and his Opponent’s bar point; and it advances men further toward home than any other throw.
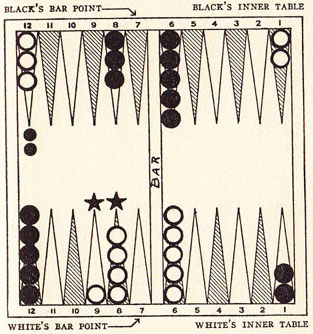
V. Initial Plays Illustrated
All initial moves now will be given in detail with illustrations and comments. These moves apply only to the player who has won the throw and is making the initial play of the game. Plays made after the first move will be considered in Chapter 8.
All diagrams in this chapter picture the completed play. White has had the initial move, and is referred to as the Player. Black is referred to as the Opponent. The dot marks the point from which the man has been taken, and the star marks the point to which the man has been moved. (Note: If Black were making these moves, he would make exactly the same plays going in the opposite direction.)
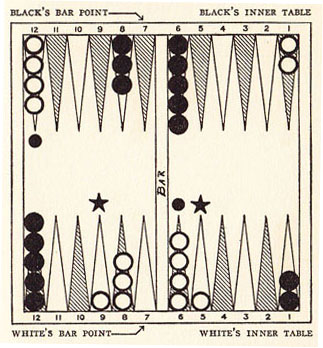
Double Ones
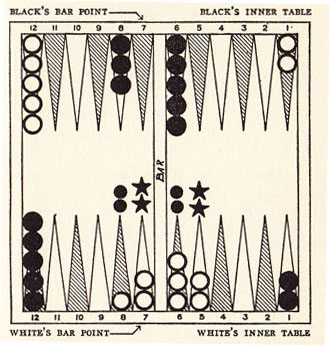
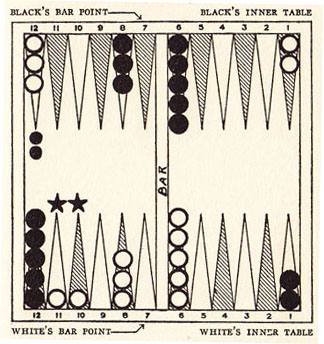
| Diagram 8 |
| Double ones is considered the best possible throw since it allows the player to block the two most important points in his inner and outer tables. Play as in Diagram 8, by moving two men from point 6 to point 5 and two from point 8 to point 7, which is the bar point. There are eight different combinations on the next throw which will permit White to cover the blot on point 8, and a throw of two and four will permit him to cover point 4. |
One and Two
| Diagram 9A |
| One and two is a very poor throw. When playing games and gammons, it should be played boldly, as above, playing the one from point 6 and the two from point 12. Without exposing another blot, the blot on point 5 now can be covered on the next play with a throw of a six, a three, or a one. (Note: The disadvantage of this play is the risk of the blot on point 5 being hit, in which case it must be reentered in the Opponent’s inner table and must travel all the way around the board. There are 36 possible throws, 15 of which permit the Opponent to hit point 5, so Player has better than even chance not to be hit.) |
| Diagram 9B |
| When the score is based on the number of checkers left on the board, one and two should be played conservatively. Move a man from point 12, first the two and then the one, as in Diagram 9B. (Note: A third way to play one and two, which is recommended by some players, is to play the one from point 1 in the Opponent’s inner table and play the two from point 12 in the Opponent’s outer table. This leaves two blots and will spoil a chance to bring the two men safely out of the Opponent’s inner table with doublets on the next throw. No diagram is given for this play as it is not recommended in this book.) |
One and Three
| Diagram 10 |
| One and three is one of the two best possible throws whenever a player is obliged to use his own and his Opponent’s throw for the first move and, therefore, can never have doublets. It is always played to block point 5 in the inner table, as in Diagram 10, by playing the one from point 6 and the three from point 8. |
One and Four
| Diagram 11A |
| One and four is a poor throw. When playing games and gammons, play the one from point 6 and the four from point 12, as in Diagram 11A. The reason for exposing a man on point 5, instead of on the bar point, is that there are more chances to cover the blot on point 5, on the next move, than there are to cover the bar point; and points 8 and 6 each are left with extra men which still can be moved without exposing a blot. Also there are seventeen throws which permit the Opponent to hit the bar point and only fifteen which permit him to hit point 5. (See table of Probabilities in Chapter 8.) |
| Diagram 11B |
| When the score is based on the number of checkers left on the board, play the one from point 1 in the Opponent’s inner table and the four from point 12 in the Opponent’s outer table. This play makes it very dangerous for the Opponent to leave a blot on his point 5. (Note: The only move that prevents leaving two blots is to play a man from point 12 in the Opponent’s outer table to point 8 in the Player’s outer table. This places too many men on one point, which is poor strategy, and leaves no future possibilities.) |
One and Five
| Diagram 12 |
| One and five is a poor throw. The strategy is the same as for one and two and for one and four. When playing games and gammons, play as in Diagram 12, by moving the one from point 6 in the Player’s inner table and the five from point 12 in the Opponent’s outer table. (Note: When scoring by the number of checkers left at the end of the game, play the five, as in Diagram 12, and the one from point 1 to point 2 in the Opponent’s inner table, as in Diagram 11B.) |
One and Six
| Diagram 13 |
| One and six is one of the two best possible throws whenever a player is not allowed to throw his own dice for the opening move and therefore cannot have doublets. The one always is played from point 8 in the Player’s outer table, and that man then is covered with a man from point 12 in the Opponent’s outer table. This blocks the bar point, leaving three consecutive blocked points, which give the Player a tremendous advantage. |
Double Twos
| Diagram 14A |
| All doublets are good throws as they block points without exposing blots. There are two excellent ways of playing double twos. The first, pictured in Diagram 14A, plays two men from point 12 in the Opponent’s outer table and two men from point 6 in the Player’s inner table. This blocks two points and still leaves three men each on point 12 and on point 6. These odd men are always valuable for making points on the next throw. |
| Diagram 14B |
| Double twos may be played to advantage as in Diagram 14B, by moving the two men in the Opponent’s inner table all four points. This is important when the Opponent previously has had an initial move of one and six, since the Player is in danger of being blocked in the Opponent’s inner table. Some players consider it an excellent move in any case; it blocks the Opponent’s point 5, and makes it difficult for him to block the Player an dangerous for him to leave a man exposed in his own outer table. |
Two and Three
| Diagram 15 |
| Two and three is a poor throw. Two men should be moved from point 12, leaving the Player with an excellent chance to cover either point 5 or the bar point on the next throw. (Note: The play of a man from point 8 to point 5 is not recommended, for it is more dangerous and only slightly improves the chances to cover a valuable point. The only play which leaves no blot is to move a man from point 12 to point 8. This is an absolutely safe play, but it leaves the Player with no improved possibilities.) |
Two and Four
| Diagram 16 |
| Two and four is another very good throw. It always is played to cover point 4 in the Player’s inner table, by playing the two from point 6 and the four from point 8. |
Two and Five
| Diagram 17 |
| Two and five is a poor throw. Play two men from point 12 in the Opponent’s outer table. The blot left on point 11 may be very valuable to help cover a point on the next throw, and it only can be hit with one particular throw — four and six. (Note: It is not possible for the Opponent to hit this blot with double fives on account of the blocked point 6.) This is the safest point on the board on which to leave a blot. |
Two and Six

| Diagram 18 |
| Two and six is also a poor throw. Since a blot must be exposed in any case, choose the one which can be placed on the important point to block, and play one man from point 12 to point 5 in the inner table. (Note: Some players take a man from point 1 in the Opponent’s inner table to point 9 in the outer table. This man would have less distance to go back if taken up, but this is offset by the advantage of covering point 5 in the inner table if not taken up.) |
Double Threes
| Diagram 19A |
| Double threes is one of the best throws since it permits the Player to cover his bar point or his point 5 in his inner table. The first is an excellent play, for it covers one of the most important points and leaves no man exposed. Bring two men from point 12 to point 10 and then the same men to point 7. |
| Diagram 19B |
| A second and excellent way to play double threes is to move two men from point 6 to point 3 in the Player’s inner table and two men from point 8 in the Player’s outer table to point 5 in the inner table. Those who consider point 5 the most important point on the board always play double threes in this manner. (Note: A third play sometimes made is to move two men from point 8, and two men from point 1 in the Opponent’s inner table.) |
Three and Four
| Diagram 20 |
| Three and four is a poor throw. Move two men from point 12 in the Opponent’s outer table. The position now is favorable to make a point on the next throw, and there is no throw which will permit the Opponent to take up both of these men. (Note: Some players advise playing the three from point 8 to point 5 and the four either from point 1 in the Opponent’s inner table or from point 12 in the Opponent’s outer table. Both of these latter moves leave the blots so that the Opponent can hit them both in one throw, and for that reason the play is not recommended.) |
Three and Five
| Diagram 21A |
| Three and five is a good throw, and the conservative play is to cover point 3 in the Player’s inner table by moving the three from point 6 and the five from point 8. This brings the men a little too far into the inner table, and the experienced player often plays as in Diagram 21B. |
| Diagram 21B |
| When playing three and five by bringing one man from point 12 for both throws, the risk taken in exposing a blot on point 5 is justified only by the importance of that point if it can be covered on the next throw. It is the only point on the board where a player would leave a blot in preference to covering a point. This play should not be attempted by inexperienced players, or when the score is based on the number of counters left on the board. |
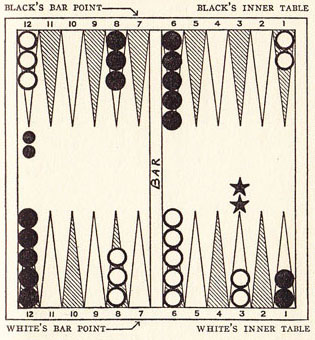
Three and Six
| Diagram 22 |
| Three and six is a poor throw. It is wise to play this throw by advancing one of the two men on point 1 in the Opponent’s inner table for both the three and the six. If he is not hit on the Opponent’s next throw, the man has an excellent chance to escape. |
Double Fours
| Diagram 23A |
| Double fours is an excellent throw and can be played in two ways. The first way is to bring two men from point 12 all the way to point 5 in the Player’s inner table. This covers one of the two most important points. The second way of playing this throw is shown in Diagram 23B. |
| Diagram 23B |
| The second way to play double fours is to bring two men from point 1 to point 5 in the Opponent’s inner table and to move two men from point 12 in the Opponent’s outer table. This play blocks the Opponent’s valuable point 5. (Note: A third way of playing this throw can be used to advantage when the Opponent has had the initial throw and has covered his bar point. Take the two men from point 1 in the Opponent’s home table all the way to point 9 in the Opponent’s outer table.) |
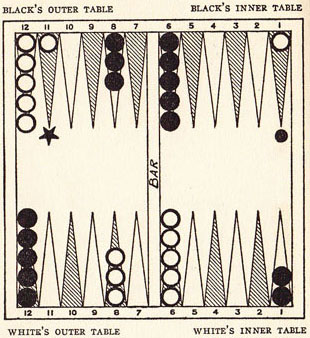
Four and Five
| Diagram 24 |
| Four and five is a poor throw. Move two men from point 12 in the Opponent’s outer table. This leaves an excellent chance of covering point 5 or the bar point on the next throw, and the blot can be hit only by a double throw. (Note: Some players prefer to move a man from point 1 in the Opponent’s inner table for both moves, but this play is not recommended. The blot can be hit with a single throw, and it usually is better to keep these two men in the inner table until a doublet allows them to be brought out safely.) |
Four and Six
| Diagram 25 |
| Four and six is not as good a throw as it may first appear to be. Point 2 in the inner table can be covered, but this brings these men so far into the table that they are out of play. The better play is to move a man from point 1 in the Opponent’s inner table for both numbers. This play is too dangerous if the Opponent has had the initial move and has a man on two points in the Player’s outer table. (Note: Picture the position if Black has played a four and six and has a man on point 11 in White’s outer table. He now has two men which can take up White’s blot with a single throw.) |
Double Fives
| Diagram 26 |
| Double fives will not accomplish as much as would be expected from the next to the highest possible throw. It only can be played by using all four moves in bringing two men from point 12 in the Opponent’s outer table to point 3 in the Player’s inner table. This separates the men a little more than is desirable. |
Five and Six
| Diagram 27 |
| Five and six is an excellent throw and is played by moving a man from point 1 in the Opponent’s inner table, first a six and then a five, to safety on point 12 in the Opponent’s outer table. |
Double Sixes
| Diagram 28 |
| Double sixes is the second best throw and is played to cover both bar points. (Note: This throw can be most embarrassing when it follows and Opponent’s initial play of one and six. In this case move four men from point 12 to the bar point, and play for a complete blockade, which means covering six consecutive points. Let the Opponent take up the single man left on point 12 if he chooses, and the Player then may use him to play when the throw is not advantageous for the blockade.) |
8
Forward And Backward Games
After both players have moved and the game actually has begun, the constantly changing positions of the men affect the play to such an extent that only general rules regarding the playing policy can be given. There is no game in which fortune changes more quickly than in Backgammon.
Most of the early throws of the game can be played as advised in Chapter 7. Caution must be exercised in leaving blots when the Opponent already has spread his men and thereby has increased the danger of the blot being hit. When playing game and gammons, the policy is quite different than when playing so much a checker. In the former case it does not matter how many men are left on the board, provided one of the loser’s men has been thrown off. In the latter case it is extremely important that the loser has as few men as possible still on the board. In the former case the additional doubles for gammons and backgammons justify risks which would be unwise when scoring so much a checker. There are three types of games or policies to adopt as follows:
I. The Blocking Game
When a player has had an advantageous initial throw, he should attempt to cover the points close to the bar in his outer and inner tables in an effort to block the Opponent’s two men in his inner table so that they cannot escape from that table. This is especially important when playing gammons. A player is justified in running considerable risk in exposing blots in an effort to create this blockade. When able to form such a blockade and at the same time get the two men out of the Opponent’s inner table, there is an excellent chance for a gammon. It seldom is wise to take up many of the Opponent’s blots in this case, as more than three of the Opponent’s men in the Player’s inner table interfere with the blockade and make it a little difficult for the Player to get his own men into his table and borne off.
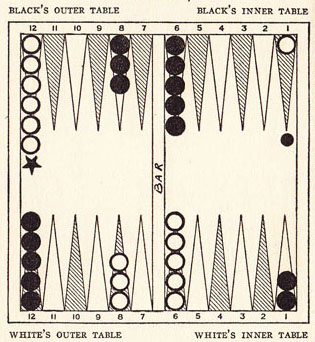
II. The Running Game
When the Opponent has succeeded in moving his two men from the Player’s inner table and the Player has a chance to move his own two men from the Opponent’s inner table, a running game should be adopted immediately by both players; i.e., the men should be gotten to the home table and borne off as quickly as possible, with no wasted moves. Always play the man which can be moved into the next table with the fewest wasted points, rather than a man which can be moved so that he stays in the same table. (See Diagram 29.)
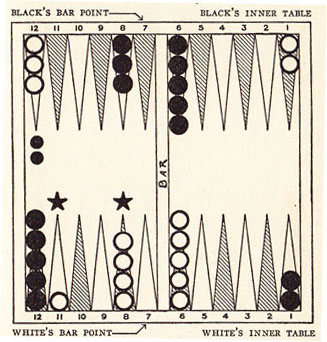
Example 1: Diagram 29.
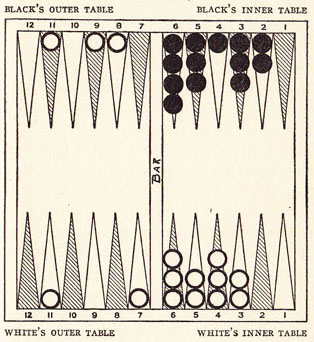
Diagram 29
In the diagram, Black has all of his men in his inner table and is bearing off. White, who is running for home, throws a two and six. He should play the man on point 11 in Black’s outer table for the two and play the same man to point 6 in White’s inner table for the six. This gets the man into the inner table without a single wasted point. (Note: The worst possible way to play this throw would be to play the two from point 8 in Black’s outer table and the six from point 7 in White’s outer table. This still would leave three men in Black’s outer table, and a double throw would be required to get any of them home. The six would have been wasted by playing a man from point 7 in White’s outer table, for a later throw of even a one would have advanced him into his home table.)
Example 2: Diagram 29.
White throws a one and four. He should play the one from point 7 in his outer table to point 6 in his inner table and the four from point 9 in Black’s outer table to point 12 in his own outer table. This does not waste a point in advancing the two men into the next table.
When the Opponent has men which must be passed in order to get home, play as follows:
When ahead of the Opponent, exercise great care in leaving blots; since it is most important not to be taken up. Do not take up an Opponent’s blot, for it will probably be a disadvantage to have that man in the way, and may result disastrously if he should hit a blot which the Player is obliged to leave exposed.
III. The Back Game
When the Opponent has had two or more good throws and the Player’s throws have been indifferently good, a backward game should be played. No time should be wasted in attempting to take out the two men in the Opponent’s inner table. They should be left on point 1 in readiness to hit any blots the Opponent may be obliged to expose when entering his table. In the meantime as many points as possible should be blocked in the Player’s home table — to make it difficult for the Opponent to enter if he is taken up. Thus in delaying his progress lies the Player’s only hope of winning. Blots should be exposed freely, in the hope that the Opponent will take them up and that these men entered in the Opponent’s home table can be used to take up any blots the Opponent may have to leave on the board. Many apparently hopeless games have been won by playing a back game, and it is the only sound defense when far behind.
IV. Bearing off the Men
The method of bearing off men has been explained in an earlier chapter. Four men can be either “thrown off” or moved when doublets are thrown, and a player may choose whether to bear off the man or move him up. It is wiser to bear off a man than to move up, except when the Opponent still has in the table a man with which he could take up a blot which was left exposed. In this case move the men forward whenever it will lessen the danger of being obliged to leave a blot on the next throw. (See Diagram 30.)
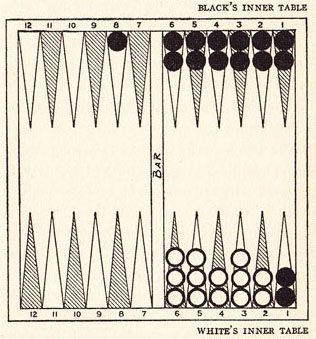
Diagram 30
White is bearing off his men. He has thrown a three and five and may throw them both off the board without exposing a blot. If he does this, he will leave his men so placed that many throws will force him to leave a blot on the next play. Black has his inner table completely blocked, so that White could not enter if taken up. If that happened, White would lose all his advantage and might easily be defeated. He should, therefore, bear off the five and play the three from point 6 to point 3. He is now in a much better position, as there are only two throws which can force him to leave a blot on the next play.
V. Probabilities
When forced to leave blots, consider the probability of being hit. The safest place is on a point which can be reached only by a double throw 5 and the farther away the blot, the fewer the numbers that can reach it. Example: A blot which is eleven points from the Opponent’s nearest man can be reached only by a throw of five and six. A blot ten points from the Opponent’s nearest man can be hit with four and six and with double fives, provided the points are clear which would permit the Opponent to play the double throw. A blot eight points from the Opponent’s nearest man could be hit with two and six, three and five, double fours, and double twos. An exception to this law of probability, and one sometimes overlooked, is the twelve which can be reached with double sixes, double fours, and double threes.
The safest place for a blot which can be hit with a single number is as close as possible to the dangerous Opponent. A blot next to the Opponent could be hit only with a one, while a blot six points away could be hit with a six and also with one and five, two and four, double threes, and double twos.
It is, of course, obvious that a blot is always safer when within reach of only one of the Opponent’s men, than when it is exposed to two or more.
The following table shows the probabilities of getting a throw which will permit a player to enter or to move a given number of points in the manner explained above. All double throws except doublets have two chances. A three and six could be the three on die number one and the six on die number two, or the six on die number one and the three on die number two. Any combination of two different numbers would, therefore, be counted twice in reckoning probabilities, and doublets would be counted once. There are, in all, thirty-six possible throws of the dice.
| 1 | can be thrown in | 11 | different ways. |
| 2 | can be thrown in | 12 | different ways. |
| 3 | can be thrown in | 14 | different ways. |
| 4 | can be thrown in | 15 | different ways. |
| 5 | can be thrown in | 15 | different ways. |
| 6 | can be thrown in | 17 | different ways. |
| 7 | can be thrown in | 6 | different ways. |
| 8 | can be thrown in | 6 | different ways. |
| 9 | can be thrown in | 5 | different ways. |
| 10 | can be thrown in | 3 | different ways. |
| 11 | can be thrown in | 2 | different ways. |
| 12 | can be thrown in | 3 | different ways. |
| 15 | can be thrown in only 1 way. | ||
| 16 | can be thrown in only 1 way. | ||
| 18 | can be thrown in only 1 way. | ||
| 20 | can be thrown in only 1 way. | ||
| 24 | can be thrown in only 1 way. | ||
The average throw of the dice has been estimated to be “eight.”
9
Rules Of The Game
Backgammon has always been a “gentlemen’s” game with very few restrictions or rules. It may be that with the renewed popularity of Backgammon some definite system will be worked out to govern the game, as has been done for Auction and Contract through the Whist Club of New York. Rules for a game of this sort should be simplified as much as possible, and should be planned so as not to interfere with the enjoyment of the game.
The following rules are generally accepted by all players. Other rules, sometimes mentioned, have been omitted here as too drastic and as unnecessary for practical use.
- The dice must be thrown into the table on the P1ayer’s right hand; and if either die jumps from one table to the other, or off the board, or on to the bar or frame, the throw is void; and the dice must be thrown again by the same player (who does not lose his turn).
- If one die rests on top of the other, or is tilted against the other or against the bar or against a counter, the throw is void; and both dice must be thrown again by the same player (who does not lose his turn).
- A man is considered “played” when it has been moved the correct number of points, in accordance with the dice, and has been quitted.
- If a player moves a man an incorrect number of points, the adversary may require the move to be corrected; but this must be done before another throw is made.
10
Russian Backgammon
When a game as old as Backgammon is handed down from one generation to another with no standard system of rules, it is impossible to avoid variations in the methods of play.
The game I have always played and known under the name of Russian Backgammon differs slightly from that described in modern “Hoyle.” Other writers, however, explain the game as it was taught to me, and as I am giving it below.
Russian Backgammon starts with the board clear of all counters. All men, both black and White, are entered in the same table — which may be at the left hand of either player. The men are entered according to the throw of the dice. Black and White are both moved around the table in the same direction, from the table where they entered, through the outer tables, to the final table from which they are borne off the board. The final table is always directly opposite the entering table and on the same side of the bar.
I. Throwing the Dice
Each player throws for the first play. Either one or two dice may be used. High wins, and the winner either may throw again with his own dice or use the initial throw for his first play. In case of a tie, another throw is made. Players continue to throw the dice, and they play alternately throughout the game.
II. Doublets
If doublets are thrown in Russian Backgammon, four plays are made in accordance with the numbers on the dice. The dice are then turned over and four more plays are made in accordance with the numbers on the opposite faces of the dice. The player then throws again. If two doublets are thrown in succession, both sides of the second doublet are played as before; but a third throw is not permitted.
The two opposite sides of the dice always add to seven, so that if double sixes are thrown, the opposite sides are ones, if double fives are thrown, the opposite sides are twos; if double fours are thrown, the opposite sides are threes; — always a total of seven.
All four plays for one side of the dice must be made, or the opposite side cannot be used; i.e., if double fives are thrown and a player is able to play only three of these fives, he is not allowed to play any of the twos on the other side of the dice and is not allowed his second throw.
III. Entering the Men
The player winning the first throw decides whether he will use the black or the white men, and then enters his men, in accordance with the throw, in the left hand table on his own side of the board. This table now becomes the starting point for both players; and all counters, both black and white, are entered here. Black and White play alternately and enter the men by placing them on the points which correspond to the throw of the dice; i.e., if a six and three is thrown, one man is placed on point 6 and the other on point 3. The points are numbered from one to six starting from the outer edge toward the bar. The point next the bar is number six.
When a player has two men entered on the same point, that point is blocked, and the Opponent cannot enter on that point.
A single man on a point can be hit by the entering Opponent, and the man then must be removed from the board and reentered.
If doublets are thrown while entering, four men are entered for one side of the dice and four men for the opposite side; the player then throws again.
If two different doublets are thrown in succession when entering, it blocks four points in the table and is such a handicap to the other player that the game is seldom interesting. For this reason the following restrictions are recommended by some players.
- Some players make the rule that if doublets are thrown by either of the players on their initial plays they shall not be allowed to use the opposite side of the dice or to have a second throw.
- Some players do not allow the use of both sides of the dice until all of the player’s men are entered. When using this method, if a doublet is thrown and the player has four or less men still to enter, he enters these men and then is allowed to start moving his men and to finish the throw — using both sides of the dice and taking his second throw.
When either of the above methods is used, the restriction of the doublets applies only to the throws made while entering the original table. All later doubles, including those made when bearing off men from the final table, are played in full.
IV. Moving the Men
All of a player’s men must be entered before any may be moved. If only one man is left to enter, that man may be entered and any man moved for the other of the two numbers thrown. This also applies to doublets.
Men are moved, in accordance with the throw of the dice, around the board to the home table, which is the same for both players. Since both are moving in the same direction, each player should make every effort to block the Opponent. The player who first enters all his men can sometimes block six successive points before his Opponent is able to enter and start moving. This is considered better policy than to hurry a few men around the table in an effort to block a point in the home table. Blots may be taken up as in Regulation Backgammon; and each one must be placed upon the bar and reentered in the first table before its owner can make another move. When all of a player’s men are in the home table, that player starts bearing them off the board. The same rules are used for this as in Regulation Backgammon (see Chapter 3, Section VII). As both Black and White are bearing off from the same table, more opportunities for hitting blots occur. The player who is behind can spread his men in order to hit any exposed blots, and at the same time can keep a few men back in the entering table to make it difficult for the Opponent to enter and move his men around to the home table again.
Both sides of the dice are used for doublets when bearing off, but a player must either bear off or play all of one side before he can use the other, and all eight moves must be made before he can throw again.
11
French Backgammon
A variation of Backgammon was taught me many years ago under the name of French Backgammon. I do not know the origin of this game or the reason for its being called French Backgammon, for it differs considerably from the French Tric-Trac.
The game begins with all the men off the table. Each player throws two dice. High wins, and he either may use his first throw or throw again. He starts entering his men, according to the throw of the dice, in the left hand table on his side of the board. The second player enters his men in the table directly opposite on the same side of the bar.
None of a player’s men may be moved until all of his men are entered. As soon as a player has entered all his men, he begins moving around the board through the two outer tables into the table from which his Opponent started. When all his men are in the final table, he commences bearing his men off the board as in Regulation Backgammon.
The two players move in opposite directions around the board, and the object is to block the opponent so that he cannot pass. Considerable skill can be exercised in meeting and passing the Opponent’s men, and it makes a pleasant change from the regular form of the game where the men are so widely separated at the start.
Doublets are played as in Russian Backgammon, using both sides of the dice and then throwing again. If doublets are thrown twice in succession, the two sides of the dice may be used on the second throw, but a third throw is not permitted.
If a doublet is thrown when entering, four men may be entered for each side of the dice 5 i.e., if a double six is thrown, the player may place four men on point 6 and four men on point 1; then throw again.
Points containing two men are blocked points on which the Opponent cannot play. Single men may be taken up and placed upon the bar as in all forms of Backgammon. They must be reentered in the original table before their owner may move any more men. If a man is taken up while a player is bearing off his men from the board, no more men may be thrown off until that counter has been reentered and moved around the board to the final table.
There are two distinct policies in the strategy of French Backgammon.
I. The Running Game
A player may hurry a few men around the table in an effort to block points in the final table, and at the same time keep back men at the starting point to take up the enemy’s men as they arrive. If he is able to take up a few of the Opponent’s men, the blocked points which have been formed in the final table may prevent the Opponent from entering. As this Opponent cannot make any moves elsewhere until the men taken up are reentered, the player adopting this method now has time to bring his remaining men safely around the board.
II. The Blocking Game
A player may keep all of his men together, endeavoring to make a complete blockade of six successive blocked points. He moves around the table, keeping to this formation as closely as possible, breaking up the blockade only when it is necessary to do so in order to pass a point the Opponent has blocked.
The best defense against a complete blockade is to expose men deliberately, hoping the Opponent will be obliged to take them up. Upon being reentered, these men then are ready to take up the advance guard of the blockade when it arrives — if the Opponent is forced to expose any blots.
12
Acey-Deucey
A variation of Backgammon, called Acey-Deucey, is very popular with the men of the Navy and Marine Corps, who use a piece of canvas, on which the backgammon design is painted, in place of a board. The same game, of course, may be played on a regulation board.
The game starts with the board clear of all counters.
Each player throws two dice. High wins and re-throws for his first play.
The player winning the first throw starts entering his men, according to the throw of the dice, in the left hand table on his side of the board. The Opponent enters his men in the table directly opposite, which will be at that player’s right side of the board.
Each player moves in opposite directions around the board to the table in which his Opponent started, and then bears off his men.
It is not necessary to have all the men entered before advancing any that are already on the board. In fact, it is considered good policy to cover as soon as possible the last three columns — 10, 11, and 12 — in a player’s outer table, in order to block the Opponent. Points are blocked when occupied by two counters. When occupied by only one counter, the counter may be taken up by the Opponent and then must be reentered before its owner can move any more men. A complete blockade is considered perfect strategy, and it sometimes may extend into the Opponent’s outer table before any of the Opponent’s men reach that section. Examine Diagram 31.
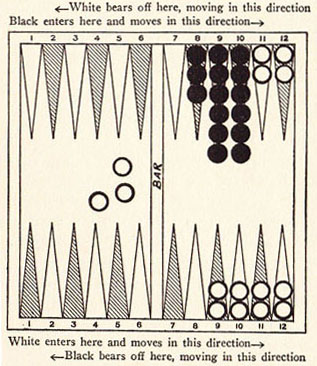
Diagram 31
White has six spaces so filled that Black is unable to pass and is obliged to pile all his men on three points. White has accomplished this while he has three men still to enter; he can take his time entering these three men and moving them to the front of the blockade; meanwhile Black will be unable to pass.
If a doublet is thrown, double the moves may be made, plus the play for the double on the reverse side of the dice as in Russian Backgammon. A second throw then is permitted. If another doublet is thrown, both sides of the dice again are played and a third throw allowed. This re-throw is permitted after every successive doublet.
If a doublet thrown when entering, four men may be entered on the corresponding point, or two men may be entered and then advanced the remaining number of spaces, or one man may be entered and advanced three times the number of spaces. The same procedure then is followed with the reverse side of the dice, entering or playing as the player prefers.
If at any time during the play an Ace and Deuce is thrown, the player advances men for the Ace and Deuce. He then selects any doublet he may desire and advances men for this doublet, playing both sides of the dice. He is then permitted another throw of the dice, etc.
When a player has all his men in the final table he can begin throwing them off the board. When throwing off, a man can be taken only from the point which exactly corresponds to the number thrown. (Note: The reason for this rule is that this number will take the man one position beyond the board.)
Example:
If a counter is on point 4, a four must be thrown to remove that counter. This is true even when the higher numbered points are vacant; i.e., if double sixes are thrown and there are no men on point 6, the player loses his throw.
If a three is thrown and there is a man on point 3, the player may choose whether to throw off this man or move a man from a higher counting point as from point 4. to point 1. If, however, point 3 is vacant, the player is obliged to move a man from a higher counting point. If he has no man on any higher counting point and point 3 is vacant, he loses his throw.
Gammons and backgammons are not scored.