 Blitzing positions are very double-edged and dangerous, and as a group are probably less well understood than almost any other group of positions, even for the very best players. Stan Tomchin told me long ago that he always tried to avoid blitzing variations if he had another alternative, because he never thought he knew how he was doing in a blitz until it was over.
Once entered into, a blitz doesn't offer much scope for ingenious or creative checker play; it simply is what it is. Both players have simple game plans. The blitzer tries to close out his opponent. The defender rolls until he anchors or escapes his checkers. Once the blitz fails and the defender anchors, the blitzer is at a substantial disadvantage, with most of his checkers now out of play. He then has to run his remaining checkers home as quickly as possible, before a prime forms against him.
|
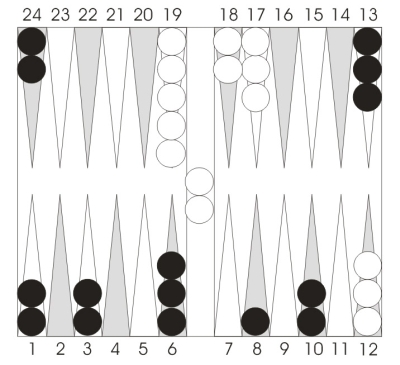
Position 1.
Money game. Black on roll.
Should Black double?
If he does, should White take or drop?
|
Blitzing positions don't have much of a theory connected with them. Instead, players learn benchmark doubling configurations and their associated values as a guide to assessing positions that arise in actual play.
Before we start discussing Position 1, let's take a look at such a benchmark doubling position.
|
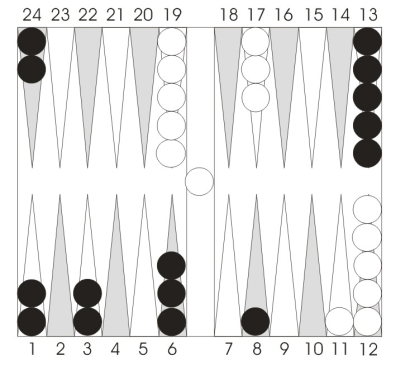
Position 2.
An early benchmark blitzing position.
|
This is a familiar position to almost any backgammon player. White began the game by running with an opening 6-4, and Black responded with 5-5, making two points and putting White on the bar. White then danced, and Black is now considering a double.
The proper evaluation of this position is double and take, and both decisions are very clear. White wins the game almost 40% of the time (which is why he has a clear take), but when Black starts off with a deuce, his game can become monstrously strong very quickly with lots of gammons (which is why he has a clear double). In fact, almost one-third of his eventual wins are gammons.
This position has a special meaning for me, since it was the first position I actually solved by hand rollouts, back in 1976. At the time, the conventional wisdom on the position was double and pass, but I was curious what would happen if I just played the game out a couple of hundred times by hand and recorded the results. It took two or three days, as I recall, but the verdict came in as a clear take. I soon made a lot of money playing it as a take in propositions, which convinced me that hand rollouts, although slow, were a valuable way to improve one's game. (A rollout today using Snowie would take less than an hour and yield a statistically more accurate result.)
To create Position 1, I modified Position 2 in a couple of ways. First, I brought two checkers down to make White's bar point. Any strengthening of White's position, such as making the bar-point or the 5-point, is a tremendous swing in the defender's favor. Then I strengthened the blitz by putting another couple of builders on the 10-point and a second checker in the air.
The net effect of these changes was to make Position 1 an easy double and a huge pass. White loses about 1.2 points per game if he accepts a 2-cube here, instead of the single point he could lose by dropping. The key change is the second White checker on the bar. This enables Black to fill the outfield with builders while White loses the chance of hitting a fly shot from the bar. Compared to this factor, White's bar-point shrinks in significance, and he has to concede when doubled.
Next time: Playing 2-1 on the Second Roll
|