 High-level backgammon is played in two ways. In clubs, people normally play cash games, either heads-up or in chouettes. In these contests, each game is independent of any games that might have come before or after. In tournaments, however, players play matches to a certain number of points. In a 15-point match, for example, the first player to reach 15 points is the winner. In matches, optimal play is often affected by the score in the match.
In general, the leader in a match becomes more defensive. He wants to protect the lead that he's created, and protecting a lead takes two forms:
- Reducing the likelihood that the cube will reach a high level. If the cube gets big enough, the entire match may swing on the result of the current game, rendering the leader's previous advantage null and void. Clearly, if the leader's chances in the current game are big enough (whatever that means in the situation), then the leader will cheerfully let the game decide the match. But mostly, he's a little more reluctant to offer a speculative cube, and a little more reluctant to take.
- Avoiding gammonish positions. The leader is obviously even more unhappy to be gammoned than he would be in a money game. So positions where gammons are likely need to be avoided.
The trailer's interests, of course, are directly opposed to the leader's. So he is willing to double a little earlier than normal, and perhaps take cubes more aggressively. He will seek out positions that are more likely to lead to a gammon, since he has more to gain from a big swing, and less to lose.
That's the theory, of course, and it's easy to understand. The real artistry lies in deciding just when you need to adjust your money play to take advantage of the match score, and when you don't. Can you judge when the time is right, and when it isn't? Test your judgment on these two positions from the recent PartyGammon tournament in the Bahamas.
|
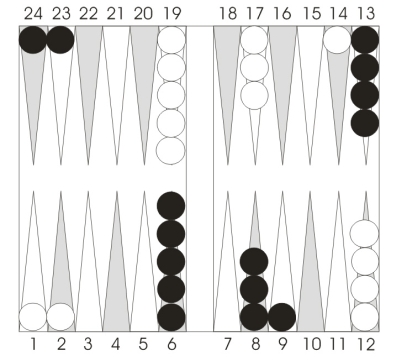
Position 1.
Black to play 4-3:
(a) in a money game, and
(b) trailing 6-12 in a 15-point match.
|
The opening rolls of this game were 4-1 for Black (which he played 13/9, 24/23) and then 2-1 for White (played 13/11, 24/23). Now Black has a 4-3 to play, and he obviously has two reasonable choices: 24/20, 23/20, making the defensive 20-point, or 9/5, 8/5, making the offensive 5-point.
For money, making the 20-point is correct by a pretty clear margin. The reason is not that the 20-point is intrinsically stronger than the 5-point. It's not. Both points are valuable. The real reason is that making the 5-point with the builders on the 8-point and the 9-point leaves Black with a poor position in front. His 8-point is now stripped, while he remains with a big stack on the 6-point. While he's made a good point, future progress will be difficult. Making the 20-point, in contrast, preserves a good distribution of offensive builders.
When this exact position arose in a 15-point match in the Bahamas, I was trailing my opponent by a score of 6-12. With either a big lead or a big deficit in a match, you're always looking at moves to see if the automatic money play needs to be adjusted for the score. Here there's an argument for making an adjustment. Making a strong inner board usually results in more gammonish positions than making an advanced anchor. Since gammons favor me, the 9/5, 8/5 play is probably a little stronger at this score than in a money game. But is the gammon factor important enough to compensate for its obvious positional disadvantages? Over the board, I decided the answer was no. After the match, the position generated some intense but well-meaning discussion among several players, who split on the merits of the two plays.
A Snowie rollout eventually settled the question. For money, making the 20-point is better by 0.06 points per game. (A decisive result.) At this score, making the 20-point is still better, but by only 0.04 points per game. The extra gammons are a slight consideration, but there are not enough of them to compensate for the obvious advantages of making the 20-point.
Now here's a cube question that might hinge on the match score. It's in a type of position which I call the late-game blitz.
|
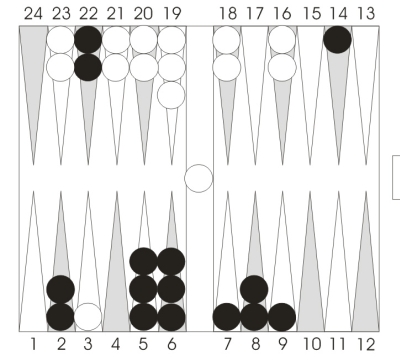
Position 2.
Black on roll.
He trails 8-12 in a match to 15.
Should Black double?
If Black does double, should White take or drop?
|
Black is threatening to attack and close White out. That's a powerful threat, but unfortunately Black has two checkers stuck behind a broken 5-prime on the other side of the board. In a money game, the position is a huge no-double and a monster take. (By the way, despite that theoretical evaluation, Black should probably double in a real money game. He'll get plenty of drops, which should more than compensate for the equity he surrenders when his opponent correctly takes.)
Trailing in a match by four points, however, I wasn't sure what the proper evaluation of this position actually was. I was pretty sure I could double and get a pass (which was what actually happened), but I thought it might actually be a double given the match score. Later on, a Snowie rollout showed that even at this score, the theoretically correct action was no double and take. As a practical matter, of course, Black must turn the cube in any event.
Going back to the money game variation, the astute reader might well ask, "How much does Black's position need to improve to make the proper theoretical cube action double and take?" I'll present the answer in two forms, first by leaving White's position alone and improving Black's game, then by leaving Black's position alone and making White's position worse.
|
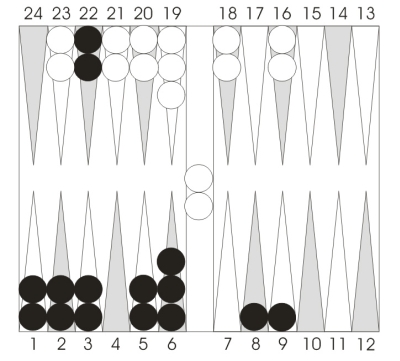
Position 3.
Black on roll.
Cube action in a money game?
|
Position 3 shows a correct double-take when Black still has two checkers trapped behind a 5-prime. White needs to have two checkers on the bar against a 5-point board with Black on roll. Given that this is still a take, you can see how bad Black's double is (theoretically) in our original position.
|
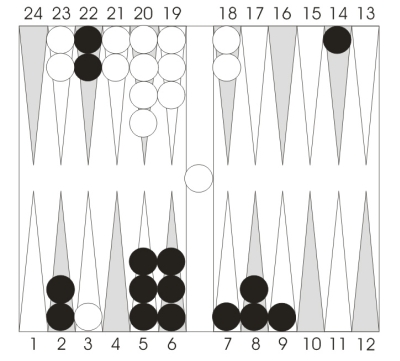
Position 4.
Black on roll.
Cube action in a money game?
|
Position 4 is also a proper double and take. Now we've left the position on Black's side alone, and just reduced White's prime from a broken 5-prime to a solid 4-prime. Both of these are excellent benchmark positions to be memorized.
Next time: Evaluating Blitzes
|