 Back games can take a lot of different forms, each with its own unique set of problems.
Last time we looked at a couple of positions where the theme was to keep checkers moving into the outfield when one side was playing a back game. This time we'll look at a position where the shape of the game has not yet been completely determined, and both sides have to keep their options alive.
|
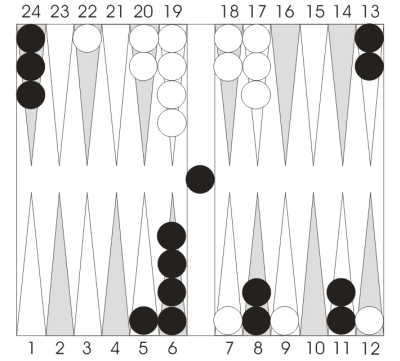
Position 1.
Black to play 2-2.
|
First, let's try to orient ourselves. Black looked like he might get stuck in a miserable ace-point game, but has just thrown a fantastic shot, 2-2, which is so good it actually lets him pursue a few different options. In backgammon, it's good technique to try to list all the reasonable plays before you start analyzing the merits of any one play. With that goal in mind, let's see what we can find for candidate plays.
- Bar/23, 11/9*/7*/5. Black turns the tables on his opponent with this play, which ignores defense and goes straight for the attack. By closing his 5-point while putting two White checkers on the bar, Black gives himself the chance to win by going forward. If he can hit one or two more blots and escape a checker or two from behind White's prime, his plan might succeed. On the negative side, he hasn't done anything yet about his rear checkers.
- Bar/23, 24/22*(2), 11/9*. This play combines a little offense with a lot of defense. Black makes the 22-point, shoring up his defenses and giving himself a good chance to make a second back point. Meanwhile, he's still put two White checkers in the air, so he could develop some offensive chances if White doesn't roll a five.
- Bar/23, 24/22*(2), 23/21. Maximum defense, no offense. Black hits only one checker, but gives himself the best chance to establish two good back game points, in this case the 21-point and 22-point.
- Bar/23, 24/22*, 11/9*/7*. Black hits three checkers while spreading out his back men. Plenty of offense, but the lack of the 5-point could be dangerous. If White rolls a five, a lot of men could be headed to the rear.
- Bar/23, 24/22*, 11/9*(2). Hits a couple of checkers while leaving no extraneous blots. Aggression plus safety, although the lack of the 5-point is once again a factor.
That's quite a lot of choices. How can we narrow the field a bit?
One way of narrowing the field is to remember a very reliable principle. In general, you want to go forward. Plays that contain a significant chance of going forward tend to dominate more defensive plays unless the position is truly critical and the offensive chances are unrealistic.
That argument favors the initial play, bar/23* combined with 11/9*/7*/5. Are the offensive chances after this play realistic? Certainly. White has two men in the air, so he's not even a favorite to enter both men from the bar. In addition, he has two more blots vulnerable to aces and deuces. It's not at all a stretch to imagine that White could shortly have four men behind three or four black points. For this plan to work, Black will need to escape a checker or two in the near future, but White only has a four-prime, so that's not an impossibility.
The other plays aren't bad, but in all of them Black has only a one-point board, so White is under much less pressure. When drifting into a back game, always keep your eyes open for a breakout play, something that has the potential to alter the direction of the game completely. It's often the best choice.
Next time: Switching Gears
|