 Back games are among the most interesting, and the most difficult, of backgammon game types.
In a true back game, one player makes two or three points in his opponent's home board, then hopes to hit a shot and contain a checker as his opponent bears off. If he's succeeded in maintaining his timing (that is, he can still build a containing prime on his side of the board), and can hit an enemy checker soon enough (before his opponent can bear off too many men), then he may have good winning chances. If not, he may be reduced to a desperate struggle to avoid a gammon.
That's the theory, anyway. In reality, back games can take a lot of different forms, each with its own unique set of problems.
Back Game Position Types
I like to classify back game positions into five very distinct types. Each type of position is governed by its own characteristic goals and strategies. Here's a brief description of each position type.
- Proto-Back Game: These are positions in which at least one side (perhaps both sides) has a lot of men back, but the opponent lacks a strong board or a prime. In this case a back game is just one possible result of the position. Often what happens is that neither side can establish any real control, and the advantage shifts back and forth over many moves. These positions are exceptionally interesting and difficult.
- Back Game with Prime: These are the positions most commonly discussed when people talk about back games. One side has two or more back game points, the other side has a containing prime. The side in the back game tries to maintain his timing by releasing checkers, the defending side (the side with the prime is considered the "defender") attempts to throttle those efforts.
- Back Game without Prime: The difference between this and the previous category is that the defender has never managed to complete a full prime. (Typically the bar-point is missing.) Consequently, the back game player has an easier job maintaining his timing, although timing problems can still occur.
- Containment Game: After the back game has hit a shot, we switch into the containment game phase. Now the job is to contain the loose checker, and possibly look for the right moment to double. These positions can arise out of other game types besides back games. (Low anchor games, for example.)
- Post-Ace Point Game: When the back game player succeeds in containing the loose checker and actually closes his board and reaches a bearoff, we get to the post-ace-point game. The main problem here is when to double. The answer usually depend on how many men the original side bore off before getting hit, and to a lesser extent, the quality of the bearoff structure on both sides. Checker play problems also arise and can be very tricky and difficult. Like the containment game, these positions can arise from other game types besides back games.
Having said all that, let's take a look at a couple of back game positions from the Goulding-Traboldt match.
|
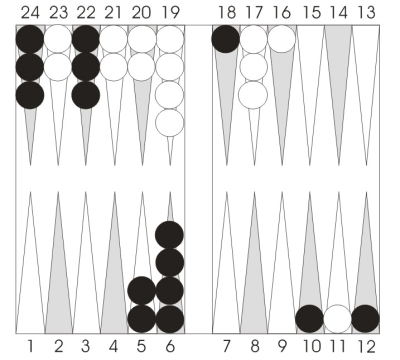
Position 1.
Black to play 2-2.
|
First, let's step back a bit and familiarize ourselves with the position. It's the type we described above as "Back Game without Prime". Black has reached a 1-3 back game, but White never managed to secure his bar-point. As a result, Black should have an easier than usual time getting his checkers to the outfield.
The 2-2 roll is a great shot for Black, and the first three deuces are obvious and strong. Black should hit with 18/16*, and make his 4-point with 6/4(2). But what should he do with the last deuce?
Black decided that he wanted to reduce his chances of being hit, and played 16/14 with his last deuce. He correctly didn't want to play 12/10, because he didn't want two outfield checkers on the same point. By playing 16/14, he noticed that he was duplicating White's numbers to some extent. (White needs ones, twos, and threes to enter from the bar, and after 16/14 he also needs ones and threes to hit.)
Although it was a clever play, Black missed the main thread. In all back games, the key idea is to make sure your checkers can keep moving into the outfield. Accordingly, Black should move 24/22(!) with the last deuce. By moving his other back spare to the highest possible point, Black prepares to jump those checkers into the outfield and gives himself the best possible chance of preserving his timing. In back games, timing is everything!
Here's another problem from a couple of rolls later in the same game, illustrating a similar theme.
|
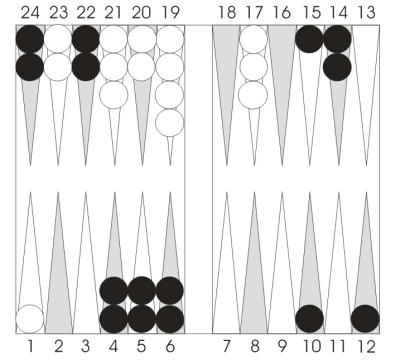
Position 2.
White to play 4-2.
|
Since the last diagram, Black has flooded the outfield with his spares, while White has managed to safety one of his loose blots. Now White has a 4-2 to play.
White elected to try 24/22 8/4. It looks like a good move. Black doesn't have any direct shots at the rear checker, while 8/4 puts that checker on a good point and prepares to clear the 8-point. It's the play most players would make.
But there's a better play: 24/18! It looks risky, because White is apparently walking into a hail of direct shots. But in fact the play gives him the best overall chance of getting home. If Black misses the shot (6-6, 6-4, and 4-2 miss) White is poised to run for home. If Black hits loose on the bar-point, White will have six return shots from the bar to hit the blot (6-1, 5-2, and 4-3), and a few other rolls that also leap into the outfield (6-3, 6-2, and 5-3) plus a bunch of rolls that leave him on the 2-point or 3-point.
Players tend to reject 24/18 because they think it presents too much risk and jeopardizes their racing lead. What they overlook is that they're already an underdog in the position! Black's control of the outfield has made him the favorite, and White needs to decide the game quickly, before his front position starts to crumble. Precipitating an immediate crisis with 24/18 is the best way to proceed.
Next time: More About Back Games
|