 Next to races, the most common type of position in backgammon is what we call the anchor game.
Anchor games occur when one side escapes his back checkers to the safety of the midpoint or beyond, but the other side (the "defender") does not. Instead, the defender manages to anchor his two back checkers somewhere in his opponent's home board.
Take a look at this pretty typical position.
|
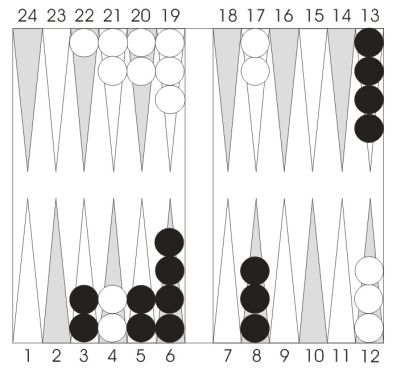
Position 1.
A typical anchor position.
Black has escaped his back men,
and White is holding
an anchor on the 4-point.
|
An anchor on the 4-point, 5-point, or bar-point (7-point) is considered a high anchor. An anchor on the or the 1-point is a low anchor. The 3-point constitutes a separate case, with characteristics of both high and low anchor games.
The side who has escaped his back checkers (Black in Position 1) is almost always the favorite in an anchor game. Here Black has a 20-pip lead in the pip count, and that's enough to make him almost a 3-to-1 favorite in the game. If he doubles (which he should), White has a clear take. Then Black will try to bring his checkers home without being hit. Sometimes he'll succeed, occasionally he won't. Most of White's wins come when Black leaves a shot somewhere (often when trying to clear the midpoint or the 8-point) and White hits. Very occasionally, White will roll a couple of big sets of doubles and actually win the race. But mostly, White's hoping to get a shot and hit it.
Clear a Point, or Wait and Build?
Since clearing points is very important when bearing home against an anchor, many players tend to make point-clearing plays automatically. But in backgammon, no play is ever really automatic. Let's look at some of the issues involved. Consider Position 2, for example.
|
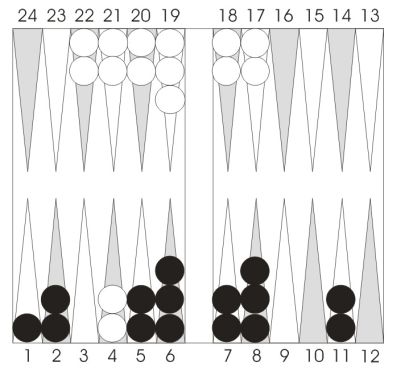
Position 2.
Black to play 5-3.
|
Black is on roll and leads in the race by 21 pips, 93 to 114. He's already doubled. He has one outside point, the 11-point, left to clear. One way for Black to lose this game is to eventually leave a shot on the 11-point, and then get hit by a subsequent 5-2 or 6-1 from White. With his roll of 5-3, he can eliminate that danger by simply clearing the 11-point now, with 11/6 and 11/8. It's clearly the right play, leaving Black an enormous favorite. Now he's only concerned with clearing his outside points successfully.
|
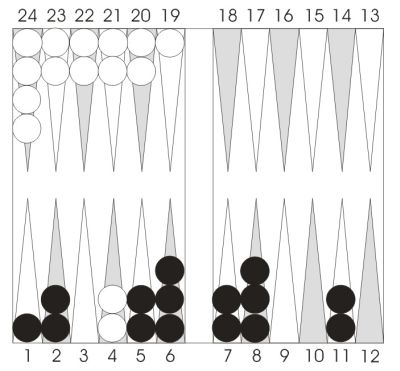
Position 3.
Black to play 5-3.
|
Although Black's pip count is the same (97 pips) as in the previous position, White's has changed dramatically. Instead of trailing by 21 pips, White now leads by 17 pips! As a result, Black's strategy has to change completely.
The danger of Black's getting hit on the 11-point at some later time is now relatively inconsequential. White's real threat is much more direct: he simply wants to win the race. At some point (perhaps next roll) White will run off the anchor with a 6 or a 5. Black will then need to attack the checker that remains and attempt to fill in his 3-point and 4-point, completing a prime. The best plan is to fill in the 3-point now, then attack the 4-point as soon as White leaves. This plan has more risk than Black would like, since a single 4 from the bar may win for White, but it's all Black has. He should just play 8/3 6/3 and await developments.
The moral here is pretty simple. When playing against a high anchor, knowing the pip count is crucial. With a big lead (which is usually the case) look to bring your checkers home with minimum risk. If the race is close or you are trailing (as in Problem 3), White may have to leave his anchor before you can come home. In that case, being well-placed to attack is crucial.
Next time: Doubling in High Anchor Games.
|