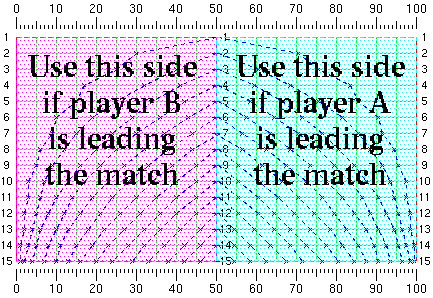
Which side of the chart to use
Suppose player "A" and player "B" are playing (will play, or played) a match, and you want to know the match equity from player A's point of view.The match equity chart is separated in two parts by the "even score line", the line drawn at the center or 50% location of the chart.
If A is leading the match, then use the right side of the "even score line" of the chart. If B is leading the match, then use the left side of the "even score line" of the chart.
Score notation used in the chart
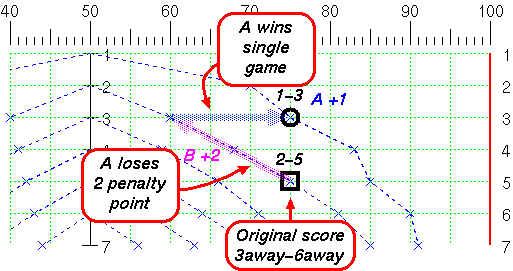
In this page (actually through out all my site), I use "normalized score notation" for any match scores. For the match played between player A and B (and again, you want to know the match equity from A's point of view) if A is leading by 3 point vs 0 point in a 5 point match, A needs 2 more points and B needs 5 more points to win the match. "Normalized score notation" refers those points that both players need more to reach the match point, and reads like "A is leading the match 2away-5away (or simply just 2-5 in my pages)."

Locating a score in the chart and reading its match equity
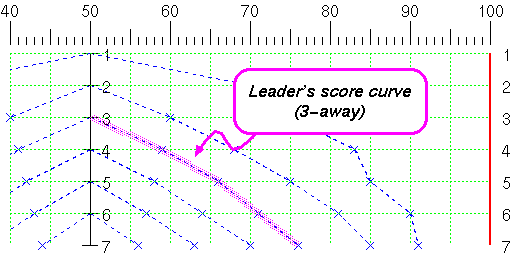
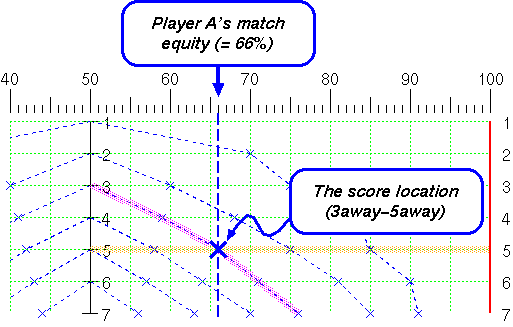
Example 1: A is leading 3away-5away
Because A is leading the match, use the right side of the even score line.The leader's score is always on a curve. Find the curve that is labeled "3" for "3away" on the even score line. (The third curve from the outermost line.)
The trailer's score is on a horizontal grid line. Find the horizontal line labeled "5" for "5away".
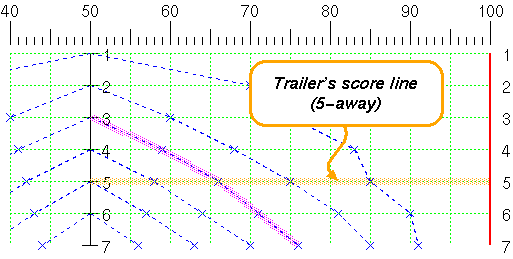
The intersection point of those two lines is the location of the score, 3away-5away.
Read the gauge on the top or the bottom of the chart, and you get 66 [%] match equity of the score for the player A.
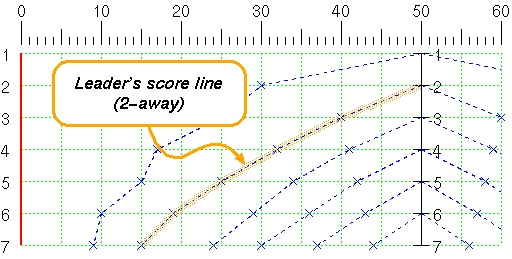
Example 2: A is trailing 4away-2away
Because A is trailing the match, use the left side of the even score line.Find leader's (B's) score line for "2away".
Find the horizontal grid line that is labeled "4" for "4away" on the even score line (the fourth horizontal grid line from the top).
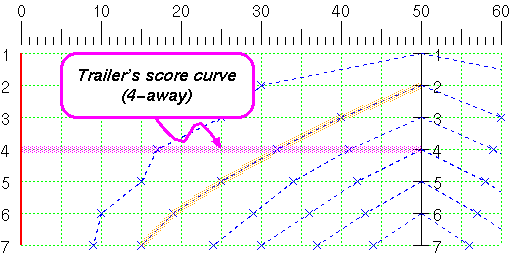
Read the gauge, and you get 32 [%] match equity of the score for the player A.

Possible score transitions for one game
In one game, only one player can win one point or more, and the other player's score stays the same. Both players can't win points in the same game under normal circumstances.For that reason, number of possible score transitions are limited, and in the match equity chart, a transition can be along the curve to climbing direction or either toward the right edge or the left edge of the chart which ever the closest from the original score location.
For example, if the original score is 6-4 (6away-4away) from A's viewpoint, the score point is located in the left half of the chart. Possible resulting scores can be on the curve up to the center line, or on the horizontal grid lines either the 4away line of the right side (if A wins) or the 6away line of the left side (if A loses).