Erhvervsvejlederen
At være
lejemorder er slet ikke som de fleste tror. Mange forestiller sig f.eks. at våbenet spiller en helt central rolle.
Det er vigtigt, selvfølgelig, men på en anden måde end de fleste regner med. På
film ser man ofte hvordan lejemorderen opvarer sit præcisionsvåben i en
specialfremstillet attachetaske. Den ligner lidt de kufferter topnøglesæt
leveres i. Med hver del anbragt sirligt i sin egen lille fordybning så al ting
ligger pænt og ordentligt. Filmlejemorderen åbner højtideligt sin taske og
samler omhyggligt sit
våben. Jeg er sikker på, du har set den klassiske scene hvor skydevåbenet med
rutinerede bevægelser samles stykke for stykke. Til sidst monteres
kikkertsigtet, der gør mesterskytten i stand til at ramme en gråspurv i røven på
flere hundrede meters afstand. Det hele er sat sammen så der langsomt bygges et
klimaks op omkring det øjeblik hvor skytten får sit bytte i sigte og forsigtigt
krummer fingeren om aftrækkeren. Det spændende er selvfølgelig om offeret i det
afgørende øjeblik bukker sig ned eller forsvinder fra synsvinklen.
Jeg håber
ikke, jeg skuffer dig, når jeg fortæller at sådan er det slet ikke i
virkeligheden. En lejemorder bruger som regel kun sit våben én gang. Alene af
den grund er der selvfølgelig ikke tale om et stykke raffineret
præcisionsteknologi, men typisk om et relativt billigt, serieproduceret
standardskydevåben. Og offeret nedlægges som
regel på klods hold; ikke noget med 200 meters
mesterskud. Hvis der altså i det hele taget benyttes skydevåben, hvilket nok
hører til undtagelserne.
Personligt
undgår jeg helst skydevåben. De er besværlige at anskaffe uden at sælgeren vil
udgøre en potentiel sikkerhedsrisiko, de skal skaffes af vejen efter jobbet så
de med garanti aldrig findes igen, og de fremprovokerer typisk en ret stor efterforskning fra
myndighedernes side. Enkle metoder er efter min bedste faglige vurdering langt
bedre. Man kommer langt med et blyrør eller en spejderkniv. Det stiller krav om
tæt kontakt med subjektet, men det er som regel intet problem. Skydevåben
bruges mest efter kundes ønske, eller hvis det kan være umuligt eller for risikabelt at komme
rigtig tæt på. Brug af skydevåben koster altid ekstra.
Er du som
folk er flest, vil du sikkert gerne kende prisen. Du vil vide hvad det koster
at løse et problem af den slags der går på to ben. Det er ingen
hemmelighed. Grundtaksten er 80.000.
For 80 små stykker papir med den rette dekoration vil jeg slutte en skæbne for
dig. Særlige krav til metoden, tidspunktet, oprydningsarbejdet, spor, rejser,
etc. koster ekstra. Der kan også blive tale om risikotillæg hvis subjektet er
en berømthed. Alt i alt løber det hurtigt op, men du ville blive forbavset
over, hvor løst pengene sider. Hvis bare problemet er stort nok. Den største
opgave jeg har haft var på 900.000 og strakte sig over det meste af seks uger.
Når jeg tænker tilbage, var prisen nok for lav, omstæmdighederne
taget i betragtning. Seks små, lette jobs à 150.000 er klart at foretrække. Som
nu f.eks. det jeg sidder og venter på at fuldføre, mens jeg i tankerne
fortæller dig disse ting.
Staying Ahead
Taking
doubles when leading
in long backgammon matches
by Lasse H. Madsen
This text deals with a common problem in tournament
backgammon: How to protect a lead in a long match, e.g. when the match might
still have a long way to go. For now, the main focus is on taking doubles when
leading in the match. First we’ll have a look at accepting initial
doubles when leading in the match; then we turn to
accepting redoubles.
The approach I’m going to take is a general one. I
won’t be explaining how to calculate take points, and I won’t be presenting
lots of numbers, formulas and algebra. Plenty of
excellent sources for that sort of thing are already available, many right here
on GammOnLine. Rather, I’ll be presenting charts showing the patterns of
how the match score influences take points, and develop some general guidelines, along with
some practical examples.
The reason for this approach is that I’m
having a really hard time doing match equity calculations over the board
under tournament conditions. Back home at my desk, with pen,
paper and spreadsheet¾heysure, no problem. At the quarterfinals in the
average regional tournament, after eight hours of play, with a crowd of kibitzers watching
and mumbling, possibly
under time pressure, it’s a different story. If you feel the same way at all, please read
on.
Since the approach I take is kind of an experiment, I’d be more
that happy to receive some feedback as to whether or not it’s a useful way to
present the information.
Accepting initial doubles with a match
lead
Generally speaking, a match lead
should not make too big a difference in your taking policy when we’re taking
initial doubles. What might make a small difference is that
gammons usually are more costly than normal, and that you
don’t
get as efficient redoubles as usually. How big are those factors?
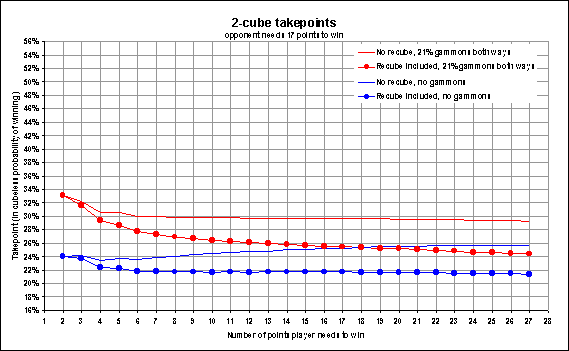
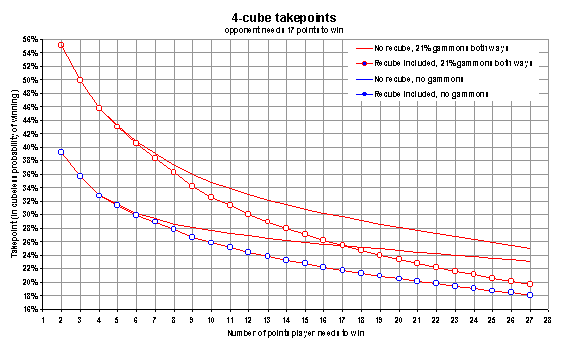
The chart
shows the winning chances you need to accept a 2-cube when
your opponents still has 17
point to go. The blue curves indicate no-gammon situations; the red ones assume that 21% of either
players wins will be gammons. Of course this is seldom
going to be exactly the case, but it gives an idea of the effect of
gammon, in many opening and middle game situations. The lines
with markers indicate the cube equity is taken into account, thus producing a
lower take point (measured in cubeless probability of winning, CPW¾sometimes also referred to as cubeless
game winning chances, cgwc).
We’re looking at the big picture here, so the chart
includes all scores right from 2-away, 17-away to
27-away, 17-away. (The opponent score is held constant at 17-away,
while the player, whose take strategy
we’re examining, is treated as a variable).
In the simple case, where there are no gammons and
no recube equity, as in, say, a last roll bear off situations, the chart
indicates that you will generally need around 25% to accept a
cube, just as in money game. No big surprise here. It should be noted, however,
that
as the match
lead increases it becomes slightly more
attractive to accept
an initial double under these conditions. It’s not a big deal, however, but at
6-away, 17-away, the leader should be able to accept an initial double in a
last roll bear off situation with about 24% winning chances rather than the usual
25%. Few people will be able to judge winning
chances that accurately, so in practice this is not too
important.
When we grant the leader cube access it becomes a bit easier to
accept the initial double; the take point is just shy of
22% cubeless winning chances, just as in money game. (See the blue
curve with markers). The value of owning the cube diminishes, however,
as the end of the match approaches, since the leader would be reluctant to
redouble to four: Notice how the distance between the blue lines gets smaller as
the lead gets bigger. Obviously, when the
leader needs only two points to win, he
gets no cube
value at all. The main point to notice is that the take
points are still pretty much as in money game, with a small exception when the leader can’t
take advantage of cube ownership.
When gammons are included (at
the rate of 21% for both sides) we still have pretty much a money game situation,
except when very close to the end of the match. The worst situation
for the leader is at 2-away, 17-away where the lead is really big and where he gets no
recube equity at all. In this case he needs about 33%
winning chances to justify a take, and that’s quite different from the roughly 26% he’d need at
money game or further away from the end of the match, where he could put
the cube to some use.
Before we turn to some actual examples, let’s try
to summarize what we’ve learned so far about accepting initial double with a match lead:
·
It’s not the
size of the lead but the number of points still needed to go that has the
greatest effect on the leader’s take point.
·
With lots of
point to go, even a big lead shouldn’t cause the leader to be more cautious
in
accepting
doubles when gammons are unlikely.
·
With lots of
points to go, a big lead should cause the leader to be only slightly more cautious,
in accepting gammonish doubles; the takepoint is typically about 2 percentage
points higher compared to even scores.
·
Near the end
of the match, when the leader is within about five point of
victory, his take points increases a little (1-2 percentage
points) for non-gammonish positions, and a good deal (2-5 percentage
points) for gammonish positions.
·
With a big
lead you can take a last roll bear off position with slightly
less than 25% winning chances.
Let’s take a look at a couple of examples of this:
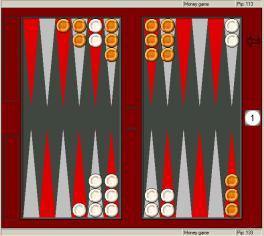
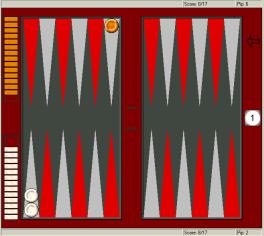
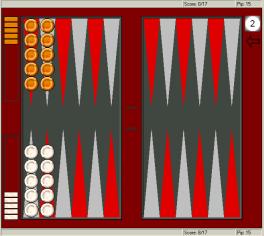
The first position is taken from Kit
Woolsey’s article Reference Positions,
from GammOnLine. Being 20 pips down, and the other guy with lots of time, White has only a small take for
money, says Woolsey. Since gammons are extremely unlikely in this position, we
now know that White should have a take also
at virtually
any
match score, with the possible exception of
being 2 or 3 points within victory, since the
take might depend on being able to redouble, should the
game turn around. That is indeed an accurate assessment; White should take
with any kind of lead in the match, except when he’s 2-away or
3-away; in that case he has small pass.
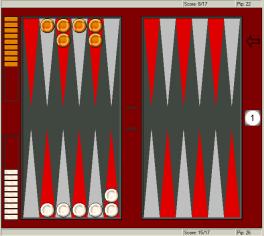
When gammons are a real possibility, things are not
quite as happy for the leader, even at initial
doubles:
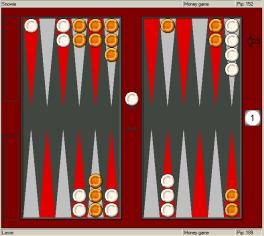
For money, White should have
a reasonable take here, although not a particularly happy one. It’s easy to
see people passing this one. Gammons are very possible, but with the anchor and
not too many blots around for Orange to scoop up, it’s not as if White is grave
gammon danger. So White takes in a money game and at any
even match score with lots of points to go. With a big
lead, however, White might have a pass, based on the gammon risk. If you think
the take is really borderline in the first place, then a pretty small lead
like, say, 12-away, 17-away could turn it into a pass. It you think the take
is pretty clear, you would either need a really big lead, like 6-away, 17-away to justify a
pass, or to be close to the end of the match, like 4-away, 8-away. At the double-edged 2- and 3-away
scores, you would most likely not want to
take this one.
The point here is not so much exactly what White’s winning
chances are, and what the precise take point at all
conceivable scores would be. We’re trying to build a general feel for just how
much more cautious the leader should be.
I wouldn’t claim to know the theoretical correct cube play
at various scores, but an educated guess would be that White can take the
double unless he’s within six points of victory and leading
substantially. With an extremely large lead, in, say, a 27-point
match, he might have a pass a bit before that.
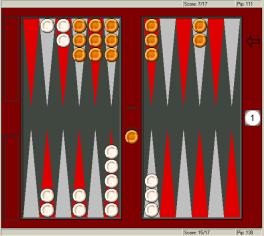
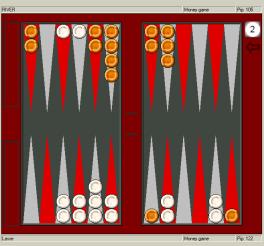
Suppose
we weaken Orange’s position, by giving him four checkers on the
20-point, while doing damage to his racing lead:
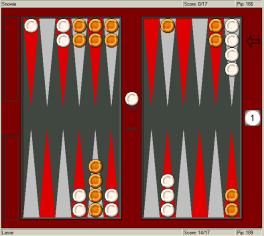
In this position White should have
a pretty clear take for money and at almost any
match score, with the exception of the notorious 2-
or 3-points away. When White is 2- or 3-away
and enjoying only a small lead, like [2-away, 4-away]; [2-away, 5-away]; [3-away,
5-away] or something like that, he has a
rather big pass, since Orange is now threatening to win the
match or take the lead by winning a gammon, which is still not too unlikely. 2-away,
10-away, for instance, would probably also be a pass, but not nearly as big as
at 2-away 4-away where Orange’s gammons operate at maximum efficiency.
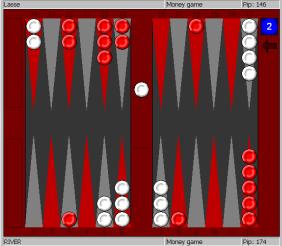
Next is a simple position illustrating one of the finer
points of taking with a match lead:
As most players are aware, for money this last roll
situation is a true borderline take/pass decision. What fewer
know, however, is that it doesn’t take much of a match lead to turn it
into a take. With a 5-point lead or more, White has a pretty clear, although still small,
take. Don’t overestimate this effect, though. Pure 3-roll
positions are still passes, with any kind of lead, for
example. (In fact, initial doubles in 3-roll
positions can’t be taken at any
match score, unless there’s an automatic redouble
available). Also, note that this really only works in last roll positions; in
longer bearoffs the diminishing cube leverage
for
the leader would balance the slight incentive to take more aggressively.
Now it’s time take a closer look at the scores
where the leader is near the end of the match. In the next chart, we’ll fix the
leaders score at two, three, four, and five points away
while treating the opponents score as a variable. This may be a
bit confusing at first, since the x-axis is now the other guy’s score, rather
than ours, so take your time to familiarize yourself with the chart.

From chart 1 we know that when you need four or
five points to win, your takepoint is somewhat higher when you enjoy a big lead
and face a gammonish initial
double. Chart 2 verifies our suspicion that the bigger the lead,
the more
true this is. The red and green curves clearly indicate higher take
point when the opponent needs lots of points to win. It’s not a dramatic
effect, though; each extra point you’re leading raises you takepoint by only about one
sixth of a percentage point. For example a 6 point lead, 4-away, 10-away suggest a
take point of about 27%, compared to the roughly 26% you’d need at
4-away 4-away (taking into account gammons and
recube potential).
What’s really interesting about chart 2, though, is
the cyclic
pattern the curves
depict, especially at when the leader is two points from
victory. This suggests that it’s actually easier
to accept an initial double, even a moderately gammonish one,
when
the opponent has an even number of points to go. That’s quite counter
intuitive, since after the Crawford-game the leader has a free pass whenever
the opponent has an even number of points left. But when you’re two
points away it’s almost the other way around: You’d rather
take when the trailer needs an even number than if he’s an odd
number away. At 2-away,
even-away the take point is generally about 2 percentage
points lower, than at 2-away odd-away. With a really big
lead the difference between even-away and odd-away is as big as 4 percentage
points.
Let’s se a couple of examples of this
phenomenon:
In the above diagram, White is trailing
by four pips, 26 to 22, which is pretty serious in a race this short. For money,
and at most match scores, White would probably have a small pass, winning 21.1% cubeless according to
one
database. Being 2-away with a big lead changes things, however.
White should pass
if Orange needs 7, 9, 11, 13, 15, 17, 19 or 21 points to
win, but take if Orange needs 8, 10, 12, 14, 16, 18, 20 or 22 points. That’s kind of
funny, but it seems to hold up to further analysis.
It should be noted, however, that this principlephenomenon only occurs
when White is holding a sizeable lead. If Orange needs 4, 5
or 6 point to go, White has a pretty low takepoint, around 20%, as long as
gammons are not possible. If Orange on the other hand needs 2 or 3 point, White would be quick to
pass, with takepoints of 30% and 28% respectively.
The same pattern can, perhaps surprisingly, be seen in positions
with some gammons chances:
In the above position White is a distinctbig underdog, it’s pretty
volatile, so for money and in most match situations Orange has a fine double. White, on the
other hand, has several ways to win, is not in particular gammon danger and
should have a reasonable clear take. If White leads and
need only 2 point to win and hence can’t win a gammon or
redouble after taking, it might be another story. Chart 2
suggest that White will usually need at least 30% winning chances in
order to take a moderately gammonish initial double when leading
2-away, something-away. That’s considerable more than he’ll need at an
even score, and it’s hard to say if it’s there. As
it turns out, While probably has a small take if Orange needs
an even number of points, and at least 6, while he
should pass if Orange needs an odd number greater than or equal to 7.
With a smaller lead, when White needs 3, 4 or 5 points, White is better
off passing.
The concept of adjusting one’s taking policy to
whether the opponent needs an odd or an even number of points
applies when the leader needs 2 or 3
points. It’s a delicate thing,
however, and should be applied very carefully, i.e. when
breaking ties in otherwise close
decisions.
Accepting redoubles with a match lead
As we might expect the take
point for redoubles are more strongly influenced
by match score than initial doubles. Let’s again fix the trailers score at 17-away, and see
what happens when the leader a) expands his lead; b) gets closer to the end of
the match.
First of all, the size of the lead now has a profound effect on the
leaders take point, especially if a gammon is possible. In that
case the leaders take point
increases by about 1 percentage point for every
point he’s leading. And when we get closer to the end of
the match, it’s more like 2 percentage points for every
match point lead. Real close to the end of the match things are pretty extreme; if you ever
happen to double your opponent at 2-away 17-away in an gammonish position you’d better pray for a good roll well, for you’ll need to be a
clear favorite to accept his automatic recube next turn. (Of course this example is a bit
academic, since most people would be sophisticated enough not to
double in the first place).
Second, note that in the case of a non-gammonish
position, the same pattern holds, although to a lesser degree. A one point lead still corresponds
roughly to an increase in take point by about 1 percentage
points, but we need to get pretty close to the end of the
match to see take points much higher than 30%. Notice that the leader’s recube equity
is not totally insignificant until the leader is close to handling the trainer
and automatic redouble to the 16-level. For example, at 12-away, 17-away the trailer
will still need about 14% to accept an 8-cube, and that’s enough
to give the leader some recube equity so he’ll take with about
24% rather than the 27% he’d need in a last roll position.
A summary of taking redouble before we turn to
examples:
·
With a match
lead, even a small
one, be slightly cautious
of accepting redoubles in gammon free positions, and very
cautious in gammonish positions.
·
As a rule of
thumb, your take point increases with about one percentage point for each point
you lead, when there’s still a long way to go.
·
Typically it
takes around 30% or more to accept a gammonish redouble when
leading. And make that 40% when you’re leading substantially and
within 6 points of victory.
·
In
non-gammonish positions, take almost like in money game until
within 6 points; after that you need to be careful, with a take point of at
30-40%
·
If you’re
within 8 points of victory don’t figure in any recube equity (redoubling would
mean playing for 16-point and most likely the match).
Let’s see some actual positions:
This position is an almost perfect 5-roll bearoff (double aces
don’t necessarily work); White wins with probability 28.1% and has a clear take for money of course.
What kind of match lead might cause some doubt on the take? Since the take is so clear to begin
with,
we
need a pretty big lead to
change that. Note that with a big match lead White gets no
value from the cube, he might not even be able to redouble (to 8) in a 2-roll
position. So basically the question is: By how much should White be leading
to raise his take point from below 25% to 28% cubeless? One possible answer would be a 10 point lead,
7-away 17-away, as can be seen from chart 2. With an even
bigger lead he would have a clear pass. As always, when we get closer to the end of the
match, the take gets harder. For instance White would pass at
5-away 11-away also, even though his lead is smaller than 10 points.
When
gammons are an issue, a smaller lead might make the
difference:
Here, OrangeRed has a nice redouble based
on a combination of a racing lead and some attacking chances. White will
normally have an OK take, since there are some immediate strong shots if OrangeRed fails to
clear up his blots. With a match lead, however, the combination of a
four-cube and a gammon threat could make it a pass. With only a two- or three-point lead,
10-away, 12-away, for instance, the take is
quite borderline. With a bigger lead or closer to the end of the
match, White will usually have a pass. 10-away,
17-away would be a clear pass, and so would 6-away, 8-away. If White is both close to winning and
enjoys a big lead, like 6-away, 17-away, taking becomes a huge blunder.
Let’s do one
more:

This time, for money White has a bigger
take than before, in fact, the redouble may technically be
quite close, although it’s certainly a good practical double. Red is a bit short of ammo so his game is not quite as
strong as it looks. With a match lead, however, this is
somewhat balanced by the fact that OrangeRed has a significant gammon threat; maybe about one third of his
wins will be gammons. As a consequence White’s proper strategy is
quite similar to the previous position: With a lead of two or three points he
should consider passing even in a match with long way to go. With a bigger
lead or when approaching the final stages, say at 6-away, passing becomes
mandatory.
Methodological note
The match equity
table. All numbers
and charts presented here are based on a match
equity table I computed some years ago. The reason I’m not using
Woolsey’s table is that it doesn’t go further than 15 point and that it doesn’t
have
decimals. The problem is that even though everybody
agrees that match equity tables are not accurate to one decimal point, this is the
accuracy you need to calculate meaningful take points at certain scores. Take points
at loop sided scores depend critically on the exact numbers in the match equity
table used, since small differences and rounding errors are magnified in the
calculations.
To see this, suppose for instance that we want to
calculate take point at 2-away, 13-away. We might use numbers from Kit
Woolsey’s table with no decimals, or we could use my computer
generated table with one decimal point:
Woolsey Madsen
Leader passes
for 2-away, 12-away
95% 95,4%
Leader takes
and wins for victory
100% 100,0%
Leader takes
and loses for 2-away 11-away 94% 94,0%
Gain from
taking and winning
5% 4,6%
Loss from
taking and losing
1% 1,4%
Take point
17% 23,3%
That’s quite a difference. When the gains
and losses are small, it doesn’t take much of an error to impact the
loss:gain ratio
dramatically. For this reason you won’t be able to use Woolsey’s
table to confirm the point about the 2-away even-away score, where
the leader should take more aggressively than at 2-away, odd-away¾we simply need greater accuracy at these scores.
My table was generated using an iterative
algorithm, starting off with a cubeless match equity table, then
repeatedly adjusting it to reflect asymmetric cube leverage
until a stable table emerged. I can’t be sure,
of course, that it’s any better than the next guy’s, but it does
seem to produce quite consistent results. I’d
be happy to mail a copy to anybody interested.
Cube leverage. I use a simple, recursive formula to estimate cube
leverage for any give match score and cube level. It takes into
account whatever level the cube might meaningfully get to, and assumes 60% cube
efficiency on average. Again, it’s not completely clear that the underlying model is accurate or if there
might be some better approach, but to me the results look reasonable, and besides I couldn’t come up
with anything than works better. The key is, I think, that it gives a good feel for the
dynamic of taking strategy in various situations¾even though the take points (that are average figures anyway)
might be shown to be off by a little.
Rollouts. I used computer rollouts to verify the conclusions in the text, so they shouldn’t be too far
off. However, the
exact difference between cube action at various match scores depends somewhat on the match equity table used, and on the method used to convert cubeless figures to correct cube action. It’s possible that different
robots will give slightly
different answers,
even based on rollout
results. I couldn’t do the
ideal, true live cube score based rollouts, but I think the results should be reasonably accurate.