 Six-point primes are backgammon's ultimate weapon. Five-primes are strong, but six-primes are better. No matter how well you roll, you can't escape from behind a six-prime. It's maximum security. There's no tunneling out; you have to wait for the walls to fall down.
However, as in most backgammon situations, it's not completely hopeless. Six-primes do have one weakness: it takes 12 checkers to make a six-prime, leaving only three checkers left for maneuvering. That opens up a few defensive possibilities for the side trapped behind the full prime. If he can build some sort of block of his own, he can create cracking numbers for his opponent. Once the six-prime cracks, it's a new ball game, and the advantage can swing quickly, because the player with the (now former) six-prime can find himself with a timing disadvantage.
|
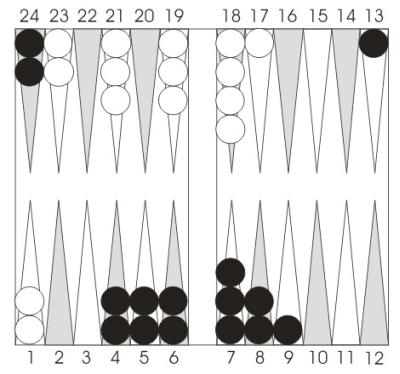
Position 1.
Black to play 6-4.
|
Don't be too clever. It's easy to fall into the trap of thinking that Black could lose the priming and timing battle here, and opt for the clever-looking 24/14 (preserving timing) instead of the obvious 9/3, 7/3. But here the obvious play is, in fact, completely correct.
Making the six-prime is, of course, right on general principles. Might Black have to bust up later after being outprimed? Possible, but very unlikely. Notice this key fact: White has to play all his numbers this turn, with sixes going to the 2-point and doubles crushing his position. Even if White can make the 3-point or the 5-point, how long can he hold it? He probably starts to crunch the second turn. Meanwhile Black has the checker on the 13-point to move, and he can break the 8-point and still keep a 5-prime with White not at the edge.
No need to be timid here. Although a six-prime can be vulnerable, it's still the formation you're striving for. Making the full prime wins both more games and more gammons than 24/14.
|
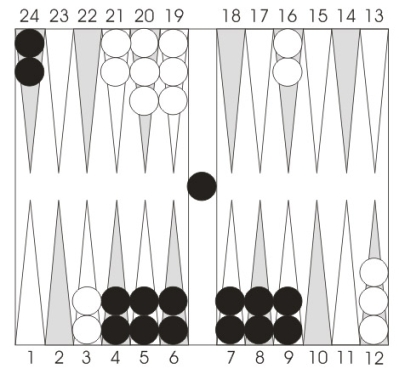
Position 2.
Black on roll.
Should Black double?
If Black does double, should White take, drop, or beaver?
|
Black has completed a full six-point prime in Position 2, and White has some work to do before he can finish a prime on his side. Black is on the bar, so perhaps dancing will help him maintain his prime. In addition, Black has very few numbers that force him to enter and immediately break his prime—only 8, in fact (3-3, 2-2, 5-1, 4-2, 4-1). Surely this all adds up to a strong initial double, right?
Wrong. The problem is that Black has to get three men out and through White's entire army, all the while hoping that his six-prime holds up. And once his prime does break, he's in serious trouble, despite the fact that a five-prime still remains. If he opens with, say, a 4-2 (not his worst breaking number) and plays bar/23, 9/5, White is already about a 60-40 favorite cubeless, and even more if he owns the cube as well! If White gets just a little lucky and makes one additional key point (the 3-point or the 7-point), then any poor throw by Black will make him an immediate serious underdog.
In fact, we've all played these sorts of games many times, where you make a quick early prime, then lose after what appears to be a fluke roll or two. Actually, they're not such fluky losses at all. What's happened is that you've built a prime at the cost of leaving your army severely disconnected, and in fact you were never much of a favorite at all. Be careful when making your prime leaves you without any checkers in the center of the board, as here. You may not have made any mistakes as the rolls came, but you're still in a vulnerable situation.
Although Black is about a 52-48 cubeless favorite in the starting position, he shouldn't double. White has a huge beaver if doubled. Failing to beaver would cost White about 0.35 points per game(!)
Next time: Adjusting for the Match Score
|