Naccel: a[N
accel]erated Pipcount
by
Nack Ballard
Count
-- On Me?
"Twelve plus
fifteen plus six in my board, that's thirty-three, plus sixteen for the
two on my
eight point, that's forty-nine, plus nine equals fifty-eight, and fourteen
equals seventy-two, plus three on the... what IS that, the 'twenty-two' point,
is sixty-six, added to.... Oh no, what was it again?..." I mumbled aloud.
"I wasn't
really paying attention... sixty-six?" my doubles partner suggested
dubiously. "You had just counted
the checker on their eleven point", he added helpfully.
"Well, yeah,
thanks, I know that... but it's the ANCHOR that is sixty-six. I forgot the running count I was
supposed to add it TO..." Here I go
again, I thought... now I'll have to start all over again for the tie-breaking
count. "What were my first two
tries?"
"Hmm....they
differed from each other by eleven... I remember that..." his voice faded as
quickly as his grin.
I could
already feel my equity shrinking.
"Well, let's start again with what we know. What did we get for the count on their
side, 130-what?"
"I know it
was my JOB to remember the counts", he savored the word like a sour plum. "But when you asked me about your last
pipcount, it all went out of my head."
"I wasn't
asking you, I was asking myself".
Hmm, that didn't come out right.
"Well, my
ability to distinguish rhetoric isn't what it used to be, nor is my memory. I can't even recall why I paid both
halves of our entry fee."
I was no
longer sure myself of the reason. I
wanted to quip back on his misuse of the word "rhetoric", but someone had to
pull the team back together.
"Okay,
LOOK..." Pretending I was still in
charge was the only card I had left to play. "You count Red and I'll count Black;
we'll do it really carefully this time, and whatever we get, we'll just go with
THAT."
... Sound
familiar? Well, maybe your presence
of mind is not quite as absent as mine, but might not such a calamity occur if
you find yourself deprived of enough sleep, or otherwise lacking
focus?
Counting
pips costs time, and drains our reserve of energy. It is important to be able to stay
intent on the positional considerations, which, if assessed correctly, will more
likely guide us to correct plays and cube decisions.
------------------------------------------------------------
Following
a Dream
With the
good of the human race in mind, then
-- well okay, I admit it was because I wearied of my own incompetence -- I
actually dreamt (literally) a new method of pipcount. In my dream, I was playing on Gamesgrid,
clicking on the pipcount button (that wonderful online crutch), when out popped
a cyberboard with the four quadrants taking turns bulging out at
me.
The next
morning, while driving, I mused how easy counting the race would be if all I had
to do was count FOUR BIG points instead of 24 little ones. No more two-digit numbers to add or
multiply.
Thinking
further, it seemed as if this simple scheme would indeed give a good
approximation. Beginning players
could benefit by being taught to initially adopt a Quadrant Count, to get
a feel for how much they were ahead or behind.
Then it hit
me. An expert player could use this
absurdly simple counting method, too.
The only other step would be to count the remaining pips in each
quadrant!
When I
arrived home, I set up some backgammon positions. To the checkers in my home board I
assigned a quandrant value of 1, to those in my outer tables 2 or 3, and to my
back checkers 4. Counting the total
quadrants was as easy as counting a bearoff in which my checkers were all on the
4, 3, 2 and 1 points.
To do full
pipcounts, I altered the designations of the quadrants (from 1, 2, 3, 4) to
0, 1, 2, and 3, in order to allow residual pips to be ADDED instead of
subtracted. (A checker on the "22
point" needs to travel THREE (not four) quadrants in order to bear IN, and then
4 more pips to bear OFF). Hmm...
even easier!
I started
leafing through any backgammon literature I could find which had pipcounts
accompanying the diagrams. At
first, I made a lot of silly mistakes, overlooking leftover pips. But, as I kept practicing, and gradually
streamlined the method (in particular, after introducing "squads"), I was
astounded to find myself rattling off correct pipcounts in a matter of seconds.
A wave of
euphoria, bottled up by 25 years of slavish pipcount, washed over me. I shared the details of my discovery
with a friend, Ulf Wostner, who mirrored my enthusiasm by offering to set up a
website (see the end of this article) to teach this new method of counting
pips.
It was Ulf,
in fact, who convinced me to dub this system "NACCEL". I have to admit, I like it. As I have no children, perhaps I imagine
this appellation as some alternate way of spreading my genes. I think it is only fair to clarify that
I attribute neither my psychological imbalance, nor my need to compensate, to
any lack of attention from my parents or teachers. I realize if I were a more naturally
modest, decent fellow, I would have insisted on my original name of "Accelerated
Pipcount" or even "Speed Counting".
But it is too late to pretend.
Anyway, take your pick.
------------------------------------------------------------
Other
Pipcount Methods
The most
common way to count total pips is by the "Straight Count". The number of checkers on each point are
counted, weighted by their point numbers from 1 to 24. If there are two checkers on the "23"
point, they count as 46. Three
checkers on the "14" point count as 42, and so on. These weighted subtotals are added
together to determine the total number of pips necessary to bear them all
off. To function as a human
calculator can be tedious, though the process does get easier as one gains
familiarity with multiples of the point numbers which arise most
often.
Jack
Kissane's "Cluster Counting" improves on straight counting by isolating commonly
found checker clusters having pipcount multiples of 10 (or 5). Mental shifting can produce these
clusters (other checkers to be moved the opposite way to compensate), or pips
left over are added or subtracted.
Basically, Cluster Counting utilizes several helpful reference clusters
with straight counting as a fallback.
There are
two other interesting pipcount methods which I heard about only after
near-completion of this article:
One is Mark
Denihan's "Quadrant Crossover" technique (outlined in an article by Mark
Driver). Its basic idea is
startlingly similar to one of my prototypes for Naccel: Count the quadrants, multiply by 6; to
count the remaining pips visualize the 1, 2, 3, 4, 5 and 6th points stacked on
top of each other, and add the six numbers together. Obviously, since I did not stick to that
blueprint myself, I believe Naccel to be a substantial
improvement.
The other is
Douglas Zare's half-crossover method, which weights 8 half-quadrants
("triples"), and then adds 75 to get an excellent approximate count. This is a clever idea, as one would
expect from Zare, and easier than straight counting. However, to get an exact count,
Zare says it all himself, when he humorously preludes his article with an
excerpt from Lewis Carroll's classic:
"And you do
Addition?" the White Queen asked.
"What's one
and one and one and one and one and one and one and one and one and
one?"
"I don't
know," said Alice. "I lost
count".
------------------------------------------------------------
How
does Naccel work?
The basic
precept for Naccel is that each checker is required to travel through a specific
number of QUADRANTS to bear IN, and through a specific number of POINTS to bear
them OFF. One need not identify,
let alone multiply, the "19" or "21" point or such -- there is nothing higher
than the 6 point!
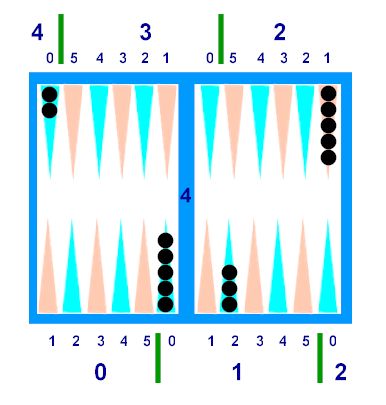
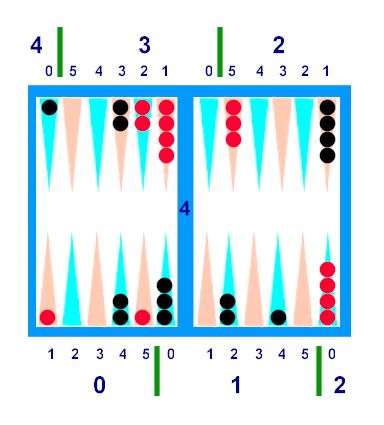
The opening
position for Black's checkers is illustrated in Diagram A below. Black's Quadrants are marked "0", "1",
"2", and "3" and "4" for a checker on the roof. In the text, we will refer to them as
"Q0" thru "Q4". Just as in the
counting of points, each unit is a "Pip"; in the counting of Quadrants, each
unit is a "Quad".
Notice that
the Quadrant divisions are shifted one point. This will be easy to get used to, I
promise, and the reason for it is simple:
It is more efficient to count 1:0 ("6-point") checkers as a Quad in and
of themselves (or 2, 3 or 4 quads, in the case of the "12", "18" or "24"
points), rather than as 0:6 (or 1:6, 2:6, or 3:6), which would mean being
saddled with six residual pips for each one.
Checkers are
pip-defined by the point numbers (0 thru 5) on which they stand -- the number of
pips required to bear INTO the next quadrant. Look at the number AFTER the
colon of a notated point; for example, "1:2" has two residual
pips.
It is
difficult to emphasize strongly enough that becoming accustomed to calling the points
by their new names will help you enormously in using Naccel. For purposes of this article, we will
refer to points by their new (mod-6) notation, though we will usually list the
traditional point numbers in parentheses as a reference.
For example,
what is classically known as the "10 point", is Quadrant 1, Point
4, so we designate it "1:4".
The "23 point" is Quadrant 3, Point 5, or
"3:5". [Note that
multiplying the number before the
colon by 6 and adding the number after the colon translates back to the
traditional number of any point].
Checkers in
Q0 will mostly be referred to by their classical name; thus 0:5 can still be
called the 5 point. The "13" point
is now "2:1", and the "7" point "1:1", though we will mostly refer to these by
their descriptive names, the "midpoint" and "bar point".
Diagram A
Okay -- How
do we count, using these new-fangled point numbers?
------------------------------------------------------------
How
to do a TOTAL Pipcount
�
Step 1: Count the number of
"Quads".
�
Step 2: Add to that the
"Squads".
�
Step 3: Count any leftover
pips.
------------------------------------------------------------
We will now
clarify these steps, as we count Black's starting position
(diagram):
(1) Count the checkers in each
quadrant, as if they are on four "big points", in order to determine the number
of Quads necessary to BEAR IN all our
checkers:
The 2 back checkers ("24pt") in "Q4" count 4. (2 x 4) = 8.
The 5 checkers (on midpoint) in "Q2" count 2. (5 x 2) = 10.
The 8 checkers (6 and "8" pts) in "Q1" count 1. (8 x 1) = 8.
[8 + 10 + 8] = 26.
(2) The three checkers on the 1:2
("8pt)" are a "Squad" (a 6-pip unit). 26 + 1, that makes 27
altogether.
(3) Count the leftover pips: The five midpoint checkers each count 1
pip. 5 x 1 = 5.
----------------------
I have
outlined the count in great detail above, but if you had been able to listen to
me count under my breath, what you actually would have heard, in a span of three
or four seconds, would have been "8..18..26..27, and 5".
An Attentive
Reader: But where is the rest of
it??
Nack: "There is no more. My count is 27:5. What is yours?
Reader: "Two on the 24 is 48, plus 13
times...65... a hundred and uh.. 13, plus 24.. 137.. and 30.. 167."
Nack: "Perhaps familiarity of the opening
points helped, and there were only four of them, but still... 14 seconds... you
are pretty fast for a straight counter.
And you got the right answer.
But did I notice you splatter a few beads of sweat as you jittered out
the arithmetic?"
Reader: (hiding
smirk well): "Well, at least someone has the total now... What
good does this 27:5 do
you?
Nack: "Technically, it means 27 Quads + 5
pips. I am confident that if I
multiply the 27 by 6, and add the 5, I will arrive at the same total you
got. But I never have the need, as
you will see".
------------------------------------------------------------
Counting
QUADS
This stage
is quite simple. Imagine a
SPEEDBOARD. That is the equivalent
of what you are counting. Your
quadrants are just big points, counted as 4, 3, 2 and
1.
The roof is
your "4 point". The opponent's home
board, your "3 point". The
opponent's outer table, your "2 point".
Your outer table, your "1 point".
Your inner board (below the 6-point) doesn't count at all. So, overall, you have the equivalent of
a speedboard with fewer, sometimes far fewer, than 15
checkers!
I admit, at
least at the outset, that counting will not be as simple as this analogy
suggests. Because the quadrants are
shifted one pip, the bar (and board edges) visually hinder the "6", "24" (and
the less seen "18" and "12"), point checkers, from being assigned to the proper
"points" of your speedboard.
I can assure
you, however, that with a basic understanding of the system, and practice, any
such confusion will rapidly disappear.
You will find ways to remember; for example, it is easy to toss the "6"
point in with the rest of the Q1 checkers when it is its usual conspicuous,
towering self.
Perhaps the
other imperfection in the analogy is that checkers spread out over an entire
board are not side by side, as they are in a speedboard, so your eyes have to
travel a bit further to count. What
you pay for in distance, though, you are sometimes more than refunded in
compactness. For example, it is
faster for me to count an outer 4-prime as 8 checkers, than it is to correctly
count 8 checkers on the 1-point.
There is not a big difference either way -- the ability to count the raw
number of checkers in a quadrant at a glance is, as you might expect, just a
matter of practice.
In learning
to count your Quads, it makes sense to start on one end and sweep
systematically; in this way you can be sure to correctly account for every
checker. I recommend starting with
Q4. Just as you would with a
speedboard, count your big "points" (quadrants) first.
As you gain
confidence, you can improve your speed by selectively combining checkers in
different quadrants in the same way you might combine different points of a
speedboard. For example, you know
that two checkers each on the 3 and 2 points create a "block" of 10 pips. In the same way, two checkers each in Q3
and Q2 create a 3322 "block" of 10 quads. (Hint: The midpoint checkers are the most
common Q2's, by far).
One
Q-pattern that frequently arises is a checker on the 4-0 ("24") point (or
roof), plus an anchor (or two checkers split in the opponent's home
board). This 433 pattern
also counts as 10 quads. Or, the
anchor can instead be three on the midpoint, say, to create another useful
10-quad pattern of 4222.
Five
checkers in Q2 (e.g., on the mid), or 22222, will become as obvious a
10-quad pattern as five checkers on the 2-point is a 10-pip pattern. Eventually, you can introduce other
patterns, such as 222211, or 2221111 (usually combinations of
midpoint and "8" point checkers), which occur to you, and the amortized gain
will save more time than the initial cost in finding or remembering them at the
board.
If 10-quad
patterns don't fall into your lap, don't fret. Positions generally range from 12 to 25
total quads, so your options of extracting a convenient block may be
limited. Just retain that image of
a speedboard in your mind. You
might be drudging along, counting quadrant by quadrant, until it occurs to you,
say, that four on the "2-point" plus four on the "1-point" are like having four
on the 1+2 "point". Similarly, four
Q2's plus four Q1's count as 12.
Whatever the pattern is, once you discover it and decide you like it, you
can add it to your repertoire.
Soon, we
will describe the other half of the equation. Then, we will put the two halves
together, and practice full board counts.
------------------------------------------------------------
Origin
of a New Term
With Quads
quickly counted, what is left? The
answer is: All the pips which
checkers require to bear INTO the next quadrant.
My first
system was to scrape these residual pips together into patterns of 10, but
eventually it dawned on me that I could allow the geometry of the backgammon
board to work in Naccel's favor for this phase of the counting as well. I have found 6-pip checker groups
to be prettier, more manageable, and fit much more naturally onto the board than
the 10-pip groups I have subsequently discarded. Most importantly, the use of 6-pip
groups has meant that EVERYTHING can be converted to the equivalent of Quads,
with a mere handful (literally, 0-5) of leftover pips.
I wanted to
think of a catchy name for these 6-pip checker patterns. "Clusters", which is a more aesthetic
name than "Clumps" or "Combos", was already taken, and "Groups" or "Sets" seemed
mundane. "Virtual Quadrants" was
descriptive and catchy, but a bit long, and "Virtuals" sounded
funny.
The next try
was to find names that suggested the number six. Looking for something jazzier than
"Hexads", I got sidetracked to mental depths I barely dare to repeat. The trouble began when "Sex", the
Swedish word for six, was suggested to me, and "Sexes" became the prime
candidate. Individual names for
"Sex" shapes filled my brain:
Checkers in a block shape became a "box", checkers in a stack a "rod",
checkers along the edge a "lay", three on a point a "three-way", and so on. I even had an animated argument with
myself about whether a certain shape looked more like a "spoon" or a
"sucker".
It is a
matter of definition whether I ever recovered my sanity, but it was when the
word "Squad" suddenly struck me, that I was jolted out of my Scandinavian
fantasy. A term that suggests
tactical deployment upon a battlefield, "Squad" gives life to the checkers,
"men"; yet it literally means a group of "people" -- hey, that might even please
the feminists (if such a thing is possible). Also, quadrant rhymes with squadron
(close enough), and Quad with Squad.
Clearly these blood brothers are meant to be a tag-team; it seems only
natural for "Squads" to take over where "Quads" leaves
off.
------------------------------------------------------------
The
Ten Basic SQUAD Patterns
The use of
"Squads" is nothing more than a system by which to quickly and conveniently
count the Residual Pips. This would include each of the checkers on
the 6, 1:6, 2:6 and 3:6 points, except that we had the foresight to shift our
quadrant boundaries (one point), thus including them in the Quadcount. We need only Squadrify the remaining
checkers, pip-defined by the point 1, 2, 3, 4 or 5 on which they
stand.
A "Squad"
is, basically, any six pips.
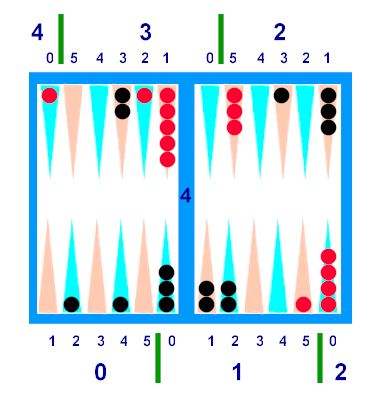
The Ten basic Squad patterns are incorporated into Diagrams B1 and B2
below (with a few irrelevant checkers on the 1:0 ("6") points so that you can
get used to ignoring them):
Diagram B-1
------------------------------------------------------------
Diagram B-2
 <>
<>
Exactly as
in the traditional notation system, everything is reversed from Red's point of
view. To get the Red notation for a
point (until it becomes second nature), you read the point on the exact FAR SIDE
of the board (just as you must do with all classical
diagrams).
Translated
into shorthand, the Ten Basic Squads are:
33, 42, 51, 222, 321, 411, 2211, 3111, 21111, and 111111. A name and description of each
follows:
�
(a) 33. The "PAIR". Starting with the most obvious pattern,
two checkers on the third point of any quadrant add up to 6 pips. This appears in the top diagram as
Black's 3:3 ("21") point, and in the bottom diagram as Red's 3
point.
�
(b) 42. The "SPLIT" can be thought of as
(4+2) = 6, or as two checkers which can be shifted, one a pip forward and the
other a pip backward, to form the 3 point.
In the top diagram, Black has a 42 in his home board. In the bottom diagram, Red's back
checkers form a 42.
�
(c) 51. The "WIDE" (as in wide
split). See top diagram, Red's
bearoff. Again, a mental shift will
transform these two blots into her 3 point.
�
(d) 222. The "DUCK", appears as 3 checkers
on Red's 1:2 ("8") point in both diagrams.
Although Q1 is the most common place to find it, 222 can appear in any
quadrant. A "duck" is a short stack
of stones marking a cross-country trail.
In backgammon, "ducks" refer to deuces.
�
(e) 321. The "LAYER": See Bottom diagram, Black's Q1. It is easy to see this is the bottom
layer of a 321 prime (the "Double Layer").
Whenever we add a layer, we add a unit of Squad. Other Squad patterns can be easily
visualized in combination with (on top of) the Layer.
�
(f) 2211. The "BLOCK". See Top diagram, Q1, or bottom diagram,
Q0, both Black. This is a really
handy formation. If doubled in
height, it becomes the "Building" (or if tripled, the
"Skyscraper").
�
(g) 411. The "WEDGE". Bottom diagram, Black's Q2. As with all basic patterns, these can be
combined from separate quadrants; e.g. 3:4 ("22pt") + two on the
mid.
�
(h) 3111. The "TRIANGLE": Top diagram, Black's Q2. A good resource for a 3-point checker
which can't form a pair, or find a layer.
�
(i) 21111. The "SOCK": Top diagram, Red's Q2. Useful at the end, to round up
1-pointers (midpoint, bar pt, ace pt, roof). See also the "Stack".
�
(j) 111111. The "STACK": Bottom diagram, Red's Q2. Six checkers on, or symmetrical around
any point, convert to an exact number of Squads (in this case, 1). For example, six checkers on a 5 point
count 5 Squads.
------------------------------------------------------------
Multiple
Squad Patterns
The most
useful Multiple Squads are "isolated" -- those which cannot be constructed by
piecing together Singles. That
these Multiples are the Singles' mirror images around the 3 point helps
to reinforce the patterns. (The
Pair, Split and Wide above, and the Kicks below, are their own mirror
images). Multiples arise less often
than Singles, but are worth their weight in gold because they combine the
otherwise clumsy checkers on the 5 and 4 points.
The isolated
Doubles are 552, 543, 444, 5322 and 4431.
They are illustrated, along with the two Triples of 5553 and 5544, and
the one Quadruple of 55554, below in Diagram B-3.
The
Quintuple-Squad 555555 ("Big Stack") is the mirror image of one of our basic
Squad patterns (the 111111 "Stack"), but is so rare, that I have not depicted
it.
Diagram
B-3
�
(a) 552. The "FIN", or "Big Wedge" is in
Black Q1. A "fin" is jargon for a
five-dollar bill, and this pattern also resembles a shark's fin. A theme in all multiple-5 formations,
The "2" gives one pip to each of the 5's and tips you off that the formation
counts 2 Squads.
�
(b) 543. The "BIG LAYER" (2 Squads), is
the mirror image of the 321 Layer (and the same ideas for building up
apply). If you look at Black's home
board, you will see a Big Layer partially lurking under other checkers (as
layers often do). Remove it, then
take away a "Fin", and you will see that the home board is left only with a
"Wide" (51), which comes to a total of Five Squads.
�
(c) 444. The "FORCE" ("May the fours be with you is a popular
backgammon pun"), or "Big Duck" (2 Squads) is in Red Q0. It is easy to combine checkers from
different quadrants, e.g. a 1:4 ("10-point") blot hops forward exactly one
quadrant, or over from the 3:4, to stack onto the four
point.
�
(d) 4431 and 5322. The "KICK" (looks like a foot
kicking a soccer ball) -- see Red's checkers in both outer boards. This is the only pattern whose mirror
counts the same (2 Squads), hence only one name. An easy shift (one checker back, the
other forth, one pip) transforms either Kick into the 4422 "Double
Split".
�
(e) 5544. The "BIG BLOCK" (3 Squads) is in
Black's Q3. The mirror image of the
"Block" (2211), 5544 is great for ridding the least combinable checkers. If twice as high, it is called the "Big
Building".
�
(f) 5553. The "BIG TRIANGLE" (3 Squads; the
"3" part tells you so). In Black's
home board, this can be removed to leave 5421, which I call the "Split Layer" (a
combination of the 42 Split and the 51 Wide); it adds 2 more Squads, for a total
of 5 Squads in the home board.
�
(g) 55554. The "BIG SOCK" (4 Squads, as the
"4" indicates). Of all the ways we
have counted this particular Black home board, using the Big Sock is
easiest. Left over is simply a
Layer (which again brings the count to 5 Squads).
"One
even, two odd" is a useful rule to apply to all formations, including the
Squad Combinations below: When
there is one blot (or a lone checker on top of a primish squad), it is
always on an even-numbered point.
If there are two blots, they will both be on odd
points.
------------------------------------------------------------
Squad
Combinations
Most
multiple Squad patterns are combinations of two or more Single ("basic")
patterns. Consider these advanced;
knowledge of them is a lower priority than of those illustrated in the "B"
diagrams.
It is great
practice to visualize (or set up) the following combinations, and determine
which single (or multiple) patterns they combine. (Note how the mirror images help to
reinforce the patterns). If you are
not in the mood to do so now, feel free to skip this section and come back to it
later, or use it as a reference.
�
2
Squads: 4332 = "Hat". 54111 = "Wide Wedge." 441111 = "Double Wedge". 44211 = "Drop-kick". 43311 = "Tandem". 4422 = "Double Split". 5511 = "Double Wide". 5421 = "Split-Layer". 332211 = "Double Layer'. 33222 = "Chair". 3222111 = "Boot". 322221 = "Top Hat". 333111 = "Odds". 22221111 =
"Building".
�
3
Squads: 333222111 = "Triple Layer". 433332 = "Big Top Hat". 44433 = "Big Chair". 4433211 = "Truck". 443322 = "Tri-pair". 444222 = "Triple Split". 555111 = "Triple Wide". 55521 = "Wide Fin". 553311 = "Short Odds". 55332 = "Big Tandem". 55422 = "Big Drop-kick". 554211 = "Feet-In". 544221 = "Feet-Out". 543321 =
"Sombrero".
�
4
Squads: 555333 = "Big Odds". 555531 = "Wide Triangle". 544443 = "Giant Top Hat". 5543322 = "Big Truck". 55433211 = "W". 444332211 = "Fourplex". 554433 = "Double Big Layer". 55442211 = "Split Blocks" or "Double
Split-Layer". [8-4] Prime =
"Special 5-Prime".
�
5
Squads: 5554443 = "Big Boot". 554433222 = "Big Fourplex". The [1-5] Prime or any "Six-Prime" also
counts 5 Squads.
------------------------------------------------------------
Squadcount
Trouble-Shooting Guide
This is the
final preparation for counting full boards (and also a reference for
later). A comprehensive look at the
pitfalls which are possible during a Squadcount will prevent you from being led
astray:
�
(1) Far
Side confusion: This is the
most likely cause of a miscount.
There can be a tendency, at first, to confuse the middle points in Q2
and, especially, in Q3. This
is because Red's 2 and 3 points are Black's 5 and 4 points, and vice versa.
Remedy: Until instant recognition sets in, just
keep reminding yourself which direction the checkers are traveling for the side
you are counting.
�
(2)
Shrinkage: Uncounted
checkers disappear as if they were counted.
�
(3)
Ghosting: Checkers you have
taken off the board reappear, causing you to combine/count them again.
Remedy for
both: Sweep systematically, as if you are
vacuuming a rug, so that you are less likely to forget or redo a corner. Avoid darting around, leaving isolated
checkers or groups. If you collect
only part of a point, "vacuum" the rest of it as soon as
possible.
�
(4)
Pattern Confusion: 2111 is
too short to be a sock. 432 is a
bogus layer. 441 is not a real
wedge. 5422 is a footless
kick. 3322 or 4433 is a phony
block.
Remedy: Verify that patterns total 6, or a
multiple of 6. Review Diagrams B1
thru B3, and keep practicing your counts.
Getting these patterns right is mainly a matter of repetition; soon, the
misfits will just plain look wrong.
�
(5)
OverSquads: With proper
combining, these rarely arise, but, occasionally, your final remainder will be
more than 6 pips, with no squads available. These rogue combinations are 322, 431,
441, 443, 522, 532, 553, 544, 5554, 55555, and certain
subsets.
Remedy: Review the Multiple Squads section, and
focus on combining 5's and 4's first.
Ration low point-count checkers (e.g., midpoint and 1:2). If you do oversquad, just shift the high
checker(s) up to the 6 point, to create a 1-checker squad, or shift to make the
3 point. For example, 553 or 544
can shift to 661 = 2:1, or 443 becomes 533 = 1:5. This is a one-time deal, and occurs
last; thus, it is easy to add to your (s)quad total.
�
(6) Crossover Shift: What appears to be an innocent shift
between the "6 point" and a lower point, actually crosses over a quadrant
boundary. (By contrast, note that
shifting 1:0 to 1:1 ("6" to "7"), or vice versa, is fine, because that does not
cross over). Similarly, with the
"24", "18" or "12" points, though the temptation to shift there is relatively
infrequent.
Remedy: Make your shift BEFORE counting the
original Quads (and then so as not to forget, start the Quad count from that
end). If you do shift after,
subtract 1 Quad if shifting 6-5 (or add a Quad if 5-6). Or, sometimes you can plug the desired
prime holes by "Quad-hopping" (shifting checkers 6 pips), which can be
done freely, without burdensome side effects. The text accompanying Diagram D contains
illustrations of this theme.
------------------------------------------------------------
QUADS
and SQUADS -- Putting it All Together
Yippee! It is time to apply the techniques we
have learned to count full boards.
Take another
look at Diagrams B1, B2 and B3.
Count the Quads, and then add the Squads, as you go, to the Quads
(sub)total you got. Do not convert
to pips. Write down your Quad
totals for Black, for Red, and the Quad difference. Then compare them with the answers,
below.
[Please note
that the term "Quads" refers both to the quadrant units first counted, and also
to the combined total of these quadrant units and the Squads added to them. In context, it is usually easy to see
which one is being referred to, but if there is possible confusion, then the
terms "Original", or conversely "Combined" (or "Total") can
preface].
If you feel
slow, or lose track of the Naccel procedure, or get the wrong answers, review
"How to do a Total Pipcount", "Counting Quads", or the Squad sections, as
needed, and try again.
----------------------
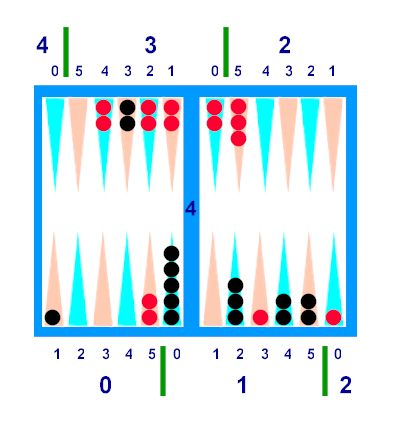
Diagram
B-1 --
Black:
Quads: The anchor (which is two checkers in Q3)
counts as 6 quads. The clump of 4
checkers in Q1 is convenient to add to it, because that makes 10. The three on the 1:0 ("6-pt") are also
Q1 checkers (remember), so that's 3 more quads, making 13 so far. The four checkers in Q2 count 8, for a
total of 21
Quads.
Squads: Starting from his back checkers and
sweeping around: Black has a Pair,
a Triangle, a Block, and a Split, for a total of 4 Squads. Adding that to the 21 original Quads,
makes 25 Quads
altogether.
Diagram
B-1 --
Red:
Quads: The five in Q2 are nice, that makes 10
Quads. There are 8 more in Q1, for
a total of 18
Quads.
Squads: Starting from the midpoint area: Red has a Sock, a Duck, and a Wide, for
a total of 3 Squads. That makes 21 Quads
altogether.
Summary: Red leads 21 Quads to 25, a difference
of 4
Quads.
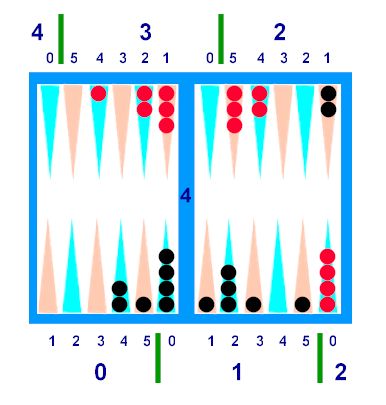
Diagram
B-2 --
Black:
Quads: Black has three in Q2, which count as 6
quads, plus 8 more in Q1, makes a total of 14 Quads.
Squads: Black has a Wedge, a Layer, and a Block;
that's 3 Squads. That makes 17 Quads
altogether.
Diagram
B-2 --
Red:
Quads: Red's back checkers count 6, the
midpoint is 12, plus 5 in Q1, makes 23 Quads.
Squads: Red has a Split, a Stack, a Duck, and a
Pair; that's 4 Squads. That makes 27 Quads
altogether.
Summary: Black leads 17 to 27, a difference
of 10
Quads.
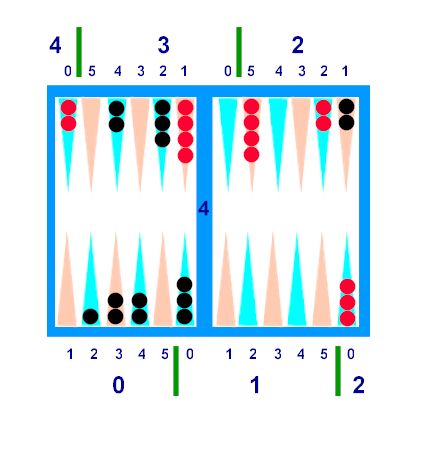
Diagram
B-3 --
Black:
Quads: Black's back checkers (four in Q3) count
12, plus 3 in Q1, makes 15
Quads.
Squads: Black has a Big Block (counts 3), a Fin
(2), a Big Sock (4), and a Layer (1), for a total of 10 Squads. Added to the 15 Quads, that's 25
altogether.
Diagram
B-3 --
Red:
Quads: Four Q2 checkers make 8, plus 8 in Q1,
makes 16
Quads.
Squads: Red has two Kicks (or two Double Splits
by virtue of shifting) -- each counting 2, so that's 4 so far. The Force in the inner board counts as
another 2, for a total of 6
Squads. Added to the 16, that's 22 Quads
altogether.
Summary: Red leads 22 to 25, a difference of 3 Quads.
------------------------------------------------------------
Counting
a Real Game Position
Squads are
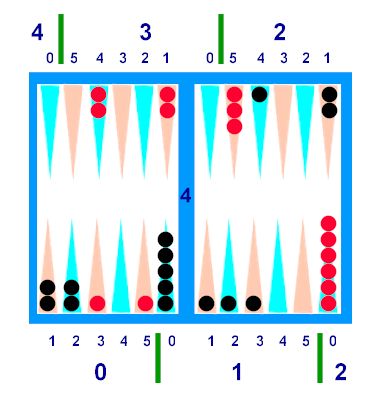
usually not ALL as conveniently arranged as in the B diagrams. Let us try counting a position which
arose in an actual game -- a tricky middle-game example from New Ideas in
Backgammon (Woolsey/Heinrich) #21 (p. 60), illustrated
below.
Admittedly,
we would not count this position in live play. No matter what we discover the race to
be, it is too risky to break the anchor and hit with the 6-3 rolled in the
actual game. Nor can either side
consider a double based on the race until there is a shot, serious
deterioration, or some sort of contact is broken. We are counting this position purely for
practice.
Starting
with this diagram, I recommend you pull out the original books (if you have
them), and open to the page from which I've borrowed the diagrammed positions
for this article (or print or photocopy from here). This will avoid having to scroll your
screen or turn pages back and forth in an attempt to follow
explanations.
One final
recommendation, before beginning:
To best benefit from this article, make the effort to understand each
adjustment in each step of the full counts offered under each diagram, before
moving on. At first this may seem
tedious, but when you catch on, your reward is that your mind will probably feel
a bit like a rocketship at takeoff.
Again, count
on your own (Quads + Squads, and leftover Pips, please). Write down your steps, and compare your
answers to those immediately below the diagram:
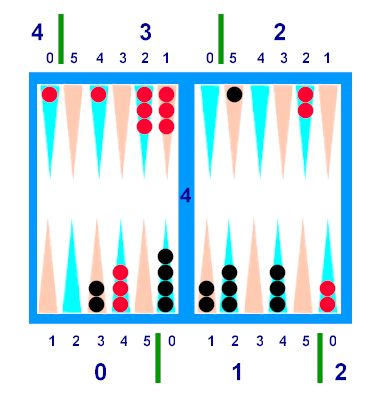
Diagram C
Diagram
C --
Black:
�
Quads: Two Q3's is 6, plus 12 (in Q1) =
18.
�
Squads: The 3:3 point is a "Pair", for 19. The 5544 is a "Big Block" -- that's
22. The "Duck" makes 23, with just 1 leftover pip (ace
point).
Diagram
C --
Red:
�
Quads: Two in Q3 and two in Q2 (the 3322 combo)
make 10, plus 7 in Q1 makes 17.
�
Squads: The 3 point "Pair" -- that's 18. The 5 point plus a 1:2 checker create a
"Fin" (counts 2) -- that's 20 -- which leaves a "Block" outside, that's 21. The 2:4 goes with one of the 3:2 for a
"Split", makes 22, with 3 leftover pips (3:2 +
mid).
TOTALS: So, Black has 23:1, and Red has 22:3. Red leads by 4 pips. [If you don't yet see this difference
easily, count on your fingers up from 22:3, thusly: "22:4, 22:5, 23:0,
23:1"].
----------------------
How did you
do? Your count was wrong? Okay: Try to figure out how it happened. And don't worry. There's a significant chance that you
will make a mistake or two the first few times.
I gave a
longer solution in the text above, but actually I lucked out and counted Black's
entire position in under 3 seconds.
"6..18... wow -- 23, and 1."
Can you guess what I had done?
I had noticed that Quad-hopping the 3:3 point around and inserting it
into the 1:3 slot formed the "Big Fourplex" pattern (worth 5
Squads).
Before long,
squads will jump out at you right and left, even when combined from different
quadrants (believe it or not), and you will be counting them as confidently as
chairs around a table. There will
be many choices, but finding squads which use up the 5 and 4 point checkers
first will retain more flexibility for coralling the rest of the checkers. You can let that principle guide your
sweep, as it did Red in the above position.
Red went
straight for the 5 point (knocking off the Pair on her way, so as not to leave
it isolated), and had a choice of 2-point checkers to combine. She chose the one outside because it
left a Block there, but she could just as easily have grabbed one of the 3:2
checkers, combined the remaining one with the 2:4 (a Split), and shot down the
Duck, with 3 one-pointers left over (bar point and midpoint).
An
experienced counter would likely see Red's 3:2 point as 4 pips to be combined
onto the 2:4 blot, and quad-hop them to the 4-point for a "Six-prime" (5
Squads), with 3 pips left over.
------------------------------------------------------------
Counting
the RACE
We utilized
the last diagram mainly to practice a full count. In actual play, the only good reason for
needing to know the TOTAL count for both sides (as opposed to just a Comparison
count) is in order to decide whether to double, to redouble, or to take or pass
a cube in a straight race (or light contact
position).
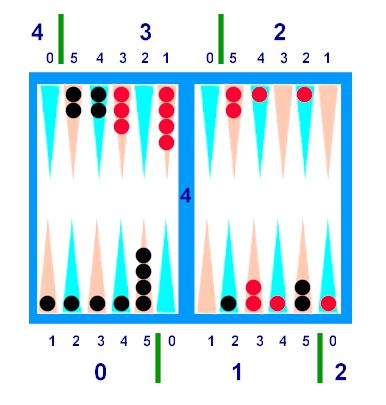
Consider the
position below. Should Black
double? Redouble? Should Red take?
Let's start
by determining the total count (Quad + Pip format) for both sides. Do NOT convert the Totals to
Pips, only the difference to Pips.
Don't worry: In the next
section, I will show you how to make accurate cube decisions with the same
Naccel-style numbers we have been producing, and with greater ease than you have
ever experienced with straight pipcounts!
Diagram D
Diagram
D --
Black:
�
Quads: Two Q2's (midpoint) is 4, plus 10 (in
Q1) = 14.
�
Squads: The 4 point + 1:2 ("8") point (a great
"Double-Split" to know), makes 16, plus a "Layer" makes 17. The 5 and 1:5 team up with the midpoint
for two Wides, making 19. There are 0 leftover
pips.
Diagram
D --
Red:
�
Quads: Four Q2's is 8, plus 8 (in Q1) =
16.
�
Squads: 33222 is the "Chair" (Pair + Duck), for
18. The 5 point combines with two
1-pointers on the mid for two Wides, that's 20. There are 5 pips left over (the 3 pt blot
+ two mids).
TOTALS: Black leads 19:0 to 20:5, for a difference of 1:5,
or 11
pips.
----------------------
Before we
determine cube decisions, note that this diabolical diagram contains a couple of
advanced pitfalls. Knowledge of the
Special 5-Prime (8 thru 4 pts), could be just enough to get you in trouble. If you shift the 6-point checkers, one
forward and the other backward, you have achieved that
prime.
However,
under the Squadcount Trouble-Shooting section, a warning is issued (with
explanation). Shifting from 6-5
should be done before the original Quad count, or if afterwards, one
needs to remember to adjust by subtracting one Quad. Deciding never to shift the 6-5 is the
safest policy, though that may deny what could otherwise prove to be a useful
resource.
"Quad-hopping"
can often achieve a desired goal without encumbrances. Any time you combine checkers from
different quadrants to form a Squad, you are essentially employing this
technique. Moving checkers 1 or
more exact Quads maintains their parity, while positioning them into
recognizable patterns. In the
position at hand, Quad-hopping creates the Special 5-prime, worth 4 Squads
(cleanly leaving a 5th Squad, the "Layer", left over). This is the fastest way to count Black's
position.
Even without
knowledge of the Special 5-prime, hopping both 6's down and covering the 5 point
with a third clarifies our view. By
banding the entire army of checkers together, all the ways of combining workable
Squads, as well as remainders, are now easier to see: Big Block and a "Boot" (which is Layer +
Block); or Fin, Double-Split and a Triangle; or Duck, two Wides and a Kick; and
so on.
Red's
position contains a different trap.
Shifting the 1:2 ("8pt) checker forward and the 1:0 ("6pt") checker
backward (this time it is the okay direction, because it does not step over a
real quadrant divider), creates a 5-prime.
However, it's the wrong one!
Only 5-primes centering around a 3 point [1 thru 5], or sandwiched by
them [8 thru 4], convert to an exact number of Quads.
"Quad-hopping"
all four midpoint checkers down to the bar point is useful, though not as a
5-prime. We can now more easily
count Red's position as a Double Layer plus either two Wides or a Fin; or a
Chair and two Wides; either way, with 5 pips left over.
All roads
lead to Rome; the preponderance of small counters makes it impossible to
oversquad here. A Quad-hop of the
3-point checker back to create a Triple Layer still leaves a Wide to grab, with
a single 5-pip checker as a remainder.
Even if we employ the stinkiest technique possible by using the Sock to
mop up all the one-pointers, the [Pair + Fin] or [Pair + Kick] rescues us. How did you do with this
diagram?
Okay, now
that we have seen a variety of ways to quickly arrive at the correct totals, we
will figure out what to actually do with our count of 19:0 to 20:5. What are the correct cube
actions?
-----------------------------------------------------
Naccel
Race Formula
Truncate the
Leader's count to
just the Quad number (nothing after the colon). Now,
�
If 12 Quads
or more, subtract 1, divide by 2, and round down.
�
OR, if less
than 12 Quads, simply subtract 6.
This is the
minimum lead (in pips) necessary for a correct DOUBLE.
Add 1 to get
the minimum redouble, or
Add 4 to get
the maximal take point. [If leader
has 18+ Quads, add 5].
-----------------------------------------------------
That's
it. No percentages. The Naccel Race Formula matches
Robertie's [8 / 9 / 12%] Formula surprisingly well.
Because the
[8 / 9 / 12] Formula is not intended for use below 12 Quads (72 pips), Naccel's
simple [subtract 6] rule then approximates Trice's short-race (no wastage)
formula, which is [Subtract 5 from PIPcount, divide by 7, round down for take
point, subtract from that 3 for redouble or 4 for initial
double].
For example,
the leader has 9:0, 9:1, 9:2, 9:3, 9:4, or 9:5. Truncating, and subtracting 6, Naccel
gives a doubling point of 3, a redouble of 4, and a take of 7. Trice's formula agrees with all numbers
in this range (54 thru 59 pips).
There are a few spots elsewhere in which Naccel's thresholds differ from
Trice's by 1.
It is tricky
to find the right balance of close fits and easy implementation, though I am
happy with the way the Naccel formula has turned out. Currently, I am unaware of the existence
of any other reference formulas or tables which would allow me to sharpen
Robertie's or Trice's approximations.
(Weaver's clever "10% -2 / -1 /+2", though highly practical for
traditional pipcounts, does not offer Naccel accurate enough numbers to
emulate).
Please let
me know if you find any Naccel examples for which the thresholds stray from
these or other known formulas, so I can review them for possible
revision.
----------------------
Let's apply
the Naccel Race formula to the count of 19:0 to 20:5, difference of 11 pips, we derived from the
most recent position:
*** [19 - 1] divided by 2
equals 9. ***
So, 9 is our minimum double. 10 is our minimum redouble. 14 is our maximal
take.
(We added 5
to derive the take point, because the leader's total is at least 18
Quads).
The actual
difference is 11 pips. Black has a solid redouble, and Red has
an easy take.
------------------------------------------------------------
Remembering
the Count
All counting
methods are vulnerable to a common disaster. What if you have completed the count for
the second player, but have forgotten the count of the first player? Well, there's not much you can do at
that point, other than redo the first player's count (and hope you don't then forget the second player's!). This is a case where an ounce of
prevention is better than a pound... on the head.
I heard or
read (I don't remember where, or if I'm parroting the method correctly -- sorry)
that to remember a traditional count, you could touch a finger of your left hand
to the outside of the board, immediately in front of the point that corresponds
to the first digit (or two) of the count, and a finger of your right hand in
front of the point which corresponds to the last digit.
So, 113
would be "bookmarked" with your left finger by the 11 point, and your right
finger by the 3 point. In theory,
for 89 you would have your left finger by the 8 point and your right finger on
the 9 point, causing your hands to cross (to avoid confusion with 98), though I
suppose instead holding one finger at an angle in such cases could clarify
that. Presumably, pipcounts higher
than 129 would just ignore the first digit. So, for 130, you could left-finger the 3
point and right-finger the bear-off tray.
Possible
drawbacks to this might be that your arms might tire while you are counting the
other color, it might inform an observant opponent of the pipcount (in case that
matters), and it just plain looks silly!
However, the method works, and it is easy to
remember.
The board
could be employed in a similar manner to remember Naccel's counts, but because I
was raised to keep my arms and elbows off the table, I recommend an alternate
method:
------------------------------------------------------------
The
"Handy" Count
�
Choose a
primary location to rest your left hand (could be on your thigh or alongside
your chair). Keep track of the last
digit of your Quadcount by extending 0, 1, 2, 3, 4, or 5 fingers. For a higher digit, move your hand to a
secondary location (could be your knee), and extend 1, 2, 3, or 4 fingers to
denote 6, 7, 8 or 9 respectively.
�
Extend the
fingers of your right hand the appropriate number of Residual
Pips.
------------------------------------------------------------
It is
unnecessary to bookmark the first digit of the Quadcount. For example, 12 Quads is virtually a
bearoff position, and it would be very hard to confuse that with the 22 Quad
length of, say, the opening position.
For best
Naccel results, I recommend use of the Handy Count. As your speed increases, you may wish to
gradually drop the use of your right hand (residual pips), and eventually even
your left.
The Handy
Count can also be tagged to the Comparison count (see next section). Your left hand can bookmark the Quad
difference (palm up means up Quads, palm down means down Quads),
while you figure out the Top-Heavies or Residual Pips.
If you ever
see me holding MY fingers up by the board, it will not be a new method. You will know that I'm either having one
of my fits (usually accompanied by slobbering and guttural noises), or I am
hoping you'll know how to read the bogus pipcount I will be subliminally
signaling.
------------------------------------------------------------
------------------------------------------------------------
a[N
accel]erated COMPARISON count
�
Step 1: Compare Quads.
�
Step 2: Compare either Top-Heavies, or Residual
Pips.
�
Step 3: Add or subtract.
------------------------------------------------------------
I recommend
the traditional method of Comparison counting IF, and only if, you find
yourself in a position highly symmetrical to your opponent. In this case, sizing up a few
adjustments will be a little faster than Naccel's method. In all other positions, I recommend
Naccel.
For
positions which are difficult to comparison-count using the classical method,
Naccel is profoundly practical. In
many cases, you will be able to stop right after the first step -- the "Quad
Comparison". While a
close count is not guaranteed, accuracy to the nearest Quad is
typical.
What this
means is that you can often garner sufficient information during Step 1. If you are cubed, and find yourself down
several quadrants in a light contact position, you are NOT going to take the
double -- it is merely a waste of time to figure out the relatively small swing
in the remaining pips. Top-Heavies
or (especially) Residual Pips are just "fine tuning".
Similarly,
if it is a question of doubling, and a simple Quad Comparison reveals you are
not ahead, there is no point in sharpening the count (unless the upper halves of
your opponent's quadrants look much
heavier than your own). Other
counting methods, which lump it all together, offer no such
relief.
If you want
to know the race to help you decide whether to make an aggressive or a passive
checker play, a Quad Comparison will nearly always suffice. However, the second step of counting
(adjusting either for top-heaviness, or to the precise pip), will always be your
privilege, should you choose to exercise it.
------------------------------------------------------------
Comparing
Quads
One approach
to comparing Quads is just to count the total Quads for both sides and subtract
one from the other, as we have been practicing. However, if we have decided we are not
counting for purposes of applying the race formula (and thus have no need for
totals), we can adopt an even shorter procedure, elaborated
here.
We do not
normally compare "Speedboards" by counting their pips, but imagine how easy it
would be. You could just go from
point to point, canceling differences.
"I have 2 extra on the 3 point, so I'm down 6 pips. She has one extra on the two point, so
now I'm only down 4 pips. She has
three extra on the ace point, so altogether I'm only down a
pip."
Comparing
Quads is an identical procedure.
While not as vertically compact, the opposite-colored checkers are on
each "big point" are right across from each other, just as in a speedboard, so
it is easy to see the differences.
Additional
cancellations can help, as long as one does not have to strain to find
them. If Black has a checker on the
roof (Q4), and Red has a couple extra checkers on the midpoint (Q2) instead,
these are convenient to cancel.
(This is no different, in essence, than Black having a checker on the 4
point of a speedboard, while Red has a couple extra checkers on the 2
point). Other common cancellation
possibilities include 433 vs 22222 (five on the mid), Or 33 (an anchor) equals 222 (three on
the mid).
These
supplemental cancellations can be quite useful in asymmetrical positions. In symmetrical ones, they will tend to
increase the likelihood of a "ghosting" error, and are not needed anyway. Unless a peripheral cancellation is a
clear and easy gain, it is more practical to stick to the straight
quadrant-by-quadrant comparison.
For purposes
of a Quad comparison, it is often convenient to count a 5 or 4 point checker as
a Quad. Good examples of this are
666 vs 665, or 6666 vs 6664 (or "24 24" vs "24 23"). Pre-canceling such groups is easy
visually, and will likely improve your estimate (4 or 5 pips is closer to 6 than
it is to zero). Even if you plan to
do a full Comparison (with residual pips), you can carry around a pip or two for
later adjustment -- you will save not having had to count the Quad one way, and
later the 4 or 5 pips the other way).
If such a
cancellation does not feel clean or "fair", it may be because you are seeing
other 5's and 4's which seem to warrant weight too. That is a signal you should go ahead and
perform the standard Quad comparison, and then hone it by applying a more
comprehensive 5-4 adjustment, described in the next
section.
------------------------------------------------------------
Comparing
Top-Heavies
This
optional supplementary count is done after the pure Quad Count. It quickly estimates the effect of
"top-heaviness" by counting the number of 5th and 4th point checkers (in all
quadrants) each side has. The idea
is to correct the Quad-count, in less time than it takes to perform the totally
accurate Residual Pipcount.
The
Top-Heavy Adjustment is a trade-off between time and accuracy. It seems warranted when the combination
of (a) and (b) below seems compelling:
�
(a) I notice some 5th and/or 4th point
checkers sitting out there.
�
(b) The position is of the type that I don't
need an exact count, but in case my current count is off a Quad or so, it is somewhat likely that I will
make an error.
Theoretically,
one would like to count 5/6 Quads for each excess 5, and 2/3 Quads for each
excess 4, but that is way too complicated.
Even treating 5's differently from 4's seems like more trouble than it is
worth. Although you can tailor your
particular method of adjustment to the level of accuracy you wish to achieve, I
recommend:
----------------------
TOP-HEAVY
ADJUSTMENT: Adjust 1 Quad for each 5 or 4 one color
has in excess. If the difference is
3 or more, Subtract 1 from this adjustment. In the unlikely event the difference is
7 or more, subtract 2.
----------------------
The
Top-Heavy Adjustment is an easy, level-headed compromise, if you feel the count
needs a bit more accuracy, but not an absolutely pinpoint. [If you then change your mind and
feel, after all, you need the greater refinement of a Residual Pipcount, it is
like changing horses in midstream, but still possible: Just back out the T. H.
Adjustment].
------------------------------------------------------------
CHECKER
PLAY based on Quad Comparison
Knowing the
race can often help us choose between what I term "Passive vs Aggressive"
plays. ("Safe vs Bold", which
considers exposing a blot, as in Diagram G, is a subset). For that purpose, I find that to
think of the race difference in terms of a small manageable number of "Quads"
easier than some larger number of pips.
It allows me to more easily see the big picture. Also, as you will discover, it is
usually sufficient to stop after a quick simple Quadcount, without
refinement.
Below is an
early bear-in position from New Ideas in Backgammon, # 33 (p.97). Black is considering how to play a roll
of 6-4. Is it better to run around
to the 1:4 point, or to make the outfield anchor (2:4)? Is the race a consideration, and if so,
at what race-count would you change your play?
First, write
down your Quad-comparisons and Top-Heavy Adjustments; then check those posted
under the diagram.
Diagram E
Diagram
E -- Comparison:
�
Quads: Black's back anchor (two Q3's) cancel
Red's six outer Q1's. Another Black
Q3 cancels Red's extra 6-point and midpoint checkers. The other two Black Q3's count as 6 Quads.
�
Top-Heavies: Black has 4 Top-Heavies, and Red has
only 2. Adjust Red's lead from 6,
to 8
Quads.
----------------------
Though a 2
Quad adjustment is unusual, this Top-Heavy adjustment is a slight over-swing of
the pendulum (actual count is 7:3, so 7 or 8 was the closest it could
come).
So, what
about this roll of 6-4? Is making
the outer anchor an aggressive or a passive play? The answer is "passive", even if we grab
the checkers with a great flourish, and jam them into the 2:4 ("16") point,
aiming a two-barrelled gun at his midpoint. This will intimidate the opponent only
until next roll, when he starts to realize that what we are actually holding is
a water pistol. Running around to
the 1:4 ("10") point is actually the aggressive play, maintaining the back
anchor for more real contact. It is
important to get this conceptually straight, so that we know in which direction
the race deficit will affect our play.
After we get
a Quad Comparison of 6, we can ask ourselves: Do we feel that the relative race zone
we have estimated renders our play of 6-4 a close decision? If so, might fine-tuning the count
affect our choice? If no to either,
we stop at the Quadcount. If yes,
we perform a Top-Heavy Adjustment, or a Residual Pip comparison. (At the board, this "decision" to
sharpen the count is all done in an intuitive wink of the
eye).
At a race
difference of 8, or 7:3, or even 6 Quads, it is correct to run around (to
the 1:4 point) with the 6-4, and by a huge margin. Kit Woolsey, in his book, offers
insightful analysis, and does particularly well to emphasize how the large race
deficit influences the correct game plan.
By contrast,
I sometimes hear the argument put forth, "the race has nothing to do with it --
it's only a matter of seeing the timing", but this ignores the fact that race
and timing are closely related. At
some reduced relative count, various racing or showdown scenarios will become a
practicable option; it will become preferable to create a stepping stone, rather
than to keep forces divided solely on the sole merit of the additional shot
equity yielded as a result of clinging to the deepest
point.
Being
informed pedantically that a certain move is "clearly" correct, in no way
invalidates our possible perception that, at the time we had to make a decision,
we felt it was beneficial to sharpen our count. What it should do is encourage us to
learn how to better evaluate a particular class of positions, and to mentally
adjust our relationship between certain race parameters and play
thresholds.
It turns out
in this position that one has to shift the race further than I would have
guessed to swing the correct play.
If one moves both ace-point checkers and a 6-point checker back to Red's
midpoint, Black's race deficit has been cut from 7+ to 2+ Quads. Only then does it become correct for
Black to partially abandon the back anchor and make the flexible outside (2:4)
point.
For some
cube or checker play decisions (though not in this example), you may wish to
acquire a count to the exact pip.
To this end, you will be soon be shown tricks for performing quick
Residual Pipcounts. An
entertaining one (not necessarily fastest) for the above position could
be:
"Remove a
Black 0:2 and a Red 1:2 checker.
Stack Black's 4pt checkers onto the 3pt, and demote his back anchor one
point to compensate. This sets up a
horizontal symmetry vanishing all 14 checkers which remain on the far side of
the board. Now, Red's midpoint is
worth one of Black's 3 pt checkers, and the other three make 1 (s)quad, with 3 pips left over, for a total of
7:3"
This
illustrates a good example of forcing a symmetry within our grasp. But I offer this just for a taste. You may wish to check it out, blow by
blow, after you have read the Residual Pip section.
------------------------------------------------------------
CUBE
DECISIONS based on Quad Comparison
We have seen
how the Quad Comparison can affect what kind of a checker play we might
select. Now let's look at the other
reason for comparing Quads: To
decide whether to double, redouble or take a cube.
To this end,
we will analyze a position from Jerry Grandell's Important Matches
(Ortega/Kleinman), p. 194. (This is
a worthwhile book, in spite of the fact that I am in there as one of Jerry's
victims).
Compare your
Quads, and then if you think a Top-Heavy Adjustment is a good idea, you can
practice that too. Write down your
answers, and then check to see if you arrived at the correct
count.
Diagram F
Diagram
F -- Comparison:
�
Quads: Cancel Red's three Q3's with 9 Black
Q1's -- his extra 6 point checker, and the 8 on the outside. Red's 2:5 ("17pt") checker offsets Red's
two Q1 checkers. This leaves only
Red's two midpoint checkers, which count for a 4 Quad
deficit.
�
Top-Heavies: Black has 4 Top-Heavies, but Red has 5
(one extra). Adjust Black's Quad
lead to 5.
----------------------
I noticed
Red's checkers on the 5 point, and then some high points in the outfield. In addition, I felt a rough Quad count
was insufficient information. A
4-Quad lead here made this position a solid take in my mind, but more Quads, I
wasn't so sure; and less quads, then I wasn't sure about the double. The presence of high-pointers and cube
sensitivity clearly indicated the necessity of a Top-Heavy
adjustment.
Knowledge
that Black's lead is actually around FIVE Quads is enough to give me complete
confidence I should double, and redouble.
It is even enough to lean me towards passing. The few immediate possibilities of
hitting Black are ameliorated by the two blots in Red's board, and the holding
game equity appears insufficient at that big a racing
deficit.
In the
actual game, Black did not even proffer an initial double. Perhaps he was operating on a certain
general principle which advises, when bearing in against a semi-primed holding
game, to get the straggler home and lose the market small. I have to wonder, though, if Black
counted the race.
For example,
let's advance Red's two checkers on the 2:5 ("11") point to the 4 point. This makes Red's board more powerful for
later, yes, but, more crucially, for any immediate hits. However, in these key variations, she
also hits less often (198 vs 296 in 1296), so all is largely offset. The main factor of moving Red's checkers
forward is a gain in the race, a guarantee to be gammoned on the run less often,
and to win the race more often.
This
alteration slices Black's racing lead from 5 Quads to 3, turning a questionable
take into what is not even an initial double. Such a sizeable swing in cube strength
illustrates how important it can be to refine the straight Quadcount when one
seems to be in an uncertain range.
And, of all possible contact positions, a simple holding game, which this
diagram is rapidly approaching, is the main candidate for cube sensitivity based
upon race.
Thus, it is
quite conceivable that one might feel a Residual Pipcount is in order -- a
tie-breaker to decide a close pass.
This time, the RP count below uses squad comparison, which you can
probably already follow. Anyway,
you will have a chance to peruse the myriad of Residual Pip cancellation options
in the upcoming section.
Residual
Pips: Black's "Force" near the midpoints
cancels Red's "Double-Wide" there.
Black's Duck, Wide (from 2:5 and bar point), and inner Pair cancel Red's
Big Triangle (home board). Finally,
Black's remaining bar pt blot cancels Red's ace pt blot, leaving Red with three
checkers on the 3:3 ("21") point, which count as a Quad + 3 pips. Added to the original 4-Quad comparison,
Black's exact lead is 5:3.
In summary,
there were 9 pips more which were unaccounted for by the original Quad
comparison, a bad miss. In
recognizing the 5 and 4 points looked heavy, we opted for a quick Top-Heavy
adjustment, which caught 6 of them.
Performing a Residual Pipcount instead, though a longer procedure, would
have caught that 6 plus 3 more. As
"luck" would have it, these 3 extra pips turn out to be enough to nudge this
holding game past the take point.
------------------------------------------------------------
Comparing
Residual Pips
There are
two main reasons that you might wish to compare Residual
Pips:
(A) You feel that an exact comparison count
of a contact position might actually swing a checker play or cube
decision.
(B) Your intention had been to spot-check a
cube decision (no re/double vs re/double, or take vs pass) in a straight race
(or light contact position), and you chose Comparison counting over Total
counting because it is faster. You
now realize that a Residual Pip comparison may confirm the race to be close
enough to Quadcount the leader, and apply the race
formula.
Basically,
speedy Residual Pip comparison comes down to the ability to quickly recognize
cancellation possibilities. Here
are some options:
�
(1) You can cancel Squads on one side with
similar or different Squads on the other side. As you are ridding these for both colors
at once, it is more orderly to try for the same quadrant, or adjacent quadrants,
and handle next whichever checkers remain in that area of the board, if
possible.
�
(2) Checkers on the Acepoint,
Barpoint, Midpoint, and/or Roof ("4:1") are called "Aceys". Counting one pip each, Aceys are very
flexible for offsetting, and not just each other. Two of them will cancel a checker an
x:2, three of them an x:3, or a 4 and a 1 can cancel a 5, etc. Aceys can easily pair with (or offset)
checkers left over from squad transactions, combine with a plus pip-shift, or
counter a minus pip-shift.
�
(3) Any checker in VERTICAL
opposition to an opponent checker can be offset. For example, if both sides have a blot
on the 4 point, or both own the 2:5 point, these cancel. (This is the only type of symmetry which
also works in classical comparison counting).
�
(4) Checkers can be offset
HORIZONTALLY, symmetrically around the bar. Black's 3:2 ("20pt") anchor will cancel
against Red's 1:2 ("8pt"). Or 3:4
("22pt") offsets opp's 1:4 ("10pt").
A Black ace point checker offsets a Red midpoint
checker.
�
(5) Checkers can be offset using
INNER symmetry, within a quadrant. A Black 3:4 ("22pt") anchor balances
Red's 4 point right next door, so once again all four checkers disappear. Applying the same principle, Black's
bar point offsets Red's midpoint -- the opposite end of the same
quadrant.
�
(6) The final symmetry possibility is
"HOP-SYM", found by hopping a checker 6 pips and then applying either
horizontal or vertical symmetry.
Black's 4:0 ("24") point offsets Red's 3:0 ("18") point. Or Black's 3:4 ("22pt") offsets Red's
2:4 ("16pt"). This symmetry is the
hardest to notice, but can sometimes prove handy.
�
(7) If a desired symmetry doesn't
match up exactly, you can force it, then mentally SHIFT checkers elsewhere the
same number of pips in the opposite direction (or just add or subtract a pip or
two from a running count). Or, you
can (for any reason) swap ANY checker, point, or group, with that of the
opposite color -- ANYWHERE on the board!
Note that
"Quad-hopping" is a combining technique for same-colored checkers, not a
cancelling technique for opposite-colored checkers. You can, of course, Quad-hop to position
a Black checker, as long as it is symmetry which causes the actual cancellation
(see "Hop-sym" above).
Keep on the
lookout for old and new ways to combine and cancel. As you add tricks to your repertoire,
you will have fewer and fewer checkers or adjustments to "remember", to the
point that within a few seconds you will just "see" the Residual Pip
difference.
------------------------------------------------------------
Fine-Tuning
Checker Plays
Decisions
whether to expose a blot or not (Safe vs Bold play) are generally more sensitive
to the exact pipcount than are some of the less volatile types of Aggressive vs
Passive plays (such as the 6-4 play in Diagram E). A small race adjustment can swing a play
more easily.
With this in
mind, our final example is an early middle game, from Backgammon
(Magriel), p.217 [reprinted in Classic Backgammon Revisited (Bagai),
#38], on which to test all three Comparison skills you have
learned.
We are
Black, and have a 3-2 to play.
Should we hit, or play safe?
Is the race a consideration, and if so, at what race threshold would you
guess it becomes correct to switch plays?
For each
position arising in actual play for which you feel a Comparison count is needed,
you do a Quadcount, followed if necessary, by only one (or neither, but
not both) of the Top-Heavy or Residual Pip alternatives. However, for purposes of teaching, I am
asking you to practice both full comparison alternatives (Quadcount +
Top-Heavy, and Quadcount + Residual Pips), and compare your answers with those
found below.
Diagram G
Diagram
G -- Comparison:
�
Quads: Black has an extra checker in Q3, while
Red has his extra in Q1 ("6pt").
Red has a 2-Quad
lead.
�
Top-Heavies: Black has 3 Top-Heavies, Red has
two. Adjust Red's Quad lead to 3. OR:
�
Residual
Pips: Swap Red's 5 point with Black's 3:3 next
door. Horizontally cancel one of
the Black's new 3:2 checkers with a Red 1:2 ("8pt") checker. This leaves Black only with his 2:4
checker, counting 4
pips. Added to the 2 Quads, this
makes a race deficit of 2:4.
----------------------
In the Safe
Play vs Bold Play chapter of Paul Magriel's book (which is still often referred
to as the "Bible"), the above position is given, with the example of a lone 3
roll accompanying the diagram. The
recommendation was to hit, but that is a substantial error, as Bagai points out
25 years later, because doing so breaks the 1:2 ("8") point.
Hitting with
the 3 reflects the perceptions and priorities of the time. Strong player's of the 1970's battled
over key points aggressively, with little concern for the race. There was an unspoken agreement that the
only skillful win was one in which a pure position triumphed over a cracked one
-- and especially deserved if one first maneuvered into a backgame or
beautifully complex holding game, well down in the race. It was a charming era, to be
sure.
I know; I
learned in that environment. I even
unwittingly helped perpetuate the myths.
They/we played these poor positions quite well, and even got away with it
handsomely, until the level of play improved. Eventually, opponents no longer buried
early when they could slot, or took crushing redoubles. Nor did they go to the other extreme of
dangling so many carrots that it became hilariously profitable to abandon a
backgame, or pass bluff re-whips.
Fortunately,
we can still pay homage to this biblical archive by altering the roll to
3-2. I will assume there are
two choices: (a) Hitting from 1:4,
or (b) Covering 1:4 and playing up to 3:4.
(I'll rule out coming down with the 2 and hitting, which leaves four
blots, though it is an "opportunity" at which many '70's players might have
leapt).
Perhaps
there are players who would hit with the 3-2 even if way ahead, and others who
would play safe even from way behind.
For those players, counting would be irrelevant. But most players would probably have some race threshold (either exact or
rough-range) that would help decide the hit. Consulting the race is likely to
help.
It turns out
that in this position, because we are down 2+ Quads, it is very right to
hit with the 3-2. If we
reduce our race deficit one Quad by advancing our anchor out to the bar point,
then hitting is still correct, but not to as great a degree. As we inch our anchor towards the
midpoint, the margin narrows by about 1% per pip pair (there is a safe-warp at the 16 point, but that has
to do with the value of using the 2 to connect the back checker), and by the
time we get to the 14 point, it is nearly a tossup. With the aid of rollouts, we have
discovered the threshold: We should
hit if down 2 pips or more.
If we
further advance one of these checkers to the mid and the other to the "6" point
(to give us a 1 Quad lead), we arrive at Magriel's counterdiagram, and, as you
will guess by now, playing safe is (very) correct even though we can hit without
breaking the 1:2 ("8") point. It is
a pity that Paul did not either choose our 3-2 roll, OR stick with the lone 3
but add a builder to the 1:2 point (from the mid); either way, that diagram pair
would have supported his well-conceived theme perfectly. It is also a pity that Paul is such an
honest fellow; otherwise he could claim his diagrams were
misprints.
Contrary to
popular belief, the issue of having more versus fewer checkers "back" plays
second fiddle to the race as a
criterion for choosing a Safe or Bold play. Having established the 2:2 ("14") point
as a Safe/Bold threshold: If, from
there, we move two checkers from Red's mid to her "6" point (to refund the 14
pips we stole, in the way which least affects immediate tactics), hitting
is correct by 7%, just as in the original diagram. In spite of the fact that Red is
now the one with the extra checker "back", we make the bold play because, as
before, we are down 2+ Quads.
That we
might not know that the Safe/Bold threshold is -2 pips (or even in the
neighborhood of zero Quads), is no excuse for throwing up our hands and not
counting the race; a better informed decision will be right more often. A more rational excuse is that we are
slow at counting, and don't feel it is fair to keep our opponent (and perhaps by
ripple effect, half the people in the tournament hall) waiting. I applaud that "excuse"; hearing it is
like a breath of fresh air. But
don't let me get started on that.
It suffices to say that if we get faster at counting, we no longer need
to be a slave to that excuse, nor to chugging away at tedious
arithmetic.
Quadcounts
are off about 4 pips on average (though can stray a fair bit further). Will this inaccuracy make a difference
in the play that we select?
Sometimes.
If we feel
that our decision is race-sensitive and the Quadcount is on the bubble, then we
can add in the Top-Heavy Adjustment, which is quick and cuts the inaccuracy in
half. Or, if a Safe vs Bold Play
position is close to a reference position we've seen, and/or we are capable of
making sound adjustments, then the pinpoint accuracy of a Residual Pip
comparison could well determine our choice of play.
------------------------------------------------------------
Racing
Onward
Don't
worry! You are not expected to
remember all of the counting nuances in this article. If you have even followed, let alone
absorbed, ten percent, you are doing very well. The numerous options are not meant to
overwhelm you, but to be your friend, so add what you like, a little at a
time. Meanwhile, Naccel can
function quite adequately on the mere fraction you have
digested.
One of the
major ways we improve our level of playing skill is to build up a portfolio of
"reference positions" (organized in a notebook or loosely etched on our brains
over time) which indicate exact (or rough-range) thresholds at which we should
alter certain checker plays or cube actions. While the race is only one contributing
factor in making these decisions, it is a more dominating one than players in
the past have realized.
Backgammon
is, in essence, a race. The respect
modern players have gained for the race is reflected in the types of positions
for which they strive, and in their inclination to count a greater variety of
positions. For this purpose, it
makes sense to choose a method of counting that is not only multi-faceted,
flexible, fast and reliable, but also fun.
It is my hope that, by adopting Naccel, you will be encouraged to count
the race far more often, while investing less overall time doing
so.
------------------------------------------------------------
If you would
like to continue practicing your counts, verification of accuracy is much easier
if pipcounts are pre-posted next to the diagrams (to convert, multiply your
Quads by 6 and add the residual pips).
Suggested sources are: The
Woolsey and Bagai (only 3 count errors each -- can you find them?), and
Ortega/Kleinman books, from which this article borrowed diagrams, and Mario
Kuhl's magazine Backgammon Today.
Finally, if you save online matches, every move gives you a new position,
which you can count and then verify with the touch of a
button.
Our deep
appreciation goes to Ric Gerace for providing such legible color diagrams, and
incorporating so precisely the new quadrant numbers, point numbers, and quadrant
divisions. (You can find some cool
stuff on Ric's website, which is http://www.ricgerace.com/).
This is the
full-length August 2001 version of the Naccel article. A slightly updated, though edited,
version will appear in September in Backgammon
Today.
Ulf Wostner
is planning to construct a website, for the purpose of teaching Naccel. If successful, this article will be
reprinted there, in expanded form, along with reader input and various teaching
mechanisms, gradually improved over time.
The address is www.cyberprof.com/nack, though we do not know how soon it
will be functioning.
------------------------------------------------------------
------------------------------------------------------------
------------------------------------------------------------