|
| Cube Theory |

I’d like to share my thoughts on how to handle the doubling cube in money games.

Peter Bell
The information in this article is almost certainly available in the book “The Doubling Cube in Backgammon.” I don’t have this book, however, so I went ahead and figured out what I could on my own. My sources are mostly postings in the newsgroup rec.games.backgammon and my own reasoning ability, which I hope is sufficient!
I will not attempt to discuss cube handling in match play, which is more complicated than money play — I’d recommend Kit Woolsey’s monograph on that subject to anyone serious about winning matches.
Comments, questions, and corrections can be sent to me at usrobots@aol.com or posted to the newsgroup. Enjoy!
Part 1: The Basics
Last roll position
The simplest example of cube use is a last-roll situation in a money game. Note that “last-roll” means “the game will be decided by this roll”. It does not mean “this is the last theoretically possible roll in the game.”
Last-roll situations may occur late in the bearoff. For example, if you (white) are on roll, have two checkers left to bear off, and your opponent has two checkers left on his one-point, the game will be decided on this roll.
|
|
Position 1 White’s next roll will decide the game. |
Either you will win, if you bear off both checkers, or you will lose if you do not. (Last-roll situations may also occur in the middle game, usually when one player has a game-deciding shot and the cube is still in the middle.)
| 11 | 12 | 13 | 14 | 15 | 16 |
| 21 | 22 | 23 | 24 | 25 | 26 |
| 31 | 32 | 33 | 34 | 35 | 36 |
| 41 | 42 | 43 | 44 | 45 | 46 |
| 51 | 52 | 53 | 54 | 55 | 56 |
| 61 | 62 | 63 | 64 | 65 | 66 |
Next, you win if you roll any of the following doublets: 6-6, 5-5, 4-4, 3-3, and 2-2. Counting 1 for each of these adds 5 more rolls, for a grand total of 19.
There are 36 possible rolls, so your winning chances are 19⁄36 = 53%. In other words, you are a slight favorite in the game.
When to double
Cube decisions are straightforward in last-roll situations, assuming gammon chances are negligible. You should double if you are a favorite to win, by even the slightest amount.
The game has become a one-roll proposition, and you have a choice between playing at the current stakes or at two times the current stakes. If you are a favorite, you want to play at two times the current stakes, so you should double. Otherwise, you should not.
When to take
Conversely, in a last-roll situation, you should take an opponent’s double if you have more than a 25% chance to win the game. Consider the possibilities after your opponent doubles: you can take and lose, you can drop, or you can take and win.
- If you take and lose, you lose twice the stakes.
- If you drop, you lose the stakes.
- If you take and win, you win twice the stakes.
These outcomes can be represented by −2, −1, and +2 respectively. If you take, you are risking 1 (the difference between −1 and −2) to get 3 (the difference between −1 and +2). This is a good bet only if you win more than 1 out of 4 games, or more than 25%.
Easy, right?
Cube Access
However, last-roll situations are rare. What about other types of positions? For now, let’s assume that all positions are nongammonish, that is, the chance of a gammon or backgammon is zero. Then it turns out the take point is the same: You should take with greater than 25% winning chances, and drop otherwise.
What about doubling? If the game still has more than one roll to go, cube access is important is an important advantage. Therefore you should be careful about giving up that access by offering a double that your opponent will almost certainly take.
Why do you want to have cube access? Let’s say that you have been building up a good position and your winning chances have just increased to above 75%. You would like to double out your opponent, thereby winning the game instantly. However, to do so, you must have cube access! If your opponent owns the cube, you are stuck. He can force the game to be played to its natural conclusion simply by holding on to the cube.
Tug-of-war
Think of a game of backgammon as a tug-of-war in which both you and your opponent start at 50% and must get to 75% to win.
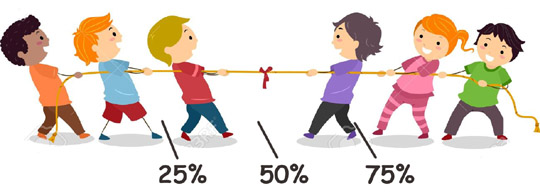
At any point during the tug-of-war, you have the right to double the stakes. If your opponent accepts the doubled stakes, however, you now have to get all the way to 100%, while your opponent still ownly has to get to 75%. Obviously, the additional distance you have to pull will make it quite a bit harder for you to finish your opponent off.
Initial doubles
If you can keep the tug-of-war analogy in mind, the following principle should be clear:
Of course, you will not always be able to sneak up on the 75% mark. It is perfectly fine to overshoot the 75% mark before doubling. If you do, you will simply cash the game and get on with the next one.
When you own the cube
Say that you own the doubling cube in a game because you took an earlier double. In this situation, you can always play the game to its natural conclusion (that is, until one side bears off all checkers) by simply holding on to the cube. Your opponent can never “double you out” (offer a double that you must pass), regardless of how good his position gets. Therefore, you always have a chance to come back and win.
Furthermore, if the game happens to swing around, you control the cube. You can be patient, choosing to double when it is most effective for you. In the simplest case, you could use the cube to double out your opponent as soon as you have more than a 75% “cubeless” chance of winning.
(“Cubeless” means “assuming the game is played to its natural conclusion”. In most contexts, winning percentages are assumed to be cubeless.)
The 75% figure assumes no gammons, and is slightly inaccurate for a reason I’ll discuss below, but it’s close enough for now. In this situation, you don’t actually have to win the game outright: You only have to gain more than 75% winning chances. In games where you do so, your opponent will never get the chance to come back. You can instantly win the game with a cube turn.
Redouble versus initial double
Cube access is the reason behind the often-stated rule that you should be less eager to redouble (that is, double when you own the cube) than to offer an initial double (that is, double when the cube is in the middle).
With the cube in the middle, both players have cube access — the tug-of-war finish lines are at 75% for both.
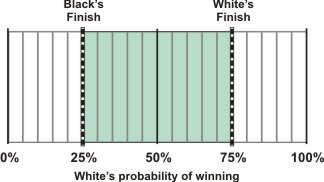
Before initial double: Cube in the middle
If you offer an initial double, your finish line moves to 100%, as shown here:
After double: Cube owned by black
This is a disadvantage. However, at least you don’t change your opponent’s finish line — it remains at 75%.
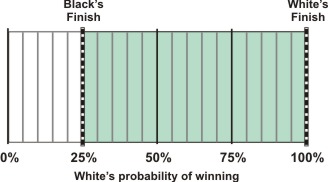
If, however, you redouble, you change both finish lines. Before you redouble, you own the doubling cube and the finish lines look like this:
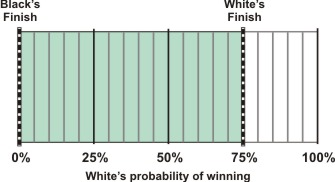
Before redouble: Cube owned by white
After you redouble, your finish line moves from 75% to 100%, while your opponent’s moves from 100% to 75%:
After redouble: Cube owned by black
Your situation has gotten worse in two ways, not just one! Therefore, when redoubling, you should be even closer to 75% than when you are offering an initial double, in most cases.
Recube Vig
Cube access is also the explanation for a concept known as recube vig (where “vig” is short for “vigorish,” which means additional winning chances).
Say that you are doubled in a non-last-roll position in which you judge your winning chances to be exactly 25%. Using the reasoning that you are getting 3-to-1 odds on your take, you expect to win the same amount whether you take or drop (in other words, you are indifferent between taking and dropping).
However, using the tug-of-war analogy, you realize that if you take, the finish lines change to be in your favor. This fact gives you additional winning chances in addition to the 3-to-1 odds you are already getting. Therefore, you will do slightly better to take in this situation. In other situations, you might have a take even if your winning chances were much lower than 25%.
When recube vig is present, it changes the strategy of both sides. The leader now has to get somewhat further than 75% before he can cash. The trailer, on the other hand, can sometimes eke out a take despite having less than a 25% chance of winning.
The amount of recube vig varies quite a bit from position to position. I’ll discuss why in more detail later on. For now, assume that you have been doubled, your winning chances are a little under 25%, and you are searching for some recube vig.
In a last-roll situation, your recube vig is zero, and you must drop. In routine holding games, it is typically only one or two percent. In racing games and blitzes, it is somewhat higher. In priming games, it is often huge, often making takes possible with winning chances that are quite a bit less than 25%.
Bearoff positions follow no general rule: Recube vig can range from zero to enormous, making proper cube handling deceptively difficult in many of these simple-looking positions.
To get a handle on the difference between cubeless and cube-dependent winning chances, let’s look at the position below:
|
|
Position 2 White to roll |
Start by figuring out white’s cubeless winning chances. White can win if he bears off both checkers this roll, or if black fails to bear off both checkers on his turn.
| 11 | 12 | 13 | 14 | 15 | 16 |
| 21 | 22 | 23 | 24 | 25 | 26 |
| 31 | 32 | 33 | 34 | 35 | 36 |
| 41 | 42 | 43 | 44 | 45 | 46 |
| 51 | 52 | 53 | 54 | 55 | 56 |
| 61 | 62 | 63 | 64 | 65 | 66 |
If white doesn’t bear both checkers off, black gets another roll. The chance of black getting to roll is 100% − 72% = 28%. And the chance that black will not bear both of his checkers off is also 28%.
White’s total winning chances are
So the correct cube action is double/drop, right?
Not necessarily. Remember that 80% is white’s cubeless winning chances. With the cube in play, there is still some chance for black to benefit from his cube ownership. If black is still alive on his turn, he will have 72% winning chances in a last-roll position, which give him a very strong double. White will have a take, but just barely.
We have now determined the key scenario: White doubles, black takes, white rolls poorly, black doubles back, white takes. Does black do well enough to justify his initial take?
Black will only get to turn the cube if he gets to roll. He has a 28% chance of doing so, as we calculated above. Since he has a 28% chance of gaining 22% in winning chances, we can multiply these two numbers to get an overall estimate of the value of the cube: 28% × 22% = 6%. This is black’s recube vigorish.
In Position 2, black’s winning chances are 20%. Black should add his 6% recube vigorish to this figure to get total winning chances of 26%. Since this figure is greater than 25%, black has a correct take. The extra 6% in recube vigorish makes a big difference.
We can confirm that black does better by taking by comparing the two possible scenarios:
- White doubles and black drops. (Black loses one point.)
- White doubles and black takes. If white wins immediately (72% chance), black loses 2 points. If white fails to bear off both checkers (28% chance), black will redouble and white will take the cube at 4. If black wins from there (28% × 72% chance), he gets four points. If black loses from there (28% × 28% chance) he loses 4 points.
(72% × −2) + (28% × 72% × +4) + (28% × 28% × −4)= −1.44 + .81 − .32 = −.95
(Black loses .95 of a point.)
Black does better on average when he takes white’s double.
Analyzing a Position
There are four important ways that you can gain the advantage in a game of backgammon:
- Get a racing lead
- Build a prime
- Escape your runners
- Build points
There are other elements that can contribute to a good position, such as outfield control and builder flexibility, but the above four are critical. If you get a advantage in any one of these areas, and your opponent has no compensating advantages, you will have an excellent double.
In a typical position, how can you combine these four key elements to determine your winning chances? There is no easy answer to this. I would like to be able to say, “A five prime against a four prime always gives you 58.4% winning chances.” However, backgammon is not nearly simple enough to allow such precise statements. There are unique features in every position that you must consider when analyzing your winning chances.
Instead of hoping for exact answers, you should draw upon your knowledge and experience to judge the size of your advantage and disadvantage in each category. For example, you might judge that your superior prime gives you an extra 10% winning chances over your base of 50%. Then, you should add up all of the numbers in each category to get a grand total, and make your doubling cube decisions based on this figure.
By using this approach, you can handle a wide range of positions that at first glance look hopelessly complicated. Here is an example:
|
|
Position 3 White to roll |
When faced with positions like this, many players simply throw up their hands. “Should I double? I don’t know — I’m not even sure I’m ahead.”
You and I, though, can do better than this. Let’s consider one important element at a time, and combine them all at the end to get a single figure for white’s winning chances.
- Racing: White’s pip count is 154, black’s is 184. But how much contact is there? Quite a bit — it might be a while before the game becomes a pure race. And with four blots strewn around the board, white could lose most of his racing advantage by getting hit. → 5% edge to white
- Priming: Neither player has much of a prime going. However, no one has made an advanced anchor either. There is still some priming potential in this game. Is white likely to build a prime? We can picture a six prime running from white’s eight point to his three point and he already has three of those points made, therefore he has some chances of building a strong prime if he can stop black from making an advanced anchor. Black on the other hand has gotten nowhere with his offense. → 5% edge to white
- Escaping: White has two men back, and black has four. White has the advantage, but it is not as large as it might seem at first. With his four blots exposed, white may have trouble completely escaping his runners. So black has reasonable prospects of equalizing in this category. → 5% edge to white
- Building points: Pretty close. Each player owns his mid point, eight point, and six point. White, however, also owns his three point, which is a valuable home-board point. Once again, white has a clear but not overwhelming advantage. → 5% edge to white
White gains a total of 20% winning chances based on the above analysis. Therefore his total winning chances are around 70%. Note how several small advantages can add up to a big advantage.
At this point, simply by analyzing the position methodically, we have an excellent idea of the situation facing the players. White, with winning chances near 75%, can reasonably consider a double. Black, with winning chances above 25%, has a comfortable take. In fact, double/take was the cube action at the table.
Summary
So, there you have the basics of cube handling.
- In a last-roll situation, double if you are a favorite, and take if you have at least a 25% chance of winning.
- In a non-last-roll situation, try to get as close to the “finish line” (75% + recube vig) as you can before doubling, especially if you already own the cube.
- If your opponent doubles you when you have less than a 25%
chance, consider whether recube vig can give you a take.
- There are four main ways to gain an advantage in a game of backgammon: racing, priming, escaping, and building points.
Of course, the estimation of all of these winning chances is often very difficult. Everyone gets better at it over time, however, and you must know the right strategy to use once you’ve figured out your winning chances.
The next section discusses equity, a more general and useful concept than winning chances.
Part 2: Equity
The concept of equity is crucial to a reasonably complete discussion of the doubling cube, because of the possibility of gammons and backgammons. Trying to talk in terms of percentages in situations involving gammons and backgammons quickly gets cumbersome. Equity, on the other hand, is one number that represents the total value of a position.
Calculating Equity
Probably the easiest way to think about equity is to assume that you are playing for one dollar per point, and to figure out how much money you expect to win or lose from your position, gammons and backgammons included.
In such a position, you may have a 25% chance to win a gammon, a 50% chance to win a single game, and a 25% chance to lose a single game. You can figure out your equity using the following reasoning: “I will win two dollars 25% of the time, win a dollar 50% of the time, and lose a dollar 25% of the time. Therefore, my expected gain is .25($2.00) + .5($1.00) − .25($1.00) = $.75.”
| Result | Probability | Win/Lose | Product |
| Win gammon | 25% | $2 | $0.50 |
| Win single | 50% | $1 | $0.50 |
| Lose single | 25% | −$1 | −$0.25 |
| Total | 100% | $0.75 |
In such a situation, if your opponent offered to pay you $.75 to settle the game, you would do just as well by accepting the settlement as you would by continuing to play.
Generalizing this concept, you can state that your equity in the position is .75 of the stakes for which you are playing, or even simpler, just .75. Your opponent’s equity is always −1 times your equity. In this case, your opponent’s equity is −.75.
The Meaning of Equity
A positive equity means that you are the favorite in the position, while a negative equity means you are the underdog. Note that “favorite” means “favorite to win money (or whatever stakes are involved)”, not “favorite to win the game.” If you only win 40% of the games from a given position, but all of your wins are gammons and all of your losses are single games, you are the favorite, since your equity is .4(2) − .6(1) = .2.
Discussions about equity can sometimes get confusing. For example, someone might say “I have 60% equity.” This is an ambiguous statement. Does he mean “My equity is .60” or “I have a 60% chance to win?”
In the latter case, assuming no gammons, his actual equity is .20, much less than .60. Therefore, to avoid confusion, he should have said either “My equity is .60” or “I have a 60% chance to win.”
By the way, converting between winning chances and equity is easy, assuming no gammons. Let P = percentage chance of winning and E = equity. Then,
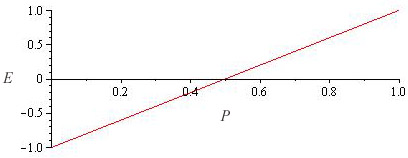
Equity vs. probability of winning
For example,
Going the other way,
| 1 + E |
| 2 |
For example,
| 1 + .20 |
| 2 |
Cubeless versus cubeful equity
Equity can also get confusing becuse plain old “equity” without a modifier sometimes means equity taking the cube position into account [cubeful equity], and sometimes means cubeless equity. In general, equity before a double means cubeless equity, while after a double means equity including the cube position.
This probably sounds strange, but it actually makes the discussion easier. When considering a double, you have two options. First, you can play on (at least for a while) without using the cube, in which case cubeless equity is relevant. Or, you can double, at which point cube considerations become important, because you are changing the finish lines.
Normalizing the cube level
Finally, equity sometimes includes the cube level (1, 2, 4, etc.) and sometimes does not. One again, the general rule is somewhat complicated.
When considering whether to double, the cube is usually assumed to be at 1 before the double and at 2 after the double, regardless of the actual level of the cube. This makes it easy to formulate rules like “Take if your equity is greater than −.5.” Otherwise, you would have to say things like “Take if your equity is greater than −.5x, where x is the level of the cube before the double,” which would soon get tiresome.
Using Equity
With all that said, we can now rephrase the situations described in Part 1 in terms of equity. Winning chances of 50% with no gammons is equivalent to a cubeless equity of .5 − .5 = 0. Winning chances of 25% with no gammons is equivalent to a cubeless equity of .25 − .75 = −.5. Therefore, in a last-roll situation, a player should double with equity greater than zero, and that player’s opponent should take with equity greater than −.5.
Peter Bell is author of
Winning with the Doubling Cube
Another way to see this is to realize that an accepted double exactly doubles the equity of both players in a last-roll situation. Therefore, if a player considering a double has positive equity, no matter how small, he will want to double that equity. His opponent will want to take if his own equity after taking is greater than −1, since by dropping, his equity becomes exactly −1.
In a last-roll situation, an equity after taking of −1 corresponds to equity before taking of −.5, which agrees with our previous analysis.
In the tug-of-war analogy, introduced in Part 1, each player starts with a cubeless equity of zero. The first to get to a cubeless equity greater than .5 (assuming no recube vig) can win the game with a cube turn. If either player chooses to double before that point, he then has to get to a cubeless equity of 1 to win. If a player redoubles, his own finish line increases from .5 to 1, while his opponent’s drops from 1 to .5.
Gammons
Unfortunately, gammons complicate this picture somewhat — in a gammonish position, one player can have an equity greater than 1 but his opponent can still have winning chances. This analogy is also limited in other ways. Therefore, we’ll leave it behind at this point, and just talk in terms of equity.
As a final point, thinking in terms of equity is somewhat unnatural. It’s easier for most people to think in terms of percentages of gammons won, single games won, single games lost, and gammons lost. However, equity is a more useful number, and converting from percentages into equity is quite easy.
For example, say that your opponent doubles, and you have a 10% chance to win a gammon, a 20% chance to win a single game, a 45% chance to lose a single game, and a 25% chance to lose a gammon. Should you take?
“Eyeballing it” might work, but since the equity calculation is so easy, you should do it.
This is a marginal take/drop, depending on recube vig. In the next section, I will use equity to consider the concept of cube leverage.
Part 3: Cube Leverage
Most of the subtlety in cube use involves the decision about when to double. The taking decision is usually straightforward, although by no means easy.
Even simpler:
There is no similar rule about when to double, however. Sometimes is it correct to double with a cubeless equity of .06 and incorrect to double with a cubeless equity of .6. In fact, given three positions with a cubeless equity of .6, the first might be not good enough to double, the second might be a correct double, and the third might be too good to double! (“Too good to double” means that the player should go for a gammon instead of cashing the game with a cube turn, for at least one more roll.)
Doubling In
Let’s say that you are playing a game, it is your turn, you have a clear advantage, but you do not have a cash. Since you are ahead, you would naturally like to double. However, there is no reason for you to rush to do so. The cube isn’t going anywhere. Before doubling, you should think about the possible directions that the game can take before your next roll — that is, during the next exchange of rolls.
Suppose you hold off on doubling. What are the possible results?
- Say that the next exchange improves your position but still leaves you below your opponent’s take point. In this new position, you can still double and your opponent will still take. You end up in exactly the same position as if you had doubled originally. Waiting hasn’t hurt.
- Say that your position deteriorates during the next exchange. Now you are very glad that you did not double. If things swing back your way, you can still double later. But if things continue to go against you, now you will only lose one point instead of two. This is a big difference and a major incentive for you to wait to double.
Is there any situation in which you will wish you had doubled? Yes:
- Say the next exchange improves your position so much that you have a cash. In this case you would prefer to play out the game with your opponent holding the cube at the two level.
Three Positions
To begin to get a handle on the doubling decision, let’s consider the potential gains from a double in various positions.
Bare double
|
|
Position 4 Should white double? |
In this last-roll position, white has 19 rolls that win and 17 that lose. Therefore, his equity is
| 19 |
| 36 |
| 17 |
| 36 |
| 2 |
| 36 |
By doubling, white increases his equity to .12 (since his opponent will take), for a gain of .06. Nice, but nothing to get excited about. If white had neglected to double, it would be no great tragedy.
Goldilocks double
|
|
Position 5 Should white double? |
In this position, on the other hand, white would make a huge mistake by neglecting to double. He has 27 out of 36 rolls to win, for an equity of exactly .5. It doesn’t matter whether his opponent takes or drops a double: In either case, he will increase his equity to 1 by doubling, for a gain of .5. This is the best equity gain he can get by doubling in a last-roll situation, assuming his opponent always makes correct cube decisions.
Late double
|
|
Position 6 Should white double? |
This position represents the opposite extreme from Position 4. Here, white’s position is so good that he gains little equity by doubling. To lose, white must roll a 1 (11 chances in 36) and black must roll a 6-6 (1 chance in 36). White’s total equity works out to be .983. After white doubles, black will drop instantly, and white will have gained .017. Doubling is correct, but it doesn’t gain much equity.
Cube Leverage
In the three positions above, we can say that white’s cube leverage (his potential equity gain by turning the cube) is small in Positions 4 and 6 and large in Position 5.
Generalizing this concept, your cube leverage in any position is typically highest when your equity is near .5 and lowest when it is near 0 or near 1. In the latter two cases, it might be correct to double, but your gains from doing so will typically be small, unless your opponent makes a mistake and either drops in a relatively good position or takes in a hopeless position.
Cube leverage provides another way of looking at the concept of waiting to double until you are close to an equity of .5. If you double with an equity of .1, you will, at best, gain .1 by doing so. While this is nice, it is nowhere near the .5 you could potentially gain by waiting until later to turn the cube.
If it is the last roll, there’s no sense waiting, but in the opening or middle game, you just don’t have that much to gain by doubling with a slight advantage.
Recube vig
Furthermore, in non-last-roll positions, recube vig becomes an important factor. In last-roll positions, you can double your equity by doubling. In non-last-roll positions, you will never be able to do quite as well, because of recube vig. In many positions, in fact, you can end up worse off after doubling, despite having positive equity, if the recube vig is greater than your equity.
As further motivation for waiting to double, consider the fact that your opponent’s recube vig is highest when you have only a slight advantage, and gets lower and lower as your advantage gets larger and larger. Remember that recube vig represents the additional winning chances your opponent gains from accepting a double.
Efficient doubles
If you are close to .5 equity, you are fairly close to winning, and can often change the finish lines without giving up too much. If you have, say, a .1 equity, you are far from winning, and there is a large probability that changing the finish lines will make a difference in the game. Therefore, doubling is likely to actually make your situation worse.
Of course, you don’t want to wait too long to double! Say your opponent’s take point (that point at which he is indifferent between taking and dropping) in a given position is .55. If your equity is above .55, you should cash (offer a double that your opponent must drop) immediately, except in special situations involving gammons that I will consider later. By doing so, you raise your equity to 1, which is the best you are going to be able to do.
It is no longer correct to think in terms of cube leverage: Just cash the game and move on to the next one, no matter what your equity happens to be. By playing on, you are merely giving your opponent a chance to get back into the game.
Overall, the lesson should be clear: Double when your equity is as close to your opponent’s take point as possible. That point is when your cube leverage is highest and your opponent’s recube vig is lowest.
If you are playing a good player, you offer a double, and he takes without a moment’s thought, you may have doubled too soon. Conversely, if he drops instantly, you may have waited too long. (Of course, you may also have used correct cube strategy — it depends upon the position. You can always ask the other player’s opinion!)
The best doubles are those where your opponent stares at the position for a long time, grits his teeth, furrows his brow, and then finally makes a decision. In such a situation, you don’t really care whether he takes or drops — in either case, you have offered a good double, and raised your equity to somewhere close to 1.
This fact is behind the aphorism “An efficient double is as good as a win.” If you have offered an efficient double — one offered very close to your opponent’s take point — you will end up very close to an equity of 1, which is the same equity as an outright win.
Conclusion to Basic Concepts
If the equity of a backgammon position always changed slowly, this would now be the end of the discussion about the doubling cube (at least with respect to money play, and assuming that one’s opponent always makes correct cube decisions). Unfortunately, equity can often change dramatically from roll to roll. This fact means that some additional advanced concepts often become important to proper cube handling.
However, these advanced concepts can also be misused, as we will see. Therefore, if you still feel like you don’t quite understand one of the advanced concepts, you will probably do better by ignoring it and sticking to the basics. Later, after you feel that you grasp it completely, you can incorporate it into your game.
Part 4: Advanced Concepts
Thirty-six different dice rolls are possible in any backgammon position.

Therefore, one way you can derive the equity of a position is by averaging the equities of the positions that result from each of those 36 rolls. This process is recursive — looking two rolls into the future, you can derive the equity of the current position by averaging the equities of the 36 × 36 = 1296 resultant positions.
This process is quite interesting in and of itself, and has led to some detailed discussions in the rec.games.backgammon newsgroup in the past. For the purposes of this discussion, we’ll assume that nothing out of the ordinary occurs during this type of process, and that it can be continued indefinitely, for as many rolls as you would like.
Thinking of the equity of a position in this way, you can classify certain rolls by the effect they will have on equity if they occur. For example, your equity in two different positions might be the same, say, .45. However, the distribution of resultant equities might be quite different in the two positions.
Volatility
Let’s assume you are on roll throughout this section, since you can only double before your roll. Consider the following two positions:
- In the first position, your best roll might increase your equity to .47, while your worst roll might decrease it to .40. In other words, none of your rolls are going to make much difference in the game.
- In the second position, your best roll might increase your equity to .95, while your worst decreases it to −.60. Obviously, some rolls in this position would be extremely good, while others would be extremely bad.
It turns out that the nature of the possible resultant equities in a position is often an important input into the doubling strategy for that position. In other words, it is not only the current equity of a position, but also the distribution of the resultant equities, that affects doubling decisions.
For example, the possibility of large equity swings on a given roll means that you might suddenly move from a position with high cube leverage to one with low cube leverage. In both positions above, you have high cube leverage, with an equity of .45.
High volatility
Let’s assume no recube equity and no gammons, for simplicity. Then, you can gain .45 in equity by doubling in either position. This is close to your maximum doubling equity gain of .5. If, however, you roll your best roll in the second position, your equity has increased all the way to .95. In the resulting position, your cube leverage is low.
Assuming your opponent’s roll doesn’t change your equity, you will double before your next roll, he will drop, and you will have gained .05 in equity. Nice, but not nearly as nice as the .45 you could have gained by doubling one roll earlier. Therefore, it may have been correct to double one roll earlier, despite the fact that you weren’t quite at the .5 take point.
Low volatility
Now, let’s consider the first position. Your best roll gets you to .48. Let’s assume that following your best roll, your opponent’s worst roll will get you to .5, your point of maximum cube leverage. Then, in the initial position, it cannot be correct to double. If things go your way, you will end up with even higher cube leverage, unlike the second position.
If things do not go your way, you will be happy you didn’t double, of course. Therefore, you should wait at least one roll to double.
Market Losers
The term “market loser” is often useful in these types of discussions. A market loser is a two-roll sequence that raises your equity above your opponent’s take point. Using this term, the result of the previous paragraph can be summarized in the following rule:
Unfortunately, some players incorrectly interpret this rule to be, “If you have a market loser, double.” Following this incorrect rule, these players often double in nearly equal positions, just because they have a few market losers.
As we have discussed, such doubles increase equity only a little, at best, and often decrease equity. The overriding criterion for offering a sound double is an equity that is close to your opponent’s take point. The mere presence of market losers does not imply that a double is correct.
Don’t fear market losers
I think the term “market loser” itself is misleading to many over-eager doublers because it sounds like something to be avoided at all costs. If such players double and their opponent drops, their first reaction is, “Oh no! I lost my market! What an idiot!”
Remember, if you double and your opponent drops, you lost your market, but you won the game! Take your money or points and start the next game.
You should definitely not worry about losing your market if you are going to barely lose it.
For example, say your equity starts at .35, then your best two-roll sequence occurs, raising your equity to .6. You double, your opponent drops. Should you be upset that you didn’t double in the initial position?
Not at all — in fact, doubling would have been a mistake! In that position, the best you could have done was increase your equity by .35. In the final position, you increased your equity by .4. Therefore, you did better with the double that was dropped, despite the fact that you lost your market!
By this reasoning, we can add a corollary to the above rule:
How to use market losers
As long as you keep the above caveats in mind, the concept of market losers can be useful. The trick is to compare your current equity with your equity after the market losers.
- If you are winning, but aren’t that close to your opponent’s take point, you must have many big market losers (those that raise your equity close to 1) before considering a double.
- If you are very close to your opponent’s take point, just a few
big market losers can make a double correct.
- In general, you shouldn’t even worry about small market losers — rolls that barely lose your market — since you will still have high cube leverage after these rolls.
- With many medium market losers, and an equity that is close, but not that close, to your opponent’s take point, you are in a gray area in which judgment and experience take over!
Different Types of Positions
At this point, we can investigate doubling strategy and recube equity for various types of positions, in terms of the advanced concepts in this section.
Priming games
Priming games are those which both players try to trap their opponent’s runners behind a prime. They often lead to extraordinarily complex and exacting positions. Here is an example:
|
|
Position 7 White’s turn to roll. |
In priming games, each player has few market losers. When playing such a game, you are trying to build and roll forward a prime, which is a difficult task. Any large doubles, or a couple of large nondoubles in a row, are likely to crunch your prime or give you a big timing disadvantage (remember, in a priming game, you want to be behind in the race.) Therefore, your position is always on the brink of disaster.
Even worse, your antijokers are likely to be big. You’re cruising along, suddenly you roll double fours, and you partially crunch. You are by no means lost . . . but here comes an efficient double, which is as bad as a loss. Meanwhile, if your opponent rolls one of his antijokers, it is not likely to be a big market loser for you. You will probably have an efficient double.
The net result of all this is that cube access is extremely important in priming games. You therefore want to be reluctant to give up that access by doubling, and willing to accept a double based on recube vig, even if your cubeless equity is significantly less than −.5.
Holding games
Holding games represent the opposite extreme. If you have escaped both of your back men, your opponent holds an advanced anchor on the 4, 5, or 7 point, and you have a healthy racing lead, you are likely to have an excellent double. Typically, you will have several market losers.
You may leave a shot, but doing so is usually not terrible and your opponent won’t double. If he hits the shot, then he can double, but if he has managed to build a prime, his cube leverage will be low. He will be so much of a favorite that he won’t gain much by doubling. He doubles, you drop, and you get on with the next game. All in all, recube equity is typically very low in holding games.
|
|
Position 8 White’s turn to roll. |
White has a racing lead of 31 pips, so he clearly has a double. Black’s chances are hurt somewhat by the fact that white has six spare checkers. Therefore, white has time to wait for a doublet, which will allow him to clear his mid point. Nevertheless, black is right on the border between a take and drop.
Racing games
In racing games, it is best to use the default strategy of trying to sneak up on your opponent’s take point. That take point in many positions, according to Bill Robertie in Advanced Backgammon, is a racing lead of 12% of your pip count. Robertie also states that you should double with a racing lead of 8% and redouble with a lead of 9%. At those points, your market losers have increased enough to make a double correct.
- With a lead of 8% or more, the favorite should offer an initial double.
- With a lead of 9% or more, the favorite should redouble.
- Trailing by 12% or less, the underdog should take.
Since the window between the double point and the take point is so small, many racing games end without any doubles being accepted. Instead, a two-roll sequence often vaults a player past both the double and take points, and that player doubles out his opponent.
Here is an example where the leader should double in his opponent:
|
|
Position 9 White’s turn to roll. |
Black’s pip count is 108; white’s pip count is 100. With an 8% lead and the cube in the middle, white should double. Black should take.
Blitzes
Blitzes are a special case because, if you win, you typically win a gammon. If the blitz fails, however, your opponent will often become the favorite in the game. Blitzes are among the most difficult positions in which to make rational cube decisions.
As an attacker, you might intuitively feel that you are not good enough to double, and then one roll later, feel that you are too good to double. Although such a situation happens occasionally, more often you will have a good double somewhere in the middle of your blitz. Therefore, you should be particularly careful to estimate your equity.
“Okay, let’s see, I think I have 40% gammon wins, 10% single wins, 35% single losses, and 10% gammon lossses. That works out to be .35 equity. Not nearly good enough to double.”
As a defender, you must also be careful to calculate equity. Using this example, some defenders get as far as the 40% gammon wins for their opponent, and instantly drop if they are doubled, in a position in which they have a very easy take.
Furthermore, recube equity is fairly high for the defender, since if the blitz fails, he will be a cubeless favorite in the game. Therefore, the defender must strive to make an objective decision about taking, despite the large chance of losing 4 points by being gammoned on a 2 cube.
Bearoffs
In bearoffs, volatility is typically huge, with market losers all over the place, in various combinations. This fact makes it difficult to figure out correct doubling strategy by reasoning from general principles. Various formulas exist to help, but fortunately, close doubling decisions do not occur that often.
Of course, every once in a while the cube can get turned three or four times in these types of positions. Therefore, a true expert must invest the time to understand them. The rest of us have too many other things to learn first!
Back games
When playing against a well-timed back game, you should be in no hurry to double. Until you have brought all of your checkers around the board and started to clear points, you have no market losers. Gammon and backgammon possibilites change from roll to roll.
|
|
Position 10 Black is playing a back game. |
Meanwhile, if you are playing against a questionably-timed back game, you may have market losers, or reach a position in which you can cash the game, before bringing all of your men around or before clearing any points.
For all of these reasons, back games are another area in which expert cube handlers can distinguish themselves from all others!
Playing on for Gammon
To conclude this section, let’s consider positions in which it may be correct to play on for a gammon rather than cashing. The most obvious type of position in which you should play on for a gammon is one in which your equity is already greater than 1. In such a position, you are giving away equity by doubling, assuming your opponent is bright enough to drop. Even if you still have significant losing chances, you should play on until your equity falls below 1.
The other type of position in which it is correct to play on for the gammon is one in which your equity is greater than your opponent’s take point and you have no market gainers, that is, two-roll sequences that will reduce your equity below your opponent’s take point. In such positions, if you have any gammon chances whatsoever, you should roll instead of doubling. You can always cash next roll if a cash crasher rears its ugly head at that point.
In most gammonish positions, the issue is not as clear-cut as in the above two cases, and you must be careful to make a rational assessment of the potential equity gains and losses of various actions. Market gainers, for example, may be small, medium, or large.
- A small market gainer reduces your equity to just below your opponent’s take point. Since you will still have a good double, raising your equity almost back to 1, it is not particularly troublesome.
- A medium market gainer reduces your equity to quite a bit below your opponent’s take point. These sequences are much worse, since you will not have a good double.
- Big market gainers, which reduce your equity close to zero are the worst of all.
For example, if your equity is .95, you are only gaining .05 by cashing. You may therefore decide to play on, even with a few medium and big market gainers. If your equity is .6, however, even one such market gainer might be enough to induce you to cash, since you can gain .4 by doing so.
There are many gray areas here, but in general, if you have several market gainers, you have to be quite close to an equity of 1 and also have a large chance of winning a gammon before you can justify playing on rather than cashing.
Summary
Let’s summarize this section.
- With no market losers, do not double.
- With an equity close to your opponent’s take point and several big market losers, a double is probably an excellent choice.
- Consider the number and type (small, medium, and large) of market losers before making a decision.
- Play on for the gammon rather than cashing if you have no market gainers, or your equity is greater than 1, or your equity is close to 1 and you have few medium and big market gainers.
All of this applies strictly only if both you and your opponent are perfect players, which, of course, is never true. The next section will discuss practical doubling strategy in a world in which both you and your opponent will sometimes make mistakes.
Part 5: Game Theory
Game theory deals with decision-making in an imperfect world. In the case of a backgammon position, there are several imperfections that influence doubling-cube decisions. Both you and your opponent may estimate the equity of a position incorrectly. Often, neither of you knows what the other thinks the equity is — a very important gap in knowledge. Imperfections in the play of both you and your opponent may affect the equity of a position. Once again, often neither of you will be aware of your opponent’s weaknesses, or your own.
Finally, in most cases, both of you are human, and will occasionally make nonrational decisions. For all of these reasons, practical cube decisions in an imperfect world sometimes differ from theoretically correct cube decisions.
Bluff Double
The most common practical application of game theory is the bluff double. This is a position that, theoretically, is not good enough to double. If you double in such a situation, you hope to steal some equity by inducing your opponent to drop incorrectly.
For example, say you have an equity of .35, and after your opponent takes a double, your equity would be .6 (because of recube vig). If your opponent instead drops, you have stolen .4 of equity, a big gain. Meanwhile, if your opponent takes, you still have a healthy lead.
The lower your equity, the bigger the bluff — you have more to gain, but more to lose as well. In any position where you do not yet have a theoretically correct double, but you think there is a good chance your opponent will drop, you should consider turning the cube.
Entire books have been written on bluffing, but the basics are obvious. When you bluff, you want to project an image of strength. Therefore, if you offer a bluff double, you should do so instantaneously and firmly. If you think about it for a while, you will probably ruin the bluff. If you are playing in person, you might even want to reach for the scoresheet, as if there is no conceivable way your opponent could take.
You also want to bluff when your opponent is feeling disappointed. This situation often occurs after he dances. He’s probably thinking, “Uh-oh. Here comes the gammon.” Whipping the cube around instantly can induce many incorrect drops. Again, in person, you might want to reach halfway towards the cube after you hit your opponent, indicating that you intend to double even if he enters. If he dances, and you then double, you will have set him up beautifully for an incorrect drop!
Delayed Double
The opposite strategy from the bluff double is the delayed double. You should use this strategy if you have a theoretical cash, but you think your opponent will still take even if your position improves somewhat. For example, if your have .58 equity and your opponent’s theoretical take point is .55, but you suspect he will take all the way up to .70, you should consider waiting a while to double.
The arguments for waiting are the same as those for sneaking up on the theoretically correct take point. If things go your way, you will be able to gain more equity with a later cube turn than if you double now. If things don’t go your way, you will be glad you didn’t double.
When you finally offer a delayed double, you should use the opposite approach from the bluff double, that is, project weakness. Think about the double for a while. Reach for the cube, then pull back. Finally, turn it like it is breaking your heart to do so . . . and cringe (while smiling inside) when your opponent snaps up the cube!
Gammon Double
Another game theory double is the gammon double. You can use this when you theoretically should play on for the gammon, but you double instead, hoping that your opponent will take incorrectly. The potential equity gain from a gammon double is enormous, making it a good practical double in many cases.
If your equity is only slightly greater than 1, you don’t give up much if your opponent drops, and you gain around a full point of equity if he makes a mistake and takes. Therefore, if you have any reason to expect your opponent to take in such a position, a double is probably wise. It should, of course, be offered just like a delayed double, tentatively rather than authoritatively.
Knowing Your Opponent
From the above discussion, it’s obvious that knowledge about your opponent’s tendencies can give you a large advantage. If you know your opponent is a reluctant taker in certain positions, you can offer early doubles in those positions, gaining extra equity when he drops incorrectly.

If you are playing an opponent for the first time, it might be worthwhile to try various combinations of these game theory doubles to try to discern his tendencies. If he is verbose or has animated body language, you can also guess his state of mind when considering a double. Of course, he also might be a hustler, sighing in despair to get you to offer an early double! Always remember, game theory strategies are very subtle and can sometimes backfire.
Pressure doubles
Another game theory double is the money pressure double. Objectively speaking, the level of the cube and the status of the scoresheet should have no effect on a cube decision. In reality, someone who is already down quite a bit of money, then faces a double for large stakes, might drop incorrectly because they are afraid — or cannot afford — to lose at the higher stakes. On the other hand, they might take a hopeless double, trying to recoup their losses in one fell swoop.
Similarly, someone well ahead on the evening might drop a high cube to guarantee a winning evening, or might take a hopeless one because they figure they will still be even on the night if they lose.
Of all of these situations, the first is almost certainly the most common. Therefore, you might stand to gain quite a bit by offering a theoretically unsound double to 16 or 32 to someone who is behind on the evening or playing for stakes they cannot afford.
(By the way, before you sit down to play a chouette, you might want to ask yourself if you could take four 32-cubes in a gammonish position without worrying about the money involved. If not, consider looking for a game with smaller stakes!)
Hard-to-assess positions
Finally, you yourself are imperfect, and will often be uncertain about the equity of a position. Woolsey's rule is often useful in such cases.
There are four relevant cases after such a double.
- In the first two, your opponent makes a mistake, either dropping
a take or taking a drop. In both cases, you gain extra equity.
- In the third case, where your opponent drops a drop, your double was correct, and all is well.
- The fourth case, where your opponent takes a take, is the only situation in which you might lose out. In such cases, you might have doubled too soon. Therefore, Neil Kazaross has amended Woolsey’s rule with what I call the Kazaross corollary:
Personally, I like to add one more corollary: “Follow Woolsey’s rule only if you feel that you understand the position.” As a beginner and low intermediate, I often reached positions in which I didn’t have a clue about my equity, even though I was pretty sure I was ahead. (I still reach such positions frequently today, alas.)
Applying Woolsey’s rule to such positions would have led to many premature doubles, costing me large amounts of equity. I think it is better to hold off from turning the cube in such positions and wait for further developments that might clarify your equity.
Well, I guess that’s enough for this series on the doubling cube. I hope you enjoyed this document. I’d like to hear your comments — send me an email if you get a minute. Good dice, and happy doubling!