
|
In the Beginning
| |
by Nack Ballard & Paul Weaver
| Thank you to Nack Ballard and Paul Weaver for their kind permission
to reproduce this article, which originally appeared in GammonVillage in 2003.
| |
This is Part 3 of a three-part series. Part 1 begins here.
|
|
Do you have Snowie 4 or Gnu BG? Backgammon Openings, Book A is on the verge of going to press, and the Backgammon Openings project (which will cover many more books) is going strong.
We still need help with rollouts. If you would like to be involved in this exciting project, please contact Nack Ballard at
nack2000@sbcglobal.net
or Paul Weaver at
walypeaver@aol.com
There is no commitment, no obligation. You can stop any time.
We thank those who help us with the rollouts in acknowledgment sections of our books and give complimentary copies to the five volunteers who do the most rollouts for us. This is a standing offer for every book that we write in this series. Regular rollout participants are also sent instructive analyses (on positions rolled out) from time to time.
We are rolling out some fascinating and controversial third-roll positions, and rollout participants are learning a lot! We all look forward to you joining us.
|

|
In the Beginning, Part 3
|
|
Red played his opening 32 by coming up with the 3 and down with the 2 (notated "24/21, 13/11" or "32-split"). See Part 1 for a detailed coverage of alternatives.
White responded with her roll of 51 by coming out to Red's bar point (notated "24/18" or "51-run"). The preferred play would have been 24/23, 13/8 (51-split), but 51-run is not without merit. For an in-depth discussion, see Part 2.
The position after Red's 32-split opening and White's 51-run response is shown in the main diagram below.
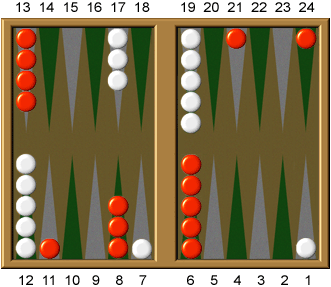
Red to play 44
Now it is Red's turn, and he rolls 44. What is his best play?
|
|
|
Contemplating the Choices
|
Before examining the many alternatives that follow, we first recommend that you consider the above position carefully and then:
- Write down any candidate plays (for Red's 44) that look plausible.
- Rank the top five (or so) candidate plays in order.
- Write down the reasons you like your first choice.
- (For advanced players.) Mark the play you would make at match scores of
- DMP (Double match point—each player needs one point)
- Gammon save (Red needs 1, White needs 2, Crawford)
- Gammon go (Red needs 2, White needs 1, Crawford)
Sometimes, seeing the after-positions in diagrams (not just in your mind�s eye) will change your opinion, or there may be one or more candidate plays that you overlooked.
In any case, after looking at the twelve upcoming diagrams (not necessarily ranked in order of strength), feel free to change your opinion and mark it on your paper. Then read the analysis that follows.

3A: After 11/7*, 13/1*
|
|
3B: After 9/7*, 8/4(3)
|
|
3C: After 13/9, 11/7*, 8/4(2)
|
|
3D: After 24/20, 11/7*, 8/4(2)
|
|
3E: After 13/9, 11/7*, 6/2(2)
|
|
3F: After 24/20, 11/7*, 6/2(2)
|
|
3G: After 24/20, 13/9(2), 11/7*
|
|
3H: After 24/16, 13/9, 11/7*
|
|
3I: After 24/16, 13/9(2)
|
|
3J: After 24/16, 6/2(2)
|
|
3K: After 13/9(2), 6/2(2)
|
|
3L: After 13/5(2)
|
|
How does one select the best play from such a dizzying array of choices?
|
|
|
Hitting the Wrong Number of Checkers
|
|
First, we will narrow down the candidate plays through process of elimination, starting with the last four diagrams (3I, 3J, 3K, 3L). These are the only non-hitting plays of the twelve diagrams shown.
Although these non-hitting plays (the most plausible of which is 3L) create some structure and duplicate (or triplicate) White's 4's, they fail to endow Red with one crucial ingredient: initiative. Virtually all of White's numbers either hit or make an offensive or defensive point.
By hitting, Red gives White far fewer good numbers, and he stands to gain much more when he is not hit back. This logic alone eliminates any non-hitting play.
Next, instead of hitting no checkers, let us look at the opposite idea. Red has one candidate play that hits two checkers (3A), repeated below.
3A: Overly optimistic
|
The problem with this aggressive play, flailing at the ace point, is that it fails to improve Red's structure. All the other candidates (except 3H) at least make some point. The double-hit is far too optimistic.
Hitting two checkers often wins fewer gammons than hitting one checker and making an inner point. Such is the case here (see 3B, 3C, 3E). Hitting twice also wins fewer games and loses more gammons than all seven of the single-hit plays illustrated! Hitting two checkers performs poorly on all fronts.
|
|
|
Imprudent Caution
|
|
Given that Red has decided to hit, the 4pt is the strongest point he can make with his double 4's. However, playing three of the 4's in this manner, as in the diagram shown below, creates a visible weakness—the two blots left behind on the 8pt and 7pt.
|
After Hitting and Making the 4pt
|
Red has one four to play
|
Red can remove part of this weakness by lifting the 8pt blot to safety, bringing a third builder to bear directly on the 1pt blot, as in diagram 3B (below).
3B: Spurious spare
|
However, this is a case where the cure is worse than the disease. Lifting from the 8pt to the 4pt creates a spurious (false) spare, violating an important backgammon principle that we have formulated and present here for the first time:
Rule of the Spurious Spare

"To position a spare in front of a vacant
point in the home board is inefficient."
|
Putting a spare on the 4pt before the 5pt is made is premature. The horizon of the 4pt spare is limited to weaker points (and only three of them). When the builder is further back, it bears on stronger points (and more of them).
In this case, a blot on the 8pt increases Red's chances of making not only the 5pt but also the 7pt and the 8pt itself.
Naturally, there are situations in which the Spurious Spare principle is overridden, but these exceptions usually occur when it is the only way to unstack a disturbingly tall point or when there is no other palatable option.
|
|
|
The Best Play
|
|
There definitely are palatable options with the final 4: coming down (13/9), or coming up (24/20). These plays (3C and 3D) are repeated below.
3C: Blot on 9pt is immune
|
|
3D: Inaccurate
|
|
In diagram 3C (left), the checker on the 9pt is a risk-free builder, because if White plays correctly, she will not hit this checker on the next roll:
- If White rolls 54, she should anchor on Red's 5pt.
- If White rolls 36, she should hit on Red's 7pt.
In the latter case, Red's 9pt checker will actually be an asset, because it can be used to hit back additionally with deuces. Or, by the same token, if White hits with 53, Red can hit back with aces, or make the 7pt with deuces.
In all other scenarios, the 9pt builder can be used to attack or prime White's back checkers. This is the reason that diagram 3C is the best play out of all the possible candidates.
The ownership of the 4pt more than offsets the concern of having too tall a 6pt. In many scenarios, Red will make another inner point with one of his 6pt spares, and his position will begin to smooth into a powerful prime.
That this wild-looking play is the best choice may at first come as a surprise. However, once it is clear that the 8pt blot will only be hit with 53, and the 9pt blot is completely immune, it becomes obvious that 3C is the star move.
Diagram 3C wins more games and more gammons than any other play. It is the only play that hits, makes an inner point, and keeps Red's priming options alive.
Diagram 3D (above, right) fails to properly adapt to the circumstances—it is probably the fourth best play. While coming up (24/20) is a much better 4 than lifting with 8/4 (as in 3B), it still falls well short of the ideal 9pt builder reinforcement (in 3C).
Moreover, making the 4pt blocks White's double 3's from hitting. By coming up to the 20pt (instead of coming down to the 9pt), Red carelessly reactivates White's hitting with double 3's (as well as walking into White's double 1's).
|
|
|
Breaking the 8pt to Make the 4pt
|
|
In many books written prior to the 1980's, it was popular to teach how doublets should be played from the opening position. While purely hypothetical, it shed light on how players of the time believed that the response should be played when the opponent's first move did not materially alter the nature of the opening position.
For example, one of the most influential books of its time, Backgammon The Cruelest Game (1974), confidently asserts that the best play with 44 is to make the 20pt and the 4pt. To quote authors Barclay Cooke and Jon Bradshaw: "[This] employs the best offensive and defensive tactics."
In fact, making the 20pt and the 4pt is a blunder. However, as nobody knew for sure how to play the early moves, and as Barclay Cooke was one of the finest players of the 70's, people paid attention. Cooke's play, shown in diagram 3M (below, left) became a popular response with double 4's during the next decade.
3M: Making the 20pt and 4pt
|
|
3N: Making the 20pt and 9pt
|
|
The correct way to play double 4's from the opening position is shown in diagram 3N (right). It is superior to diagram 3M for these reasons:
- After the correct play (3N), Red cannot be hit. The incorrect play (3M) leaves White 6 hitting numbers that are costly to Red.
- The correct play (3N) leaves Red with three offensive points (not just two). While the 4pt is stronger than either the 8pt or the 9pt, at this stage it is better for Red to own both the 8pt and 9pt than to own only the 4pt.
- The correct play (3N) unstacks the midpoint, bringing more checkers into the critical field of play and creating a superior distribution. All of Red's numbers (except 32 51) make a point next roll. By contrast, the incorrect play (3M) gives Red more non-constructive numbers (21 42 43 62 63) next roll, and fewer numbers that unstack his 6pt.
- Red's doublets (in particular 11 and 22) play much better on his next roll in 3N than in 3M.
To flex the muscles of the structural play a bit more, consider diagram 3O (below), in which White has split (13/11, 24/23) with her opening 21.
3O: Red to play 44
|
Double 4's in the above position is one of the most commonly misplayed rolls on the second move of the game. Two of Red's candidate plays are shown in diagrams 3P and 3Q below.
It may seem natural to hit and make a three-point board, as in 3P (left). After all, Red is willing to do so with double 5's. However, this is only because Red's most attractive alternative with double 5's, structurally, is to make the lowly 3pt.
3P: Blitzing play is wrong
|
|
3Q: Structural play is right
|
|
|
|
Advanced Players:
After 21-split or 51-split, Red should blitz with his 44 (as in 3P) at gammon go. These positions, among hundreds more, will be discussed in detail in our Backgammon Openings book series.
|
With double 4's, though, Red has a great structural alternative, shown in 3Q (right). The combination of the 13pt, 9pt, 8pt and 6pt creates a highly efficient structure for building points, as has been enumerated earlier.
Although Red does not hit with the alternative in 3Q, anchoring on the 20pt is a compelling bonus that is worth more than enough to make it the right play.
[If White opens with 51-split (same as 3O except White's 11pt blot is stacked on her 8pt), it is still correct (though it is much closer) for Red to play as in 3Q.]
To still further demonstrate the value of the structural play, consider diagram 3R (below, left). This time, White has slotted (13/11, 6/5) with her opening 21. Red has double 4's to play.
3R: Red to play four 4's
|
|
3S: Red to play two 4's
|
|
Obviously, Red should make the 20pt (hitting) with two of the 4's. After playing two of the 4's, Red reaches position 3S (right). The issue is how to play the other two 4's.
Red has more motivation than usual to strengthen his inner board because White is on the bar, and her other blot is being directly threatened. If Red makes an inner point, White will fan more often, and she will have fewer numbers that cover or save her 11pt blot.
Making the 2pt leaves an ugly triple-gap, but what about making the 4pt? This is the play recommended by Cooke, and is shown in diagram 3T (below, left).
3T: Aggression is wrong
|
|
3U: Patience is right
|
|
Even though this aggressive play (shown in 3T) has more justification than usual, it is still not correct. Once again, Red's best plan is to patiently make his 9pt (see 3U, right), thereby gaining a solid advantage on both sides of the board, and giving White fewer ways to slip the noose.
So, is Cooke's play ever right on the second roll? As a matter of fact, yes.
If White opens with the popular play of "32-split", the position in diagram 3V (below, left) is reached.
Red should now point on White with two of his 4's, reaching position 3W (right).
3V: Red to play four 4's
|
|
3W: Red to play two 4's
|
|
With the other two 4's, many players incorrectly blitz by making the 2pt, as in diagram 3X (below, left).
Making the 2pt in conjunction with the 4pt seems natural only if one fails to consider the position globally. The 2pt is too deep a point to waste two 4's on when there are only eight checkers in the attack zone (Red's near side).
Blitzing here is an overextension of Red's inadequate resources. Such a strategy is indicated only when there has been sufficient preparation.
3X: Blitzing is wrong
|
|
3Y: Cooke's play is right
|
|
|
|
Advanced Players:
In diagram 3V, at gammon go, blitzing (as in 3X) becomes correct.
At gammon save, the non-hitting structural play of 24/20(2), 13/9(2) is correct!
|
This is the only commonly reached second-roll position in which Cooke's play, shown on the right (diagram 3Y) is correct. (In fact, it is very correct—it would be correct even if White's 11pt blot were safely back on her midpoint.)
In conclusion, it is wrong to make the 4pt (unless pointing there) with double 4's on the second roll. While some of today's backgammon players may not know that, most understand making the 9pt, as a general rule, is superior to breaking the 8pt to make the 4pt.
It is for this reason that so many knowledgable players would be reluctant to break the 8pt in the feature position (the first diagram) of this article. Failure to do so is understandable: It requires a deep insight into the nuances of a position to be able to spot an exception.
To help deepen this insight, let us focus on the key pair of 4's:
|
Red to Play Two 4's
|
3a: It is wrong to
make the 4pt.
|
|
3b: It is right to
make the 4pt.
|
|
Diagram 3a (above left) shows the opening position after Red has played two of his correct 4's (making the 20pt).
Diagram 3b (above right) shows the feature position (first diagram of this article) after Red has played two of his correct 4's (11/7* and 13/9).
We will now spotlight Red's last two 4's. Why is it correct to make the 4pt in 3b, even though it is definitely wrong in 3a? Here are the reasons:
- If Red makes the 9pt, he can keep a useful spare on the midpoint in 3a. He cannot do so in 3b.
- White is on the bar in 3b (but not in 3a). Making the 4pt in 3b gives White 3 additional fanning numbers (64 44).
- In 3a, Red has a safe play; making the 4pt leaves 6 unnecessary shots. In 3b, however, Red has a blot on his 7pt and therefore has no safe play. Making the 4pt actually reduces White's return shots! Although she can now hit with 53, she can no longer hit with 64 44 33.
- If Red makes the 4pt and is missed in 3a, his stiff distribution will make it difficult to form a prime. By contrast, if Red makes the 4pt and is missed in 3b, his additional two checkers (on the 7pt and 9pt) will make it relatively easy to form a prime or attack.
3C: After correctly making 4pt
|
|
|
|
Making the 9pt
|
|
So, in the game position (the very first diagram), is making the 9pt definitively wrong? For Money, yes. However, making the 9pt is correct in one particular match situation.
Let us examine the diagram pair 3G and 3H, repeated below. These are relatively passive plays that focus on the outfield.
Both 3G and 3H have played 24/20, 11/7*, and 13/9 for three of their 4's. The difference is the final 4. In 3G, Red covers the 9pt. In 3H, Red steps out to the 16pt.
Which of these two plays is better?
3G: Best at gammon save
|
|
3H: Lacks structure
|
|
If you said 3G is superior for structural reasons, you are correct. For example, in the event that White enters and hits on her 5pt or 4pt, and Red enters with a 1 or a 6, he can make a four-point prime.
Bringing the 4 down from the 13pt is better for defensive as well as offensive reasons. By only coming up to the 20pt (and not bothering to continue out to the 16pt), Red maintains a good chance to make an advanced anchor.
For Money, 3G is not nearly as strong as 3C (which boldly makes the 4pt instead of coming up to the 20pt and covering the 9pt). However, 3G is best at gammon save: for example, if Red leads 8-7 Crawford in a 9-point match. He still pays off to losing a gammon, but no longer benefits by winning a gammon.
Diagram 3G loses fewer gammons than any other play.
|
|
|
Making the 2pt
|
|
Finally, when the alternatives are less than ideal, making the 2pt can be worthy of consideration.
In diagrams 3C and 3D (discussed earlier), Red made the 4pt. Diagrams 3E and 3F are identical (to 3C and 3D), except that Red has made the 2pt.
Making the 4pt leaves a blot on the 8pt and an awkward tower of five checkers on the 6pt. By contrast, making the 2pt unstacks, achieving a balance of three checkers on the 8pt and three checkers on the 6pt. Purely from the standpoint of distribution, 3E or 3F (repeated below) makes the most sense.
However, making the 2pt violates an important backgammon principle. Paul Magriel's Six Apart Rule is discussed in his book, Backgammon (p. 346-347). As paraphrased by Magriel himself:
Six Apart Rule
"Don't make points 6 pips apart
on your own side of the board."
|
Basically, the 8pt and 2pt can never be part of the same 6-point prime. They do not work together efficiently.
This Six Apart Rule, and the fact that the 4pt is much more valuable than the 2pt, are more important to honor than the distributional balance achieved by having three checkers on both the 8pt and 6pt.
3E: 8pt and 2pt are six apart
|
|
3F: Best at gammon save
|
|
However, the priorities change at a score of gammon save. Diagram 3F (right) is tied for the best play at this score. This move has one of the highest win rates—only 0.9% lower than 3C, while it loses 1.4% fewer gammons than 3C. (It also wins 3% fewer gammons, but that is irrelevant at this score).
At gammon save, it is often prudent to take out a little disaster insurance. If Red loses a hitting battle, it will be especially valuable to have an advanced anchor.
In this vein, while the 9pt blot (not present in 3F) is a risk-free builder on this roll, and the 8pt blot in 3C (also not present in 3F) is relatively risk-free, either or both might be picked up in an exchange of hits on a future roll.
Finally, it is ironic that Red's main reason for making the 2pt here is defensive, not offensive. Making the 2pt causes White to fan with 26 (which would otherwise hit) and with 22 (which would otherwise point on her 4pt).
|
|
|
Summary of Part 3
|
|
The original game position is repeated below. On his third roll, Red was faced with a roll of double 4's:
Red to play 44
|
There are a huge number of legal possibilities. Twelve of the best candidate plays are shown in diagrams 3A through 3L.
The best plays involve hitting on the 7pt and making a new point, improving Red's structure.
At most scores, the swashbuckling play of making the 4pt and bringing down a third outfield blot (diagram 3C, repeated below) is the best choice.
3C: Best play for money,
DMP, or gammon go
|
At the score of gammon save only, it is better to make the 9pt or the 2pt (instead of the 4pt), and come up to the 20pt with the last 4 (instead of starting the 9pt). This leaves one outfield blot instead of three, sacrificing the strongest offense for a better chance to make an advanced anchor.
These two positions, tied for best at gammon save, are repeated below:
3G: Tied at gammon save
|
|
3F: Tied at gammon save
|
|
|
|
Nack Ballard is a top international backgammon player. His achievements include winning the Open Section of the World Amateur Championships in Las Vegas in 1982 and reaching the semifinals in the prestigious PartyGammon Million tournament in the Bahamas in 2007. He is currently ranked #1 by his peers on the 2005 Giants of Backgammon list.
Paul Weaver is also a top international player. He was rated #3 on the 2002 edition of Kent Goulding's Rating List (updated by Laila Leonhardt) and is ranked #16 player in the world on the 2005 Giants of Backgammon list.

Return to
: Backgammon Galore
|